How to assemble a garden bed
Horizontal and vertical structures differ technologically.
Each of them can be very simple or equipped with additional devices that make care easier. But the main principle is the same: holes are cut in the pipe, where bushes are planted in the laid soil. The equipment is also different, but the set of tools you will need is the same:
- screwdriver with drill (⌀ 8-10 mm), crown (⌀ 10 cm);
- jigsaw or hacksaw;
- roulette;
- pencil or marker.
If you have a jigsaw, you can do without a crown.
Horizontal option
How to properly make the simplest bed is shown in the video:
The master from the video used carved wood plugs instead of plastic plugs. There is another option than to replace purchased material - cover the ends with thick plastic film, secured with tape or clamps. But only black, so that the earth does not start to bloom from the sun.
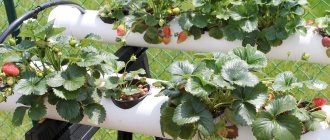
For a more complex horizontal structure, you will need two pipes: with a diameter of 10-15 cm - external, 5 cm - internal. Step-by-step assembly instructions will help even an inexperienced gardener cope with the task:
- The length of the pipes is adjusted so that the outer one is 10-15 cm shorter.
- In the planting area (larger diameter) holes are made for the bushes, as shown in the video above. In a narrow (watering) hole, holes are drilled from different sides along the entire length, leaving only 15 cm intact at each end.
- In plugs, plastic or wooden, a hole is made in the center equal to the diameter of the internal channel. Polyethylene is not used as a plug in this case.
- The bottom of the pipe (laid with the landing grooves up, as for future operation) is evenly covered with 2-3 cm of expanded clay.
- The irrigation channel is tied with agrofibre, secured with rope. This protection will prevent the earth from clogging the holes.
- Install a narrow pipe, leading out from both ends through plugs. Water for irrigation is supplied through one end, and a hose with a valve is inserted into the other to remove excess moisture.
- Pour soil and plant strawberries.
It is more profitable to install structures for planting horizontally in areas with a relatively flat landscape. The beds are hung on free sunny walls and fences. Or they make stands.
In multi-tiered systems, the beds are placed one above the other or on a corner support, as in the photo
The main condition is access to the sun to the bushes in each tier.
Vertical option
The principle is the same as that of the second horizontal version, but the watering channel is led out only from one end - the top. When preparing a wide-diameter planting pipe, light levels during the day are taken into account. If the sun comes from different directions, then the holes are made around the circumference in a checkerboard pattern.
The assembly guide boils down to the following steps:
- The lower end is closed tightly.
- A narrow pipe is installed in the center, and expanded clay is poured into a wide container up to the level of the first drilled hole. It simultaneously fixes the position of the irrigation channel and the stability of the entire structure.
- If the dimensions are correctly observed, the drainage layer is 15 cm from the plug to the beginning of the perforation, and on top the same 15 cm protrude above the planting container.
- Fill the soil, gradually shedding it so that there are no voids left.
- Plants are planted.
To moisten the soil, water is supplied to the protruding end of the irrigation pipe.
The vertical arrangement of PVC beds is more advantageous in areas with a sharp difference in height. Decorative walls are made from the strawberry “picket fence”, covering the fence, outbuildings, marking areas of the site, and decorating a children’s corner with a sandbox and swing.
Vertical mini beds made from plastic bottles
One of the most inexpensive options, as waste is used.
Place the bottle with a screwed cap horizontally and cut off the top part, using a knife to make several holes on the opposite side. It turned out to be a wonderful planting container. Having made the required number of containers in this way, assemble them with a rope into one system, as described in the previous version.
By planting low-growing, bright flowers in such a vertical flower bed, you can create entire compositions, flowering walls, and also divide your yard into zones with colorful hedges.
Strawberry care
A crop cultivated in pipes requires slightly different care than one cultivated in beds. It does not need weeding or loosening, but it does need abundant irrigation and frequent fertilizing.
Learn about pyramid strawberries: the pros and cons of growing them.
Fertilizers
Strawberries in tubes grow in a limited space, so they need more fertilizing than crops grown in open ground. When applying fertilizers you should know:
- liquid fertilizers are poured into the irrigation system, so the plants receive both water and fertilizers at the same time;
- they are carried out at least once every 10 days;
- as fertilizers, you can use ready-made complex fertilizers or organic solutions in the form of chicken droppings or mullein;
- carry out several feedings before flowering and during the formation of ovaries;
- to increase green mass before flowering, in addition to chicken manure (200 g per 10 l) or mullein (300 g per 10 l + 20 g ammonium sulfate), you can use a yeast solution (1 kg per 10 l);
- To increase the number of ovaries, fertilizers made from 5 g of boric acid, 30 drops of iodine and 1 tbsp. ash diluted in a bucket of water, as well as a yeast solution or mullein solution.
Watering
The substrate in the pipes dries out quickly in the sun, so watering must be frequent to maintain constant moisture. There are several watering methods:
- Using pumps connected to a storage tank and circulating the liquid. They can be turned on independently or using a set timer.
- A reservoir installed above the planting will provide gravity watering, and if you install a tap on the pipe near the container, the flow of water can be regulated.
- Without a provided irrigation system (without an irrigation tube), it is done manually, but this is inconvenient and impractical.
Winter hardiness
Despite the many advantages, the method of growing strawberries in pipes has one significant drawback - freezing of the soil substrate in such structures. This is a threat to strawberry bushes freezing.
Important! Materials such as hay or straw are not suitable for insulation, as mice can live in them.
To prevent this, there are several options:
- when planning to create a structure, you need to make it collapsible or portable, so that when it gets cold, you can move it to a place protected from the cold (for example, a barn or greenhouse);
- if it is impossible to move the structure, a structure resembling a mini-greenhouse can be made above it;
- Another option for wintering outside is insulation: pipes with wintering crops can be covered with spruce branches and secured well with wire or rope.
Strawberry growing conditions
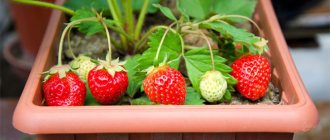
Every gardener needs to know how to prepare a garden bed for the new season. You should start by choosing a landing site. Strawberries, or as they are also called, garden strawberries, do not like shade, so they are planted in sunny areas. Since the bushes must grow at a certain distance from one another, the planting area must be such as to realize plans for a large harvest. The soil should be sandy or sandy-loamy, which, as a rule, is not waterlogged. An inexperienced gardener begins growing strawberries with the so-called classic method. It's very simple to implement.
An example of warm classic strawberry beds
Advantages of the classic version of the strawberry bed:
- This is the easiest way to prepare a plot of land for planting strawberries.
- It provides easy care and convenience when feeding berry plants.
- Such beds do not require complex equipment.
It is necessary to plant the berry in the summer or at the very beginning of autumn, and always in moist soil on which legumes or lettuce used to grow, but not cucumbers, tomatoes, or eggplants. Otherwise, the seedlings will be affected by bacteria and insects. If the strawberry bed is planted very tightly, there will also be a high probability of the spread of various diseases, and in the process of weeding and harvesting there will be a possibility of damage to the plants.
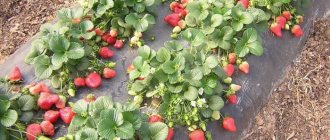
Construction of strawberry beds using agrofibre
Often strawberry beds are fenced with boards or beds are made of stone and brick. They may include two rows of plantings, which are placed from east to west so that the plants do not shade each other. The width of the fenced strips should not exceed 80 cm, otherwise there will be inconvenience during watering, weeding and harvesting. And you will have to weed quite often during the season, at least seven times. The period of growth of a strawberry bush in one place is no more than four seasons. After which you need to make a bed in a new place and replant the berry plant.
Option for constructing vertical strawberry beds
Why plant strawberries in pipes?
First of all, summer residents with small plots of land and representatives of the strawberry business became interested in the unusual way to grow berries.
For the first ones, planting strawberries in scraps of PVC pipes is a real way out of difficult circumstances. After all, the landing area increases significantly. The latter were attracted by the opportunity to make a profit from the production of garden strawberries on an industrial scale.
Once you've invested in creating a well-thought-out system, you just need to maintain its performance. And get a harvest that is incommensurate with the planting area and physical costs.
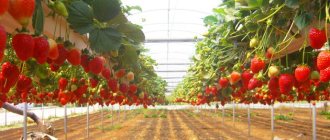
A heated greenhouse, an automated irrigation system combined with fertilizing with liquid fertilizers, proper lighting - and year-round harvests are guaranteed. Either with or without soil - in hydroponics.
Benefits for private owners
Growing strawberries in pipes is for some a forced decision (if there is very little land), but for others it is an interesting experience, an experiment. Skeptics will say that the method is expensive. But the material investments are not so large - the cost of sewer pipes is low, and everything else is available in any household. And you will have to invest only once, but a plastic bed will last for many years.
Of course, the main advantage is the expansion of the site’s capabilities. A vegetable garden in PVC pipes is also attractive because:
- Maintenance is reduced: weeding and loosening are no longer necessary.
- The simplest beds with a large number of planting places can be made in a day or two. If desired, they can be increased over time and automatic watering can be arranged.
- They are placed where nothing can be planted: along fences, on them, on the walls of outbuildings or nearby.
Install horizontally, vertically, hang. The mobility of beds in pipes is limited only by the gardener’s imagination.
- The berries do not lie on the ground - they do not spoil or rot in wet weather. This is especially true for areas flooded with groundwater.
- Pests and pathogens living in the soil very rarely reach strawberries planted above the ground.
- The method is suitable for open ground in summer and heated greenhouses in winter. Small pipes with strawberries give excellent harvests on loggias and balconies.
Landless city dwellers grow berries all year round on their windowsills. The same skeptic will say that it’s easier to buy: strawberries have long been no longer in short supply in supermarkets. But if you put the soil in the pipe yourself, sowed the desired variety, and chose the appropriate fertilizer, then you are sure: the berries are clean and healthy. No one would poison a plant with chemicals in order to achieve record yields.
And aesthetically, pipes with flowering bushes strewn with berries will decorate the garden, the balcony, and the room.
Cons and risks
The disadvantages of organizing strawberry plantings in PVC pipes are not limited to monetary costs. Even if the farm has materials after repairs, and the missing components can be replaced with improvised means, you need to come up with fasteners: racks, brackets, supports. But these are one-time difficulties.
The main disadvantages are in the care features:
- The soil in a closed system dries quickly - you need to water more often. On hot days, twice - in the morning and in the evening. Drip irrigation makes maintenance much easier.
- A substrate isolated from the environment quickly becomes depleted and depleted. Fertilizing - only liquid - is required more often.
- The colder the climate, the more difficult it is to organize winter quarters. Winter storage of pipes with plantings is the most difficult task.
But, according to feedback from practitioners, these issues can also be resolved. This means that the method is justified and pays for itself.
Hydroponics - great strawberry results!
Hydroponics is a common (in the West) and well-known method of producing crops indoors. So, in Israel, approximately 80% of farms use this method. This method means planting a crop in a layer of organic (for example, peat) substrate, folded on a mesh and lowered into a tray with a solution of substances necessary for the plant. That is, in hydroponics, the plant is nourished by a mineral solution, the components of which are mixed in accordance with the type of plant.
Strawberries produce good fruits in hydroponics in our country, but there are few producers who use this method. The advantages of hydroponics include:
- The ability for the crop to always receive the required amount of nutritional components. And they are absorbed better than in the soil. Hence, more active growth and higher yield.
- No need for constant watering.
- Soil pests and diseases do not live here.
- There is no need to purchase soil for replanting crops and spend money on it.
- Replanting a plant is not difficult, and the root system is not damaged.
- Ripe strawberries ripen environmentally friendly, since no pesticides are used during the growth processes.
The harvest in hydroponic culture is considered a record - 450 tons from 1 hectare!
This method is also popular among fruit and vegetable growers who grow berries hydroponically as a hobby. After all, this way you can grow strawberries not only in large greenhouses, but also on windowsills at home. And fresh berries, when selecting the right varieties, grow throughout the year. Hydroponic systems of various types and operating principles can be purchased in our online store in the HYDROPONIC INSTALLATIONS section. As a base at home, you can use simple plastic containers placed on shelves.
The disadvantage of large planting areas is expensive structures and significant energy costs required for constant circulation of oxygen in the solution and additional lighting. If an entrepreneur decides to obtain aromatic berries in large volumes, then there will be a need to install greenhouses, so the project becomes very expensive.
Nutrient solutions
Under hydroponic culture conditions, all the necessary components will be used by the berry crop in the shortest possible time, which is due to their rapid supply to the root system in the form of a balanced diet. When creating such a solution, both mobile (macroelements) and immobile (microelements) components should be used. Since the berry will be used as food, the components for preparing nutrient solutions must be at their best. You can decide on the composition in the FERTILIZERS section
We advise you to pay attention to the lines of organic fertilizers, for example, BioBizz or Bioponic GHE
| Name | formula | role | Amount in mg/l |
| Nitrogen | N | Necessary for the development of the aerial part. The need decreases as the plant grows. | 150 |
| Phosphorus | P | Important for cellular processes of energy consumption, especially important during the stages of root growth, flowering and fruit ripening | 70 |
| Potassium | K | Used by the culture in the synthesis of carbohydrates and increases immunity and resistance to harmful environmental factors | 350 |
| Magnesium | Mg | Important for the formation of chlorophyll and for the absorption of other nutrients | 50 |
| Zinc | Zn | Affects chlorophyll synthesis and photosynthesis, as well as some metabolic processes | 0,054 |
| Calcium | Ca | Needed to form the ground part | 260 |
| Bor | B | Promotes a balanced composition of vitamins, takes part in metabolic processes and the absorption of a number of nutrients | 0,18 |
| Iron | Fe | Participates in a number of processes at different stages of growth and development | 0,45 |
| Molybdenum | Mo | Important for the biosynthesis of chlorophyll, the inclusion of nitrogen, phosphorus and other basic nutrients in metabolic processes | 0,015 |
| Sulfur | S | Has a beneficial effect on the quality of the crop |
Making the necessary solution yourself is not difficult. The main and most important condition will be strict adherence to the required proportions. The water for the nutrient solution system must be perfectly clean and free of any impurities, so tap water will not work. The temperature of the solution is 18–24 °C. In this range, the culture feels best. You can read about preparing water for the hydroponic germination cycle here: and about nutrient solutions and requirements for them is written here:
There is also interest in hanging equipment that allows you to grow strawberries in special containers made from polypropylene.
Essence and description of the method
This non-standard solution consists in erecting structures using various pipes (mostly PVC), which are placed both horizontally and vertically. All kinds of structures are built from this material, as far as the creator’s imagination allows. The pipes are filled with soil mixture or the cultivation is carried out hydroponically (aqueous nutrient compositions). Briefly, the essence of the method is as follows:
- Take pipes with a diameter of at least 15 cm from any suitable material. It can be not only plastic, but also aluminum or chrome steel.
- They are either cut in half (only in case of horizontal placement) or holes are made in them (about 8 cm in diameter) at a distance of 20–23 cm for planting.
- The placement of the holes depends on the planting method (horizontal or vertical). In the first case, the holes are made on one side, and in the second, they can be placed in a spiral, in a checkerboard pattern, or in some other way.
- Watering is most often carried out using a thin tube in which small holes are drilled to provide water flow.
- A thin watering tube is placed in the main pipe, which is filled with soil, and strawberry bushes are planted in it.
The hydroponics method is slightly different from cultivation in a soil substrate:
- is a pipe or other container filled not with a soil mixture, but with a nutrient solution;
- cups with plants are placed in this liquid;
- for greater stability, the cups are filled with expanded clay;
- To circulate water through the system, an aquarium pump is used, which delivers liquid to all bushes, washing their root system, after which it returns to the main container.
One vertically located two-meter pipe replaces a planting area measuring 4x6 m.
Did you know? Those who remember school botany well know that strawberries
-
this is not a real, but a false berry (multi-nut).
is
actually an overgrown receptacle with small brown seeds on the surface.
Pots on a metal frame
There are many such designs, but the principle of each is the same - ceramic or plastic pots are mounted on specially made metal cells. Of course, there are both advantages and disadvantages of such a fastening system. There are much fewer “cons”, so let’s start with them.
The first significant disadvantage is the cost. Iron and all the fasteners will be relatively expensive, so if you expect to grow strawberries exclusively for yourself, it will not be profitable. If this process is a business and it is necessary to optimize the space in the greenhouse as much as possible and increase ease of care, then you can build a metal frame. Over several years of use, it will more than pay for itself. Another small drawback is the complexity of manufacturing the frame. The process is long and requires a lot of effort. First you need to make mortgages - elements to which the holders for pots will be attached, then one by one weld or bend the holders themselves, depending on the type of fastening.
The advantage of installing pots on a metal frame is the high organization of the bed - you can place the bushes in a checkerboard pattern and make the most of the free space. Height is not a limitation - structures up to 3-4 meters and higher can be made if there is not enough greenhouse space. In this case, scaffolds and ladders are used for harvesting and care. It is necessary to water only with conventional sprayers, since drip irrigation cannot be used for this method of organizing bushes.
There are portable metal frames that can be carried even without disassembling them. To install them, a tripod with 3 supports is used. Ideal for those who carry pots outside in the summer or frequently move plants around the greenhouse.
Technology for growing strawberries in horizontal PVC pipes using the hydroponic method
Hydroponics allows you to grow berries in a landless way
Sewerage pipes with a diameter of 100–150 mm are best suited for these purposes; they have standard, fully sealed plugs, which is very important for the chosen method. To carry out the work you will need a disc grinder, a drill, pipe sections Ø 20–25 mm, plastic squares, a drainage container and a water supply pump
Materials for making a hydroponic installation
Step 1. Decide on the location of the pipes and their number. The technical data of the pump and the list of additional water fittings will depend on these parameters.
Step 2. Draw a straight line on the surface of the pipe; on this axis you need to drill holes for the pots. The diameter of the peas should be slightly larger than the diameter of the holes; they should be fixed in them, but not fall through. You can place pots at the bottom of the pipe, but this option will create significant obstacles to water circulation. The distance between holes is within 15 cm.
Drilling holes in a pipe for pots
Step 3. Prepare end caps for pipes with bends. A rather complex process that requires skill and practical skills. The outlets of the water supply/drain pipes must be glued to the plugs. To do this, drill holes with a diameter 1–2 mm smaller than the outer diameter of the pipes. Carefully clean the cut area, remove all burrs and irregularities. Heat the pipe with a hair dryer or in boiling water; the end should be plastic, but not very soft. Next, forcefully insert the pipe into the hole and hold in this position until it cools completely. For complete sealing, the joint must be additionally glued with thermoactive or thermoplastic glue, preferably two-component.
In this hydroponics design, water is supplied to each pipe separately using thin tubes
Step 4. You need to prepare two such plugs for each pipe. Install them on pipes suspended above each other in the form of a ladder. Using a piece of Ø 20–25 mm and angles, connect all the pipes in series, the outlet should be in a special container, the inlet should be adapted to connect the pump. How to do this depends on the specific brand of unit.
Complete system
Pipes can be arranged in one row
Step 5. Fill the system with ordinary water and check all connections for leaks. If leaks are found, repair problem areas.
Strawberries in tubes
Installation for growing strawberries
Water should not circulate in the system continuously; it is enough to turn on the pump two to three times a day for half an hour. In order to ensure automatic operation of the system, it is recommended to purchase a time timer; it costs a penny, but works very reliably.
What is a vertical bed?
Initially, vertical beds were conceived by landscape designers as a way of landscaping and decorating limited spaces - terraces, loggias and balconies. This idea quickly caught the taste of many gardeners and gardeners. After all, with this growing method you can significantly save precious space on your site.
Growing greens
In essence, a vertical bed is containers placed or suspended on a vertical frame with soil poured into them. Such a structure can be mounted on poles, fences, walls of houses, or made in the form of free-standing structures.
But this growing option is only suitable for crops whose roots are not too branched and do not go deep into the ground. After all, the more developed their root system is, the more soil you will need to pour into such beds.
Green beds made from plastic boxes
This idea of plastic bottle boxes is perfect for small plants, flowers, salads, herbs. With the help of such a vertical bed, you will not only fill the table with tasty and vitamin-rich food, but you will also be able to create cozy relaxation areas.
Step-by-step instruction
Scheme of a vertical bed made of two PVC pipes of different diameters.
As a rule, PVC pipes that were intended to be used for home repairs are chosen for these purposes. You can also buy special containers like this. It is allowed to use an old barrel as a vertical frame. To accomplish this you need:
- two pipes;
- a piece of burlap fabric;
- pipe crust;
- adhesive tape or tape;
- binding material - rope;
- drill;
- drainage;
- priming;
- seedlings.
We will need two pipes, a drill or screwdriver, a piece of fabric, a hacksaw, drills and crowns.
One large pipe is a sewer or drainage pipe, the other should be smaller in diameter and longer in length. The fabric is suitable not only from burlap - you can take construction mesh or coarse non-woven fabric. Cork is needed for a smaller capacity.
A drill requires an attachment to make holes, both small and large. Drainage, which consists of gravel or expanded clay, can be filled with ASG. Fertilizers must be introduced into the soil. It is better to choose seedlings of hanging varieties, but you can also plant ordinary remontants.
Creation algorithm
- A container with a smaller diameter is selected twenty centimeters longer than the main pipe.
- Next, use a drill to make medium-sized holes in it. At the same time, it is worth stepping back thirty centimeters from the surface of the earth so that during watering the liquid does not accumulate below, which could provoke waterlogging and rotting of the roots.
- Burlap, construction mesh or non-woven fabric is used to prevent seedlings or soil from causing the holes to become clogged. If this happens, moisture will not flow to the roots.
- The pipe is wrapped with mesh or fabric along its entire length, secured with tape, electrical tape or adhesive tape. The crust should be attached to the lower part.
- Next, large diameter holes are drilled in a wide container for seedlings. At the same time, thirty centimeters retreat from above and below. The size of the holes for seedlings is ten centimeters.
- It is recommended to use the chess method of seating. The distance between the bushes is twenty-five centimeters.
Installation
- The lower edge of the large pipe is covered with a lid, and the structure is secured so as to create conditions for further movement to another location, if necessary.
- A container for watering is inserted into the cavity of the wide structure and strengthened.
- Then the drainage is filled in - expanded clay, gravel, ASG.
- The drainage layer should not cover the lower drain holes.
As the pipe fills, we plant strawberry seedlings.
Additional wind protection
If the pipe is installed in a container with sand, you will get a mobile structure that will be easy to move to a warm place for the winter.
Heavy drainage will serve as additional reinforcement. Drainage backfill will also prevent waterlogging. Next, the soil is filled in. It is noteworthy that periodically the soil layer must be moistened abundantly, otherwise air pockets may form.
Seedlings are planted in two ways: gradually - as the soil is filled, upon completion of construction work - when the frame has already been assembled.
From cinder blocks
The height and dimensions of your bed in this case depend only on the number of blocks and free space on the site. All you have to do is show your architectural skills to build a stable structure oriented to the south.
This way your plants will receive maximum light and warmth . Try to immediately choose the most illuminated, heated and protected from the wind place for the garden bed, because moving it to another place will be quite troublesome.
How to make a strawberry bed
Let's consider several options for making vertical and horizontal beds from materials that are freely available to most owners of dachas or private houses.
From a barrel or tires
The photo shows the result of self-created strawberry beds from unnecessary barrels or old car tires. The idea is simple to manufacture and has no financial costs.
When working with a barrel you must:
- Wash the inside of the container well and place drainage on the bottom.
- Prepare irrigation pipes with a diameter of 3-4 cm. Small holes must be drilled in them and the lower part must be plugged. The tubes are placed in the center of the barrel and slightly exceed its height.
Cut holes for planting strawberries in the bottom row and fill with soil. Cut holes again one tier higher and fill in some of the soil. Repeat this way until the top. Plant the seedlings in the holes and also on top.
A vertical bed of tires is made according to a similar principle:
- Mark locations and cut holes.
- Place a mesh at the bottom of the first tire and fill the entire space with soil.
- Install the next tire and repeat the procedure.
Made from PVC pipe
Plastic pipes are a very multifunctional material for making beds. They can be placed in a vertical and horizontal plane. The width of this strawberry bed will correspond to the diameter of the pipe, plus a little extra space around the edges.
The vertical structure is created from two PVC pipes. The first is thinner - it is inserted into a wide one and is used for watering plants along the entire height. Manufacturing instructions:
- The upper 2/3 of the narrow pipe is covered with small holes. Then it is wrapped in burlap and the bottom is covered with tape.
- The main pipe must also be plugged from below, but only using a special plastic cover. Coarse gravel (10 cm) is poured onto the bottom - it will act as ballast.
- The pipes are inserted into each other, the space is filled with soil.
Next you can plant strawberries.
The horizontal design has a similar structure. To build it, take a pipe with a diameter of 200 mm and cut holes on one side for planting strawberries. A narrow pipe with holes is installed at the bottom, one end of it is brought up at an angle of 90 degrees to inject water. Expanded clay is poured onto the bottom, then ordinary soil with fertilizers. After the soil is moistened, planting can be carried out. You can learn more about the process from the video:
Multi-tiered beds for strawberries
Multi-tiered rows with planted strawberry bushes look quite interesting in a garden plot. The design provides space saving and convenient access for care activities.
Assembly is made from wooden boards or other available material. The first tier is the widest, each subsequent one is reduced so that the width of the free land space is 40 cm. The height of one level is at least 30 cm - this way the plant roots will not intertwine.
Pyramids made of boards or tires
Pyramids can be made from boards or tires.
To build the first version of the pyramid, follow the proven technique:
- Make a box of a convenient size, fill it with substrate, and compact it.
- Place another smaller box inside, remembering to fill it with earth.
- Install 3–5 tiers in a similar manner.
- Leave 15–20 cm of unoccupied space around the perimeter of each level. Plant seedlings in these free zones.
To create a pyramid bed from tires, you need 5 used tires of different diameters. The rubber elements of the wheel are arranged in the shape of a pyramid. The structure can be decorated by installing a decorative flowerpot on top. The substrate is poured into each tire one by one during the assembly process.
Step-by-step instruction
It is necessary to understand in more detail the technology of constructing structures for growing garden strawberries.
Creation algorithm
The construction of vertical structures from pipes consists of the following sequential actions:
- Having decided on the height, which is usually about 2 m, the sewer or drain pipe is cut to the required length.
- The same is done with the irrigation pipe, but its length should be 10–15 cm longer than the length of the main pipe.
- Holes are drilled in a wide pipe (up to 10 cm in diameter) at a distance of 20–25 cm. The holes can be arranged in 2 rows, in a checkerboard pattern or in a spiral. It depends on the desire and imagination of the creator.
- Small holes (Ø 2–3 mm) are drilled in the irrigation tube at intervals of 7–10 cm, through which irrigation will occur. No holes are made at 20 cm in the lower part to prevent waterlogging of the lower plantings.
- To prevent the slots in the thin tube from becoming clogged in the future, it must be wrapped in non-woven material and secured well (for example, with wire). The lower part (without holes) is wrapped with electrical tape or tape for greater reliability.
- For the bottom drain, a plug is made with a hole for the watering pipe.
Video: construction of vertical structures
Creating a horizontal structure is somewhat different from the previous one:
- The main pipe is closed with plugs on both sides. The plugs can be replaced with durable plastic film securely secured with electrical tape or twine.
- Planting slots are made in one or two rows.
- Watering holes are drilled along the entire length of the watering pipe.
- If a pump is not provided for irrigation, it can be made gravity-flow. To do this, a container of water must be placed above the structure.
- You need to think about how the pipes will be connected and secured.
Installation
An important point in creating planting structures is the correct selection of soil mixture and proper filling. To backfill, you will need drainage, which can be expanded clay or pebbles, as well as a fertile nutrient mixture. You can buy ready-made soil, but it’s cheaper to prepare it yourself from garden soil, peat, humus (3:1:1) and add a little sand and ash. To destroy fungal spores and larvae of harmful insects, the soil can be treated with boiling water or applied according to the instructions “Trichodermin”, “Fitosporin” or other drugs of appropriate action.
Important! To improve air exchange and soil permeability, small sawdust or foam balls are added to the mixture.
Further instructions consist of successive steps:
- An irrigation pipe is installed in the center of the main pipe.
- The bottom of the pipe is filled with drainage that reaches the lower holes of the irrigation pipe. Drainage will not only prevent water stagnation, but will also give additional stability to the structure.
- Then the pipe is gradually filled with soil mixture. The soil is gradually compacted and periodically spilled with water to prevent its further shrinkage.
- Planting of seedlings can be done both as the soil is filled, and after it is completely filled.
- After all of the above steps are completed, the watering system is connected (a watering hose is connected to the irrigation pipe).
Installing a horizontal building is a little more complicated than a vertical one:
- Drainage is poured into each hole and evenly distributed in a layer of about 2 cm.
- An irrigation tube is laid on top of the drainage layer.
- Soil is poured into the slot. As you fall asleep, it should be moistened so that it compacts better.
- The edges of the pipe are closed with plugs with slots for irrigation.
- After the final filling with earth, the pipes are connected with angles or other fasteners and installed in a permanent place. You can create a stable, portable structure from wood or metal, and attach pipes to it.
- Irrigation is connected.
- Strawberry seedlings are being planted.
Additional wind protection
To enhance the strength of the structure from the effects of wind, additional protection is necessary:
- it can be done using a cable or strong rope;
- vertical structures can be installed in buckets with pebbles or gravel, which will not only give stability, but also allow movement;
- horizontal pipes can be connected in such a way as to create a structure that is stable in itself;
- horizontal structures can be hung on a fence or other suitable object.
Construction manufacturing process
Creating a structure requires a sufficient amount of free time and some materials:
- pipes with a diameter of 15 and 5 centimeters or trimmings from them;
- end caps corresponding to pipe sizes;
- drill for making holes in PVC material;
- geotextiles;
- expanded clay for drainage;
- soil mixture;
- roulette;
- hose.
Tools for creating beds from PVC pipes
Before you start creating the structure, you should decide on the planting option and the installation location of the pipes. If you plan to grow a small amount of strawberries, then you can install the structure along the fence. But when growing a large number of berries, you will need pipe supports
It is important to know that the support must be strong and reliable, since the mass of a two-meter filled pipe is about 25 kilograms. They can be made gable and in the shape of a pyramid
At the first stage, the pipes are cut to the selected length. Those with a smaller diameter can be 15 centimeters shorter, as they will be used to create an irrigation system. Next you need to make holes. Holes with a diameter of about 8 centimeters are made in wide pipes and repeated every 15 centimeters. Thin ones should have three rows of holes with a diameter of 0.5 to 1 centimeter, the distance between which is 10 centimeters. After this, the smaller pipe is wrapped in geotextile and secured with twine. Subsequent actions depend on the chosen landing option: horizontal or vertical.
Types of vertical beds
They can be made from any waste or scrap materials. But to make such beds look impressive, try to match the color and texture of the containers with the overall design style of the site.
Pyramid bed
There are many ideas for vertical beds. To create them you can use:
- PVC pipes
- containers made of metal mesh
- cinder blocks
- plastic barrels with holes made in which plants will be planted
- flower pots
- boxes assembled from wooden boards or plywood; Vertical beds can be made from this material in the form of shelves or original pyramids; in such structures large ornamental plants are placed in the lower, widest part, and small ornamental plants are placed at the very top
- car tires of different sizes
- old pallets
- ready-made plastic or wooden boxes or boxes from old furniture
- canvas or synthetic bags (for example, flour or sugar bags)
- large plastic bags or bottles
You can simply buy special bags up to 2 m long with pre-prepared holes for vertical beds. They are intended mainly for planting strawberries, but they can also be used for other types of plants.
Vertical structures can be made either one-sided (when attached to vertical surfaces) or double-sided. In the latter case, plants that do not require a lot of light are planted on the shady side.
It is better not to use metal containers for filling soil. In hot weather, they will quickly heat up in the sun, burning the plants. At night, on the contrary, the metal will cool greatly.
Do-it-yourself chain-link fence (Photo & Video) Practical fencing + Reviews
DIY garden bed
Making a strawberry bed with your own hands is not a difficult task, even a beginner can do it. Here are some ideas for vertical beds made from scrap materials:
PVC pipes
You will need 2 types of pipes - 120 mm and 20 mm. A wide pipe acts as a frame, in which several holes of 10-12 cm in diameter should be made, where the strawberry bushes will be located. Do not forget to leave the required distance between the holes of 30-40 cm.
The second pipe will serve as an irrigation device. By drilling small holes, you will ensure high-quality and timely watering. The structure is filled with black soil, fertilizer is applied and strawberries are planted.
From car tires
Tires of different sizes and diameters are used. They are laid in several tiers according to size, filling each one with drainage and soil. Strawberries are planted along the edge at a certain distance.
From bags
Fill regular bags with soil and make cuts on the sides at a certain distance. Young bushes are planted in them. This structure should be suspended from stable walls.
Raised beds for strawberries
A good solution for an uneven area to prevent rotting of the root system. Drainage will create good conditions for saturating the soil with oxygen, which will have a beneficial effect on the harvest.
Pyramid
An interesting solution for lovers of original solutions. Multi-tiered structures will not only be able to accommodate many bushes, but also become an original decoration of the site.
We hope that our article was able to help you learn how to make a bed for strawberries on your site without the help of specialists.
Choosing a location
By taking a serious approach to choosing the location for installing an unusual structure, you will get a rich harvest of the berries in question.
Optimal size
The optimal height of the sides of the structure ranges from 15 to 50 cm. The optimal width of the bed is considered to be a distance from 90 to 120 cm.
You can choose the dimensions of the future flower bed yourself, since there are no clearly established dimensions.
As for the length, compact and neat models from 1.5 to 3 meters are more common.
Did you know? The leader in strawberry production in the world is the state of California (USA), where up to 1 billion tons of this berry are produced every year. The best quality red berries are grown in Great Britain.
Nature of the relief
It is preferable that the area where the bed will be placed be level, without deep holes, steep slopes, or uneven surfaces. This question is very important because if there are bevels, the water will be distributed unevenly: some plant roots will receive an excess of moisture, others will dry out faster.
Wind protection
When choosing a site, you need to take into account the fact that strawberries do not tolerate cold winds and drafts. In addition, the wind in winter can blow away the snow cover that protects the bushes from freezing
Accordingly, it is important to consider protection from strong air flow. If there is no natural protection, you can organize artificial plantings of sunflower or corn
Soil composition and structure
A mandatory component of the soil for multi-tiered beds are small pieces of polystyrene foam. They remain virtually unchanged for many years and prevent compaction and caking of the soil. You can use a special substrate marked “for berries” or a universal mixture.
What varieties are suitable
The vertical ridge needs to be exploited intensively, so it is worth choosing varieties that produce 2-3 harvests per season. Varieties of remontant strawberries have this ability.
Ostara
The variety is remontant; the harvest ripens twice per season. The berries are shiny, conical in shape, sweet and sour taste, strawberry aroma. It is convenient to care for low (25 cm) bushes; few whiskers are formed. With good care of berries, 1-1.2 kg are collected from one plant.
Homemade delicacy
Strawberries begin to vegetate at a temperature of 5-7 °C and bear fruit until frost. The bushes of the hybrid Home Delicacy are compact, round during flowering and ripening of berries, decorative due to long, erect peduncles. A remontant variety with complex resistance to major crop diseases. The berries are bright red, tasty, round, 3-5 cm in diameter.
Description of Vityaz variety strawberries and growing features
Read
Alba
Large-fruited (30-50 g), early, non-remontant variety. From one bush you get 300-700 g of berries with excellent commercial characteristics. The harvest ripens in the southern regions in May, in temperate latitudes a month later.
Queen Elizabeth
The Queen Elizabeth bush bears fruit for 1-2 years and produces runners from 3 to 5 pieces per season. This is a remontant large-fruited (30-100 g), early variety. If you do not remove the rosettes, berries will form on them in July. In protected soil conditions, the fruiting period lasts about 10 months, because Queen Elizabeth is a day-neutral culture.
Advantages and disadvantages of vertical beds
Of course they exist, and there are many of them! Otherwise, garden beds wouldn't be so popular
Notice how varied and interesting the photos of vertical beds are
In addition to the attractive design, the arrangement of multi-tiered beds will come in handy in the following cases:
- the limited area of plantings is convenient in caring for them, as summer residents save energy and time on trips throughout the garden with buckets, hoses and tools;
- the upper tiers are easier to care for for people with spinal problems or the elderly;
- the soil in raised beds warms up faster in the spring, cover it on top and you will get a mini-greenhouse for growing early greens;
- To create such beds, scrap materials are used, this saves money and solves the problem of garbage disposal;
- beds in boxes, boxes and other isolated containers will be unattainable for common garden pests that are difficult to get rid of - moles, mole crickets, beetleworm larvae, and thus especially valuable varieties and hybrids can be guaranteed to be preserved.
When planning the installation of vertical beds with your own hands, you need to take into account their inherent disadvantages:
- the soil in such beds quickly dries out and becomes depleted; it requires regular frequent watering and fertilizers;
- During the winter, such beds will freeze, so only annual crops are planted in them;
- When constructing beds in sealed containers, good drainage is necessary so that in heavy rain the soil in them does not get wet.
https://www.youtube.com/watch?v=RCE4Atxm_Tw
Vertical planting in boxes
Planting garden strawberries vertically in boxes mounted on special poles, similar to decorative flowerpots with flowers, is carried out according to the following scheme:
- The bottom of the first level is covered with sawdust, small branches and dry grass.
- A layer of earth fertilized with humus is poured on top.
- The soil is watered with settled water and the missing layer is added.
- The next step is to form depressions in which to plant the bushes. The distance between them should be up to 10 cm.
Each subsequent level is assembled in a similar way. It is not recommended to build more than 3-4 tiers.
Did you know? The first documented mentions of strawberries date back to the 230s BC. e., when the Italians began to cultivate this berry.