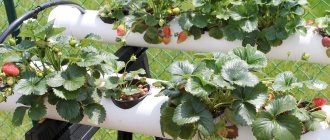
Growing strawberries in a tube is a great way to get a rich harvest of berries with rational use of the available space. PVC structures are very light and allow you to create additional beds that can be installed vertically or horizontally.
Plastic pipes will be an excellent assistant when growing strawberries both on an industrial scale in greenhouses and in small individual plots.
Strawberries in PVC pipes: growing features
Planting strawberries in pipes horizontally, vertically, or even in a greenhouse is different. For this, not only are slightly different technologies used, but also special varieties are selected to get the best possible result. For planting strawberries in pipes, only certain varieties are chosen.
They must meet the following characteristics:
- fruitfulness throughout the year;
- frost resistance;
- good adaptation to the conditions in which they grow;
- good taste and beautiful appearance.
Let's look at each type separately.
This is interesting: urea fertilizer - use in the garden
In PVC pipes horizontally
This method involves placing seedlings horizontally in specially prepared pipes. In this way you can save space and conveniently place the plant on the site. In addition, beds in horizontal pipes look very aesthetically pleasing.
The following varieties are suitable for growing strawberries in a horizontal pipe structure:
- Honey is an excellent variety with large and sweet fruits;
- Slonenok is a frost-resistant variety with large berries and outstanding taste;
- Queen Elizabeth - bears fruit from May to October, produces a large harvest, and is distinguished by high taste.
The main problem that may arise during cultivation is fungus. In closed systems, it is a frequent visitor, so it is better to protect yourself from the beginning and thoroughly disinfect the roots of the seedlings and the soil itself before planting.
The soil must be disinfected, even if you bought a ready-made substrate.
In the greenhouse
Growing strawberries using PVC pipes in a greenhouse has several advantages. Firstly, it will bear fruit almost all year, which, of course, is very profitable if you are going to do this as your own business. Secondly, pipes are excellent space savers, which allows you to place quite a lot of seedlings in a relatively small area of the greenhouse. The yield in the greenhouse is always high and stable.
In plastic pipes vertically
This method differs from the horizontal one, as the name implies, in the way of placing the bed and, accordingly, the seedlings in it.
In a vertical bed, the soil will dry out very quickly, so it is very important to monitor this and not lose sight of fluctuations in humidity. If you overdry, you can lose the harvest, which is unpleasant for any farmer.
But excess moisture in vertical beds can also be detrimental to plants, because in this case the roots rot very quickly.
The varieties most often used for this method are:
- Alba is early, climbing, tolerates even low temperatures;
- Ostara is an ampelous, compact variety with delicious berries;
- Queen - can withstand temperatures down to -15 degrees in winter, has juicy beautiful berries;
- A homemade delicacy – early, with dark red berries and a slight sourness in the aftertaste.
Just like in horizontal cultivation, in this case you should be wary of plant diseases and fungi. Take care of treating the soil and plant roots in advance.
What is a vertical bed?
Initially, vertical beds were conceived by landscape designers as a way of landscaping and decorating limited spaces - terraces, loggias and balconies. This idea quickly caught the taste of many gardeners and gardeners. After all, with this growing method you can significantly save precious space on your site.
Growing greens
In essence, a vertical bed is containers placed or suspended on a vertical frame with soil poured into them. Such a structure can be mounted on poles, fences, walls of houses, or made in the form of free-standing structures.
But this growing option is only suitable for crops whose roots are not too branched and do not go deep into the ground. After all, the more developed their root system is, the more soil you will need to pour into such beds.
How to grow strawberry seedlings in PVC
Planting using this method is only becoming more popular every season. The most important thing is to configure the entire system correctly. Why the system? Because the pipe structure, which we will talk about a little later, is not just a container with holes, but a system in which favorable conditions are created for growing plants.
Growing horizontally may seem like the most convenient way. The seedlings are placed at a distance of approximately 20 cm from each other. You can make holes in the pipe with a diameter of about 13 cm, or you can simply carefully cut off its upper part.
The edges of the pipe are closed with plugs, but at the bottom there will be a hole for excess water. We'll talk more about pipe preparation a little later. Next, a favorable growing environment is prepared, soils are selected, and an irrigation system is installed. Drip irrigation will be as convenient as possible for strawberries.
Strawberries in PVC pipes are planted vertically in a slightly different way. The holes must be placed in a checkerboard pattern in compliance with the same proportions as in the horizontal method. The distance between cells must be at least 20 cm.
A plug is placed at the bottom of the pipe, and then the drainage is filled in. In order for watering in this method to be uniform and water not to flow to the bottom of the structure, it is necessary to place an additional pipe of smaller diameter, in which holes are made, and the pipe itself is wrapped in geotextile. Such a pipe will be higher than the landing pipe. The holes in it will need to be located 30 cm from the ground to avoid stagnation of water.
Manufacturing the structure: step-by-step instructions
Methods for planting strawberries in pipes are conventionally divided into vertical and horizontal. They will differ in minor details, but the principle of construction remains the same.
Horizontal
Installation will consist of the following sequence of actions:
- Decide on the length and number of beds, and prepare the appropriate pipes to create the structure.
- If the strawberries grow vertically, then additionally take tubes of a smaller diameter to ensure watering of the column. They are not needed in a horizontal design.
- Make holes in large pipes in which you will later need to plant strawberries. It is recommended to make holes with a diameter of 7-8 cm in a vertical bed, and 10-12 cm in a horizontal bed. A circle of the required diameter should be drawn on cardboard and cut out with scissors. Using a paper circle-pattern on plastic, future holes are marked. The distance between their centers should be about 20 cm. In the horizontal version, the holes are drawn in a row, and in the vertical version, in a checkerboard pattern. Cut the holes with a jigsaw or drill with a special circular attachment.
- In horizontal beds on the opposite side of the large holes, small holes are made with a drill so that water does not stagnate. The distance between the drain holes is 30 cm.
- In thin tubes (for vertical posts), small holes measuring 0.3-0.5 cm in diameter are made with a drill, through which water will be delivered. They are drilled in a row with indentations of approximately 20 cm, leaving 1/3 of the pipe intact (the lower part). This must be done to prevent water from becoming swampy at the base of the post.
- The ends of the pipes are closed with plugs that are attached to self-tapping screws or liquid nails. In a vertical bed, only the base is closed (so that it can be moved freely), the top remains open.
Instead of PVC plugs, you can use fabric (for example, burlap), which is tied with thread to the edges. The fabric will allow excess water to pass through.
Vertical
In principle, the horizontal structure is ready. For the vertical one, you will still need to perform the following manipulations:
- A thin tube is wrapped in non-synthetic fabric, which is secured with thread, leaving 10 cm of the upper edge free. The fabric will prevent clogging of the holes and ensure uniform moisture. The lower end of the tube is tightly sealed with tape.
- The fabric-wrapped tube is installed in a vertical column against the rear wall.
Further work requires drainage and soil. Small stones, gravel or expanded clay can be used as drainage. In vertical columns it is poured to a level of 20-25 cm, and in horizontal beds - in a layer of approximately 1-2 cm. Soil is laid on top. It must be watered periodically so that the voids fall through, and lightly tamped with your hands or a stick.
At the last stage, strawberry seedlings are planted in the ground. They should have a well-developed root system and several green shoots. In this case, the culture will take root better in the constructed structures.
Preparing pipes for planting
We have reached one of the main steps - preparing the pipes.
For the system we need:
- PVC pipes with a diameter of 15 cm.
- End caps corresponding to the pipe diameter.
- PVC pipes with a diameter of 3-4 cm for supplying water, 15 cm longer than the main pipe.
- Plugs for thin pipes with the appropriate diameter.
- Hose (needed to drain water).
- A container that will contain water.
- Pump with automatic watering.
- Expanded clay (will serve as drainage).
- Drill with bit dia. 10 cm.
- Roulette
- Hacksaw.
- Priming.
For comfortable growth of strawberry roots, it is better to beat the expanded clay with a hammer in advance so that it breaks into small pieces.
You should choose a sunny place. Therefore, before assembling the structure, think carefully about where it will be located and decide on the dimensions. If this is a single bed, then you can place it on the sunny side of the fence. If you plan to grow strawberries on a large scale, then it is worth considering how and where the beds will be located.
If you decide to grow strawberries on a large scale, then take care of the supports. They can be built, for example, in the form of a pyramid. But the material must be durable. Please note that a PVC pipe with soil and only 2 meters in size will weigh as much as 25 kilograms.
Let's start preparing the pipes. At a distance of about 20 cm, make holes with a diameter of about 13 cm. In a thin pipe, prepare many small holes using a drill. Wrap a thin pipe with geotextile (agrofibre will also work), and then secure everything using wire so that the covering material does not unwind or slide.
In the plugs from the wide pipe you need to make a hole that will match the diameter of the thin tube. Sprinkle approximately 2-3 cm of expanded clay onto the bottom of a wide pipe, distributing it evenly over the surface. Then we place the prepared thin pipe so that its edges extend into the newly drilled holes in the plugs of the large pipe.
Pour soil into the slot of the large pipe, compact it, and then water it. On the one hand, you will need to connect a hose from an irrigation system with a timer or a container that will be located above the level of the seedlings. On the other side there will be a hose for draining water.
The vertical design is different in that it is positioned differently. The holes are drilled at the same distance, with the same diameter. The only thing is that they will be done in a checkerboard pattern. The design principle remains the same.
The pipe bed is ready, you can start planting!
Step-by-step instruction
It is necessary to understand in more detail the technology of constructing structures for growing garden strawberries.
Creation algorithm
The construction of vertical structures from pipes consists of the following sequential actions:
- Having decided on the height, which is usually about 2 m, the sewer or drain pipe is cut to the required length.
- The same is done with the irrigation pipe, but its length should be 10–15 cm longer than the length of the main pipe.
- Holes are drilled in a wide pipe (up to 10 cm in diameter) at a distance of 20–25 cm. The holes can be arranged in 2 rows, in a checkerboard pattern or in a spiral. It depends on the desire and imagination of the creator.
- Small holes (Ø 2–3 mm) are drilled in the irrigation tube at intervals of 7–10 cm, through which irrigation will occur. No holes are made at 20 cm in the lower part to prevent waterlogging of the lower plantings.
- To prevent the slots in the thin tube from becoming clogged in the future, it must be wrapped in non-woven material and secured well (for example, with wire). The lower part (without holes) is wrapped with electrical tape or tape for greater reliability.
- For the bottom drain, a plug is made with a hole for the watering pipe.
Video: construction of vertical structures
Creating a horizontal structure is somewhat different from the previous one:
- The main pipe is closed with plugs on both sides. The plugs can be replaced with durable plastic film securely secured with electrical tape or twine.
- Planting slots are made in one or two rows.
- Watering holes are drilled along the entire length of the watering pipe.
- If a pump is not provided for irrigation, it can be made gravity-flow. To do this, a container of water must be placed above the structure.
- You need to think about how the pipes will be connected and secured.
Installation
An important point in creating planting structures is the correct selection of soil mixture and proper filling. To backfill, you will need drainage, which can be expanded clay or pebbles, as well as a fertile nutrient mixture. You can buy ready-made soil, but it’s cheaper to prepare it yourself from garden soil, peat, humus (3:1:1) and add a little sand and ash. To destroy fungal spores and larvae of harmful insects, the soil can be treated with boiling water or applied according to the instructions “Trichodermin”, “Fitosporin” or other drugs of appropriate action.
Important! To improve air exchange and soil permeability, small sawdust or foam balls are added to the mixture. When installing pipes in a vertical position, they can simply be dug into the ground. Further instructions consist of successive steps:
When installing pipes in a vertical position, they can simply be dug into the ground. Further instructions consist of successive steps:
- An irrigation pipe is installed in the center of the main pipe.
- The bottom of the pipe is filled with drainage that reaches the lower holes of the irrigation pipe. Drainage will not only prevent water stagnation, but will also give additional stability to the structure.
- Then the pipe is gradually filled with soil mixture. The soil is gradually compacted and periodically spilled with water to prevent its further shrinkage.
- Planting of seedlings can be done both as the soil is filled, and after it is completely filled.
- After all of the above steps are completed, the watering system is connected (a watering hose is connected to the irrigation pipe).
Installing a horizontal building is a little more complicated than a vertical one:
- Drainage is poured into each hole and evenly distributed in a layer of about 2 cm.
- An irrigation tube is laid on top of the drainage layer.
- Soil is poured into the slot. As you fall asleep, it should be moistened so that it compacts better.
- The edges of the pipe are closed with plugs with slots for irrigation.
- After the final filling with earth, the pipes are connected with angles or other fasteners and installed in a permanent place. You can create a stable, portable structure from wood or metal, and attach pipes to it.
- Irrigation is connected.
- Strawberry seedlings are being planted.
Additional wind protection
To enhance the strength of the structure from the effects of wind, additional protection is necessary:
- it can be done using a cable or strong rope;
- vertical structures can be installed in buckets with pebbles or gravel, which will not only give stability, but also allow movement;
- horizontal pipes can be connected in such a way as to create a structure that is stable in itself;
- horizontal structures can be hung on a fence or other suitable object.
Soil requirements and preparatory activities
Strawberries will grow well in turf soil. Drainage must be present in all options for planting seedlings. Its thickness should be about 2-3 cm.
You can buy ready-made soil, or you can prepare it yourself. To do this, you just need garden soil, as well as peat and turf in equal proportions. Just before planting strawberries, it is better to disinfect the mixture by dousing it with boiling water and treating it with a fungicide. This will protect the planting from the appearance of various parasites and microorganisms. Be sure to add a little crushed charcoal or ash to the soil. This will prevent rot from spreading.
When placing it in the pipe, the soil should not just be filled in, but thoroughly compacted. There should not be a loose layer, because during the watering process it will be compacted and voids will appear, which we have absolutely no use for.
Before planting, strawberry roots can be processed in a special mash, which is made from equal parts of manure and clay.
Irrigation system
As previously mentioned, watering can be done automatically or simply by gravity. Gravity feeding does not require much expense or effort. The container with water must be installed above the bed, the irrigation hose coming out of it is attached to the irrigation system inside the pipe. Both hoses are attached to each other with wire. This system can be used if the bed is small.
To water several pipes, it is better to use automated irrigation. In this case, the irrigation hose is attached to the pump and lowered into a container of water.
It is important to monitor the water level in the tank; if the water does not completely cover the pump, it may burn out. Water is pumped several times a week
A relay and timer can be used, then you can set the watering time and the pump will turn on automatically.
Fertilizer is added to the water once every ten days.
How to properly plant strawberries in pipes with soil
The success of the work done also depends on whether the plants were planted correctly in the ground. In this case, it is worth considering a number of details.
For planting, you should choose those bushes whose roots have grown to approximately 10 cm. If it is longer, it is worth trimming the root system a little. The root must be laid so that it does not bend, otherwise the plant will disappear. Afterwards, the plant is covered with soil on top.
The core of the bush should be located above the bush. If it comes out too strongly, adaptation will take longer. If you overfill the bush, it may not take root at all.
Watering and replenishment
Strawberries love acidic soils. Therefore, after planting, the soil must be acidified. Take about 10 g of vinegar per liter of water, dilute and water the plants.
Thanks to the drip irrigation system, water will be supplied little by little, without critically moistening the soil and preventing the root system from rotting. Do not forget that the soil dries out very quickly in the pipes, so it is important to find a middle ground, do not overfill the water and do not forget to water the plant at all.
You also need to think about fertilizer, because strawberries do not grow in a natural environment and they simply have nowhere to get useful substances from. All of them are administered only in liquid form. This could be urea, ammonium nitrate, etc.
Cleaning the soil from weeds and insects
Sometimes strawberries are affected by various pests. It can be:
- aphid;
- slugs;
- ants;
- ticks.
If a mite has infected the plant, you can use karbofos. Snails and slugs can be flushed out by metaldehyde. Aphids are destroyed with a soap solution.
The soil must be treated before plants are planted in it. It is the treatment that allows you to get rid of pests that may be in it. Also, one of the advantages of growing strawberries this way is the absence of weeds.
Features of post-harvest care
After harvesting, closer to September, it will be necessary to mulch. Sawdust is perfect for this purpose. They prevent rotting and perform their functions perfectly.
A few days after the last fruiting, it is necessary to carefully remove dried leaves from the plant. They die off and continue to gain strength, but strawberries do not need them to weaken by winter.
If you plan to plant bushes to increase the yield, you should remove all young tendrils and leave only the longest. It will become a new bush when the time comes.
Particular attention should be paid to the land. After fruiting, it should remain moist so that the plant gains new strength and can delight you with delicious fruits next season. To avoid burns on the leaves, it is better to water in the morning or evening.
Summarize. A pipe bed is a very profitable and convenient way to grow strawberries, both for yourself and for commercial purposes. This design takes up little space. In a greenhouse you can place a fairly large number of seedlings, whether vertical or horizontal planting. The strawberry varieties used are unpretentious, but at the same time high-yielding.
Wooden vertical beds
Summer residents find rational uses for boards or wood products that have fallen into disrepair. With a small set of tools, you can easily assemble a tall wooden flower bed.
You will be interested to know about the yield of strawberries per hundred square meters and per hectare.
From boxes
This model is made in the form of a pyramid by installing boxes one on top of the other. Boxes can be taken in the shape of a triangle or square: each next one should be smaller than the previous one in size. The layers are covered with fertilized soil and immediate planting begins.
From pallets
The tray is covered with dense waterproof material on three sides and one large side. Having secured the material, the box is turned over with the open side up. Soil is poured into the gaps between the boards. Bushes are planted on top and between the boards on the open side.
The box is lifted vertically, placed along the fence, against the wall of the house or against the wall on the balcony.
From boards
The peculiarity of the plank model is that it can have any shape. It is made in the form of a ladder with steps-boxes, a shelf or a pyramid.
You can make several boxes yourself and stack them on top of each other. To prevent the boards from moving apart, it is advisable to connect them with hoops.
Important! Before use, wood must be treated with a protective impregnation.
From the boxes
You can use an old chest of drawers under the beds by simply pulling out its drawers, which will decorate any garden plot in an original way. Before use, the wood should be varnished so that the chest of drawers will further improve the decorative appearance of the area near the country house.