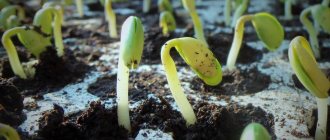
Many summer residents wonder why the soil in the greenhouse turns white, because they take such careful care of it, fertilize it, water it and weed it. So what is the cause of green soil, mold and white residue?
The most common causes are excessive soil moisture, pests and improper care.
The soil is sick for several reasons:
- If you water the soil endlessly.
- With increased soil acidity.
- When the greenhouse is poorly ventilated or absent at all, resulting in increased humidity in the room.
- If you add a lot of fertilizers to the soil.
These reasons can be combined with each other.
Pests, insects and diseases
Very often, pests lay their larvae in the soil, where they remain for a long time. If this problem is not dealt with, the number of harmful larvae in the soil will only increase. And some conditions can contribute to this, for example, heating the soil in the cold season, etc.
Ventilation diagram in a greenhouse.
The most common pests include:
- wireworms,
- cabbage flies,
- mole cricket,
- spider mite and others.
Other types of soil diseases include infections of vegetable crops - these are various mold spores and fungal diseases that can also penetrate the soil and cause its contamination. Many microorganisms are able to penetrate not only into the soil, but also constantly remain on the frame of the greenhouse itself (especially if it is made of wood). Therefore, if you carry out measures to disinfect the soil, it is necessary to touch all parts of the greenhouse in order to completely prevent the re-production of harmful microorganisms.
Common soil diseases:
- clubroot;
- late blight;
- spots on leaves;
- macrosporiosis;
- peronosporosis.
Correct crop rotation in the greenhouse
In order for plants to grow well in a greenhouse, proper crop rotation must be observed. To do this, you need to know which plants like well-fertilized soil and which less fertilized ones.
Therefore, plants are divided into the following groups:
- Plants with low fertilizer consumption.
- With average fertilizer consumption.
- With high fertilizer consumption.
It is necessary to be able to alternate planting of such plants. For example, tomatoes consume a lot of fertilizers, and after harvesting, other plants with the least fertilizer consumption can be planted in this place.
Some tips for proper crop rotation.
Do not grow one variety of vegetables in the same place for years, alternate crops, this will avoid soil fatigue.
Select suitable neighbors from vegetable crops. For example, tomatoes and sweet peppers coexist in one garden bed. And basil planted nearby will also improve the taste of tomatoes, at least that’s what avid gardeners say. But it’s best to plant dill next to cucumbers.
There are plants that can repel parasites. For example, calendula and marigolds repel aphids and nematodes. And nasturtium whiteflies and aphids. To avoid soil diseases, use only high-quality planting material and fertilizers.
At the end of the season, do not neglect cleaning the planting material and cleaning the greenhouse. Remember that in a polycarbonate greenhouse, plants grow better and the soil suffers less.
Very often, pests lay their larvae in the soil, where they remain for a long time. If this problem is not dealt with, the number of harmful larvae in the soil will only increase. And certain conditions can contribute to this, for example, heating the earth in the cool season, etc.
Soil waterlogging
Simple solutions for soil care.
If the soil is waterlogged, then in the near future you may find algae, fungus and mosses in your beds. This is also facilitated by warm air in the greenhouse. Particular insidiousness may come from groundwater, which may be located in the area of the greenhouse. Often, the owner of a greenhouse may not be aware of this and water his plants as usual, resulting in excessive moisture, which in turn leads to soreness and greening of the soil.
How to distinguish moss from algae? These two species can often be confused, but they have distinctive features:
- When the greenhouse lighting is poor, moss appears on the plants and soil.
- But if there is enough light in the greenhouse, then we can talk about the formation of algae.
Operation Rescue
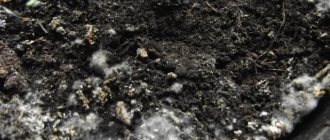
If there are single manifestations of mold on the soil, it is enough to stop watering, dry the plant and replace the surface layer of soil (2-3 cm) with fresh, calcined soil. Be sure to add “medicinal” charcoal or sphagnum moss, which will help absorb moisture. Pour in a solution of “Fundazol” (2 g of powder per 1 liter of water).
The longer mold remains on the soil, the deeper it goes.
In case of massive damage, you can get rid of mold in flower pots only by completely replacing the soil. To do this, remove the plant and set it aside to dry for a day. Rinse the container to remove any remaining soil, pour boiling water over it, and dry thoroughly. If the drainage holes are too small, enlarge them to prevent them from becoming clogged again.
On plastic pots, mold spores can survive and even after treatment with soil replacement begin to multiply again.
Place a drainage layer of pebbles or crushed bricks at the bottom. Before backfilling, new soil must be disinfected. Steam in a water bath, heat in a frying pan, in the oven, or pour over a solution of potassium permanganate. After planting a flower, pour a thin layer of sand on top or spread expanded clay, which will help draw in excess moisture.
Causes of white plaque and measures to get rid of it
White coating is a yellowish crust consisting of salt. It can form for the following reasons:
- If the soil composition is considered mechanically heavy.
- Difficult soil drainage.
- With poor or scanty watering.
- Too much fertilizer in the soil.
- A large amount of fertilizing in the soil.
- The composition of irrigation water may contain large amounts of chlorine, calcium or magnesium.
- Dry air.
- Fungus or mold.
Ways to combat plaque.
The appearance of green and white deposits in the soil is associated with excessive waterlogging of the soil.
You can get rid of white deposits on the soil in different ways:
- For example, you can sprinkle the surface of the soil with expanded clay. It is on it that a white dried sediment will appear; from time to time the expanded clay needs to be washed and returned to its place again.
- Sprinkle the top layer of soil with river sand and loosen it more often. This is very beneficial for the root system of plants.
- You can remove the top layer of soil and add leaf humus.
- Remove the top layer of soil and fill in a new one.
- Purchase a soil deoxidizer from a specialty store. Remove the top layer of soil and pour the deoxidizer deeper.
- Water the soil with softened water. To do this, use a special filter. You can put a bag of peat in a bucket of water. If possible, water should be passed through a layer of peat, then the salts will be adsorbed.
Mold Removal Methods
If the soil in the greenhouse has turned white as a result of the formation of mold, then a set of measures is taken to combat the fungus. It is necessary to increase the alkaline carbon index of the soil using mineral compounds. Such procedures will prevent the development of infection. Processing is carried out twice. The break between procedures is 30 days. Another method is to sprinkle the ground in the greenhouse with a powder mixture consisting of wood ash and charcoal in a 1:1 ratio. If plaque is widespread, you can use a copper peat solution (sprinkled under each bush in the greenhouse). Special fungicides such as Fitosporin - M or Fundazol are widely used.
To prevent unwanted vegetation, the development of infections, and soil flowering, it is necessary to observe all agrotechnical and preventive measures. Minimizing problems will allow you to get a bountiful and high-quality harvest. Thus, the owner’s invested work will be fully justified.
Increased soil acidity
To reduce the acidity of the soil, which causes moss and mold to spread throughout the area (and this is detrimental to plants), you need to take the following actions:
- Add tree resin to the soil; this should be done from time to time. But not too often.
- Add lime to the soil.
- Dolomite flour added to the soil effectively eliminates soil diseases.
Norms for soil acidity levels.
It is advisable to add these fertilizers to the soil at the time of digging up the earth, before planting and after harvesting. In this case, the soil in the greenhouse will not deoxidize, causing mosses to stop appearing.
To ensure that plants grow well in the soil and produce a harvest, do the following:
- Sprinkle lime on the soil and do not dig up the soil.
- After this, sow green manure - this is a fast-growing grass.
- After the grass sprouts, plant seedlings of other vegetable crops in the soil.
- After the seedlings have taken root, the grass is mowed and subsequently used as mulching material.
Why plaque is dangerous
Whatever the deposit on the ground or on containers is - mold or salt, it does not pose a direct threat to already grown flowers and vegetable crops. But it will definitely affect the harvest, its size, as well as the quality of the fruit. The appearance of plaque as a sign of waterlogging is more dangerous for seedlings.
Source botanichka.ru
The root system of young plants is not developed enough; they will not be able to absorb excess moisture and, most likely, will begin to rot. High humidity creates conditions favorable for the development of fungal, bacterial and viral diseases, as well as insect pests. A combination of factors worsens the resistance of plants and, if nothing is done, ends in their death.
How to Replace Topsoil
If you do not regularly ventilate the greenhouse, various diseases appear in the soil, from greening of the soil to the growth of parasite larvae. Stagnant warm air contributes to this. Therefore, it is very important to ventilate the greenhouse even in cold weather.
If the soil is already diseased, then the top layer of soil needs to be replaced. What do I need to do? And how to replace it correctly without harming the plants?
The process of removing the top layer of soil occurs as follows:
- The soil layer is removed to a depth of 30 cm.
- After this, the soil is covered with lime.
- The lime is slaked with water only the next day.
- Thus, the soil is left for 3 days.
- The lime is then covered with whitewash.
- Only then can you cover it all with a new layer of soil.
https://1poparnikam.ru/www.youtube.com/watch?v=LHxV1trbi54
You can mulch the soil with the following materials:
- sawdust;
- leaves;
- compost;
- grass;
- straw, etc.
Soil preparation is carried out before mulching. Mulch previously prepared and loosened soil.
Preventive measures
Using these tips, you can avoid the appearance of a white coating on the surface of the soil in flower pots:
Be more careful about watering. Do not start a new one while the top layer of soil is still wet from previous watering. Otherwise, you will simply oversaturate the soil with water and it will begin to stagnate. All this will lead to negative consequences for the flower;
Provide your plant with good drainage. To do this, the pot must have special holes at the bottom - this will help avoid stagnation of water in the container. Otherwise, it will lead to the appearance of fungus and mold. Also, before laying the soil, it is necessary to put a layer of expanded clay on the bottom of the container;
- Do not forget to periodically loosen the soil in the pot. This will make it more permeable to air, making it easier for the plant to breathe;
- For preventive purposes, it is recommended to water the soil with a solution of potassium permanganate once a month. This is to disinfect the soil from manifestations of the fungus;
- Don’t forget to regularly ventilate the room where the plants are located;
- The soil for planting must be of high quality; it is better to buy it ready-made in the store. But pay attention to the composition and its main purpose - the soil for seedlings is not suitable for adult plants;
- Use expanded clay as mulch. If it is not there, then you can replace it with river sand, or, in extreme cases, charcoal.
Now you have found out the reason for the appearance of white plaque in flower pots. Most of these reasons are associated with incorrect agricultural techniques, this is especially typical for beginning gardeners.
Therefore, if you provide your flower with proper care and the required conditions, you can easily avoid the appearance of plaque on the ground in your pots. And you can grow a wonderful, beautiful, and most importantly healthy flower.
Signs about a flower pot in a dream
When you dream of flowers in pots, this is one of the most favorable plots that predicts good luck and success in the future. Perhaps a great material reward awaits the person ahead, or he will buy expensive property. However, this interpretation is correct in the case when the flower did not fall and was dreamed of as blooming, green and fresh. If in a dream a person sees limp, dried flowers, then this may indicate troubles in the future. For example, there will be troubles at work, financial losses or quarrels in the family. When a flower falls off in a dream, it speaks of illness.
If in a dream a person dropped and broke an empty pot on the floor in the room, poured soil out of the pot, or broke it, then this may foretell discord in the family in the future, even divorce. Also, scattered earth at night speaks of illness, loss of loved ones or financial difficulties. It is worth considering that the prediction of dreams may depend on who dreamed of the flower pot. For example, if a young girl dreams of a beautiful flower, then a wedding awaits her. For older women, a blooming flower indicates a possible pregnancy, and for older ladies, such a dream promises the presence of diseases of the reproductive system.
Proper watering
If the same problem occurs every year, and after preventive measures the next season a white coating appears on the ground in the greenhouse again, then the approach to soil moistening should be changed. Perhaps the reason for the excess salt concentration on the surface is the location of the water intake. When using liquid from a well or running city water supply, the soil becomes salinized much faster. The best option in this case for collecting moisture would be rainwater.
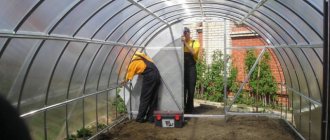
Along with the choice of liquid, it is necessary to ventilate the greenhouse through special vents. Lack of fresh air leads to stagnation of water inside the greenhouse. Evaporation and elevated temperatures lead to high humidity. Such conditions are an ideal environment for the development of fungal infections, spider mites and onion flies. Upon careful inspection, during fungal infection, a white coating forms not only on the ground, but also on the inner surface of the greenhouse. A fungal infection can be distinguished by its appearance. It resembles a downy covering with many intertwined fine hairs. If fungus is detected, you must stop watering and ventilate the greenhouse well, leaving the doors open even at night. Reducing humidity stops the development of the pathogen. These procedures allow you to temporarily stop the infection and prevent the spread to plants. After harvesting, it is mandatory to carry out disinfection measures. It is necessary to thoroughly wash the inner surface of the greenhouse and frame with a soap solution or special preparations. Disinfect the soil for the next planting of crops.
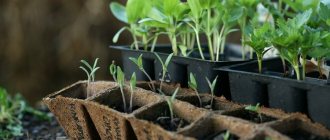
Planting seedlings in a bed
Reviews:
Irina Goritskaya
writes: Tatyana, thank you very much for your regular advice! As always, like it. Your channel is just a godsend for me. I recently began to engage in natural farming and methods and tips that do not involve chemicals and save space and effort are very important to me.
Olga Grafova
writes: Hello, Tatyana! what region do you live in? And also, you plant in April, doesn’t the greenhouse freeze?
Vyacheslav Shlyaga
writes: THANK YOU! I’ll try it this year, I have no doubt about its effectiveness.
Tattiana Osadchuk
writes: thank you very much, I took your advice into account
Venus Safina
writes: I would really like to know the date and month when you are filming.
Fourthly, add wood ash to the soil at the rate of a liter jar per 2 sq.m. Scatter it evenly over the soil and cover it with a flat cutter to a depth of 10-15 cm. If this amount of ash is not available, then save it for adding it to the planting holes. In the meantime, buy torfolin (pressed peat). Fill 5 liters of peat with a 0.1% solution of copper sulfate, leave for 5-6 hours and then stir thoroughly until smooth. Discard all large inclusions. Then add 100 g of dolomite flour and mix again. Scatter this mixture over the soil in a thin layer. After 2 weeks, repeat the procedure again.
In order to prevent mold from growing in the greenhouse, first, it is worth carrying out a number of preventive actions - ventilate, monitor humidity and, if possible, check for its presence in those places where mold may appear, saving by emergency measures at the first suspicion of its appearance. Sunlight must penetrate into the greenhouse.
The nature of molds
When systematizing plants in living nature, fungi are separated into a separate kingdom. There are more than 250 types of fungal organisms, which are grouped into orders and groups according to biological characteristics. In the international modern classification, mold fungi occupy the sixth order and are mainly represented by unicellular organisms, and in rare cases - multicellular. Due to the microscopic size of individual groups of fungi, they are called micromycetes.
Basically, mold accumulates and grows in large colonies, the appearance of which is represented by windy mycelia without large fruiting bodies. Many molds are facultative or obligate parasites. In other words, they are able to live independently or in the environment of the owner. Spores of such fungi are able to survive in conditions of increased radiation, in permafrost and even in space. Only certain groups die if they are exposed to temperatures above 100 degrees for at least three hours.