In which greenhouse will cucumbers grow better? Why do gardeners love polycarbonate so much? Is it possible to grow cucumbers in winter? Read about all this in our article.
A greenhouse for cucumbers is a must-have element in almost any summer cottage. Thanks to it, a special microclimate is created, necessary for the successful cultivation of vegetable crops and obtaining a rich harvest. There are several types of greenhouses and each of them has its own characteristics.
Organization of space inside the greenhouse
To understand what kind of structure you need, first understand what will be inside it. Calculate in advance which method will be profitable for you to grow vegetables. So, to do this, look at the table of average temperatures in your region, find out how close the groundwater is located under the beds in your building, and go from there. Indeed, in some conditions it is possible to harvest a rich harvest under an ordinary film greenhouse, while in others you cannot do without a capital structure with cellular polycarbonate and special subsoil heating.
For cucumbers, it is better to orient greenhouse beds from east to west, carefully covering them from drafts on the north side. This direction provides maximum illumination, which is very important. Additionally, consider another cover for the beds - film, spunbond or lutrasil to protect delicate plants from cold or overheating.
Today, several types of greenhouses compete with each other in which it is convenient to grow vegetables:
- Type 1. Narrow tall with plants in the middle and coarse mesh on the sides. On such a grid, the cell dimensions of which are about 30x30 cm, it is convenient to attach the shoots and harvest the crop there.
- Type 2. Wide traditional with beds on the sides and special devices under the roof, on which it is convenient to attach trellises.
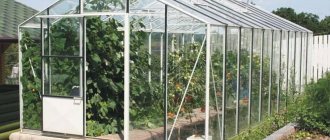
Here, for example, is how a standard structure with reinforced mesh is built (for additional protection from sunlight):
But first, decide exactly how you will attach the vegetables.
Choosing an installation location
A greenhouse in a country house should be located in the sunniest place - this is the main rule. In addition, it must be protected from drafts and wind, because this leads to constant fluctuations in indoor temperature. In order for the structure to be illuminated as much as possible, it is advisable to position it so that it faces the south side. The color of the greenhouse is of great importance. According to reviews on the forum, yellow, orange and red colors allow the greatest amount of sun into the building.
Gartering cucumbers is an important point!
And it’s a fact that trellises need to be fixed. Therefore, the biggest mistake when buying a room specifically for growing cucumbers is purchasing a model where the roof is solid without any hints as to where to attach the “tails” later. But the options with crossbars are just right.
By the way, vegetables in a greenhouse are not always tied up. Sometimes this plant is left to climb along the ground, as is often the case in open spaces. And both methods have their pros and cons. Just remember one thing: if you can water the fruits at least every other day, then hang them on trellises, because this is a significant space saver. If you come to your dacha once a week, then leave it on the ground so that the wide leaves of the plant themselves cover the ground from the scorching sun.
Trellis
Moreover, you can make such a structure yourself. Here's how to install these trellises:
- Step 1. At the ends of the row, insert stakes one meter high.
- Step 2. Stretch a cord between the stakes and lower a wire or rope tail from it to each seedling.
- Step 3. The plant itself will find and cling to the cord with special “tentacles”.
Or even simpler: when the beds are prepared, stretch two rows of wire along each bed - approximately at a height of 1.5 to 2 meters. The distance between the wires is 20-30 cm.
The fruits are also hung in a V-shape. Each row faces in its own direction, the plants get more heat, and it is more convenient to harvest. But by the end of summer it can still turn out to be a jungle, which is why the “one trellis - two passes” method still remains more popular today. Another good thing about cucumber trellises is that you don’t have to constantly bend your back.
And here is the detailed process of building a greenhouse with strong crossbars designed specifically for trellises:
Cucumber mesh
For this vegetable in a greenhouse, it is especially convenient to use a trellis net. This method has a lot of advantages:
- Significant space savings.
- The fruits do not touch the ground, do not get dirty and do not rot.
- Excellent ventilation for plants.
- It is convenient to observe and process plantings.
- The method itself is ingenious and inexpensive.
At the same time, all the plants “crawl” along the grid on their own - with the help of antennae. And modern agronomic nets are so strong that they even support heavy melons.
A simple plastic mesh can be purchased on the market - it is sold in rolls 2 meters wide. Thread a wire or cord at the bottom and top of the mesh and pull it between the supports. In the fall, the mesh can be easily removed from the support, rolled up and hidden until the next season. And as a support you can use thick metal reinforcement 2.5 meters high.
The standard parameters of the mesh are 1.7 meters high and the cells are 15x17 cm. And installing it in a greenhouse is generally as easy as pie - just stretch it between pre-installed posts directly above the beds with plants. Plant cucumbers on both sides of the trellis net, in a checkerboard pattern.
If you use a trellis net, then make the beds at a distance of half a meter.
Here's how to build a structure convenient for installing a grid:
Twine web
This method is also practiced, which summer residents have dubbed “horizontal-braided-twine.” Cucumbers are planted in the center of the bed, metal arcs with non-woven material are placed above them until the beginning of June, and the surface of the bed itself is mulched with mowed grass. At the beginning of June, the fabric is removed, the arcs are left, and twine is braided around the perimeter of the bed. It turns out that all the vegetable lashes are located inside the twine web and no longer stretch beyond the perimeter. It is convenient to water such a structure - right in the center, to the roots, and nothing gets on the leaves. As a result, as practice shows, the yield is 20-30% higher, it is easier for vegetables to withstand temperature changes and drought, and the fruiting period itself is significantly longer.
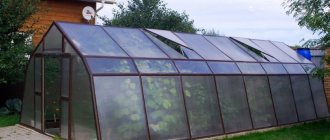
It is most convenient to mount the twine web in a lean-to greenhouse, on the high side, and on the other to place the work equipment and carry out communications:
DIY greenhouse hut
The simplest of the greenhouses that you can install on your site is a hut. It will require:
- Several narrow beams and slats
- Film
- Rope
- Nylon mesh
Construction stages:
- Determine the installation location. A space of 1 by 3 meters is enough
- Install two side triangles 1.5 meters high from beams
- Between the triangles, install a support in each of them. Place a long beam on top of the triangles, fastening it to the support
- For the side walls of the greenhouse, make a frame by nailing boards on 4 sides
- The frame is ready. It can be covered with film. You need to nail a strip to the film on one edge in order to better fix the coating and unwind and unwind the film onto this strip. You can press the film on the sides with a weight so that the greenhouse does not open
- Now you need to prepare the soil for planting cucumbers. To do this, dig up the ground with ash and sawdust, water the soil well and leave it covered for several days. After about a week, you can plant seedlings or seeds
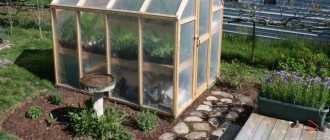
What is good about polycarbonate construction for cucumbers?
The most valuable quality of the design is the diffusion of light. After all, you noticed how light it is, but at the same time, this light does not blind. And all thanks to the special design of the covering material: cellular polycarbonate refracts the sun's rays, and they are scattered throughout the structure, well illuminating the plants from all sides. At the same time, dangerous parts of ultraviolet radiation are retained (you saw a special film on one side of the polycarbonate). And finally, in a polycarbonate structure there is always a constant temperature (one during the day, one at night), there are no sudden changes or unexpected drafts from an accidentally torn or lifted film. But these are ideal conditions:
- There is no direct sunlight, which the tropical liana does not like so much. It is not for nothing that this plant always builds a jungle above itself as much as possible - otherwise it will simply burn. Why does a cucumber grow so poorly in an ordinary glass structure?
- There are no drafts or sudden temperature changes. Believe me, it is enough to catch a plant just once, and you can forget about the harvest, while a tomato cannot live without daily ventilation.
- There is no need to remove the polycarbonate for the winter, so you can start growing vegetables much earlier!
A polycarbonate greenhouse is also good because it can initially achieve constant temperatures, which is almost impossible in film greenhouses, and even more so in greenhouses. That is why you can start growing in such a structure as early as March. If you are just choosing a site, look for one where the groundwater level exceeds 1.5 m and the slope is less than 5-10°.
You can build a convenient polycarbonate structure literally from scrap materials:
Wall-mounted
Such greenhouses are attached to the walls of existing structures. They are one of the most economical, because... for their construction it is necessary to use less building materials. It is desirable that the walls of such a building face south.
Arched
This form is very convenient, because... eliminates the presence of corners where the material usually breaks. It is also economical, because creating an arch will require less covering material than a rectangular greenhouse of the same size. All this allows you to extend the life of the greenhouse.
Pyramid-like structures are quite rare to find today. They don’t have any special “advantages”, except for their interesting appearance. Also very rare are polygonal greenhouses, which are usually constructed of metal or wood, as well as glass. But they have one significant advantage - the edges allow the structure to heat up as much as possible throughout the day. More detailed information about greenhouses can be found in the video presented or on the forum.
Tent greenhouse - excellent dispersion of sunlight
It is a fact that the vegetable does not like the scorching rays of the sun. And so far, only the awning has the best light dispersion of all known materials, which is becoming more and more popular every day in our country.
Its installation is extremely simple:
Here's how cucumbers live:
Care
Watering modes
The amount of water spent on irrigation depends on the stage of seedling growth and weather conditions. Before flowering, water 5-6 liters, during the flowering period - 8-10 liters, during the ripening of the crop - 12-18 liters per 1 sq. m. In this case, the temperature in the greenhouse should fluctuate between 23-27 ° C during the day and 17-19 °C at night. The gap between day and night temperatures is no more than 5-8°C.
Drip irrigation will help greatly in maintaining humidity in the greenhouse.
Feeding cucumbers
During the growth of cucumbers, about 4 feedings are carried out. This is done with mineral and organic fertilizers. Before flowering - liquid Agricola (2 tablespoons per 10 liters of water). You can also prepare the solution yourself. It includes 20 g of double superphosphate, 15 g of potassium sulfate, 10 g of ammonium nitrate and 10 liters of water.
Further, all fertilizing is carried out during the appearance of fruits. Dissolve 2 tablespoons of Efecton-O and 1 tablespoon of nitrophoska in 10 liters of water. Consumption – 5 l per 1 sq.m. land.
Also, for good development of seedlings, foliar feeding is carried out. For 10 liters of water, 2 g of copper sulfate, boric acid and potassium permanganate. Spray the underside of the leaves early in the morning or evening.
Disease Prevention
Most often, greenhouse plants are affected by fungi, bacteria and viruses. They usually appear due to non-compliance with temperature conditions, crop rotation and incorrect techniques for caring for cucumbers. Correct variety prevention is:
- buying good seeds, processing them before sowing;
- soil treatment is important;
- feeding seedlings;
- treatment with agents that increase plant immunity;
- cucumbers planted in a permanent place on time;
- the required soil quality in the greenhouse;
- pre-treatment of load-bearing structures and basic materials with disinfectants, if they are used more than once.
Before purchasing cucumber seedlings, double check each plant.
All these are important points in a strong chain of disease prevention in cucumbers during cultivation.
Garter
In order to get a high-quality harvest, it is necessary to provide access to light to each leaf of the plant. This can be done by tying the cucumber stems. You can tie up plants in three ways: vertically, horizontally and using a mixed method. Vertically - the rope is pulled at the top. Using a rope or twine, each unit of seedling is tied to it from bottom to top. Horizontally - place two two-meter supports at different ends of the cucumber row. Several ropes are tied horizontally to them. The disadvantage of this method is that the cucumber, having reached the first rope, curls along it, not trying to grow upward. You can read more about how to tie cucumbers in a greenhouse here.
Unusual types of greenhouses
And now - about the design of the pyramid. You can plant cucumbers in a circle - many people do this. Place a peg in the center and twine from it to the plants. Attach it to the plants. And on top - a good film.
You will be surprised, but the most wonderful place for fruits is a greenhouse on the roof, where it is always hot and humid, like in the jungle. We have a separate article on how to build one on our portal.
Or you can build such a wonderful structure from ordinary bottles (believe me, there is just enough light in it):
Growing and watering system
Once the plants that will be grown have been selected, you can think about a system for growing them. This can be done on the ground, which is more preferable, or on mineral or organic rocks, which include peat mixtures, expanded clay and perlite, coconut substrate, and mineral wool. The irrigation system will also depend on the chosen growing system: using any container, semi-automatic or automatic.
Winter design
For winter cultivation, early ripening hybrids that are suitable for hand pollination are more suitable for you. These are Almaatinsky-1 and Gribovsky-2 varieties, Bessemyanka and more modern options. Give preference to parthenocarpic hybrids if you don’t want to run around with a tassel and pollen, and in the summer – to ordinary bee-pollinated ones, whose fruits always appear smooth and beautiful.
But it is undesirable to grow in beds at such a time, because... the ground underneath them is still cold. It is better to use special pots or boxes, at the bottom of which be sure to organize drainage: expanded clay, small stones, pottery shards. This is necessary so that the water does not stagnate and cool there later.
Suitable varieties
In a greenhouse microclimate, it is better to plant hybrid varieties with shortened vines on the side, which do not require shaping (should not be pinched). The most optimal greenhouse varieties of cucumbers, producing a harvest literally 30 days after the appearance of the first fruits, are the “Bouquet” and “Temp” hybrids.
- Suomi F1 - resistant to cold and disease, a very early variety, the fruit does not outgrow.
- The Valaam hybrid is also very early and weather resistant. The fruit grows up to 5 cm in the shape of a cylinder. There are not many tubercles. Long fruiting.
- Sarov F1 is also early ripening. This variety produces several harvests from one leaf axil.
- Uglich, Okhotny Ryad, Po pike behest, Shik and Zadavaka are characterized by a long fruiting time
It is inconvenient to grow cucumber varieties that are pollinated by bees in a greenhouse, so it is better to plant self-pollinating varieties, or fruit-bearing varieties and those that do not need pollination at all. These include: Orpheus F1, Cheetah F1, Emerald F1, Glafira F1, Mazai F1, Blik F1 and others.
There are varieties of small gherkin cucumbers. Such varieties can also be grown in greenhouses. This is Alex, Alekseich, Friendly Family, Cheerful Company, Konrad, Pyzhik, Magician, Shchedrik.
Manufacturing materials
As mentioned above, greenhouses can be built from various materials - from wood to reinforcement, from plastic film to glass. It all depends on the size and timing of the greenhouse. For temporary arched structures, as well as for “butterflies”, film or agrofibre is more often used. For large greenhouses - glass, polycarbonate and film. The frame material also varies from willow rods, boards, even barrels to metal fittings.
Let's take a closer look at each material.
Greenhouse film perfectly protects plants from precipitation and cold. Most often, summer residents prefer a single-layer transparent smooth film with a thickness of 0.08 to 0.2 mm. Of course, the thicker the material, the better it retains heat, but the price also increases significantly.
A two-layer reinforced film is also used, between the layers of which a durable nylon mesh is fused. Air bubble film consists of 3 layers, between them there is an air layer in the form of bubbles, which are responsible for retaining heat.
A light-converting film is also used, the material of which has phosphors added. They convert the ultraviolet of sunlight into the part of the spectrum that is more necessary for plants. Under such film protection, the growth of cucumbers accelerates, the photosynthesis of proteins increases, and the microclimate created does not depend on whether the sun is shining or the weather is gloomy.
Agrofibre is a non-woven material. For greenhouses, white agrofibre is used, the thickness of which is at least 0.06 mm. Summer residents love it because it is water- and breathable, and provides protection from both low temperatures and the too hot rays of our luminary. This is a reusable material.
If you visit your garden only on weekends, the best option for you is agrofibre. After all, when it’s hot, the film needs to be lifted and watered regularly, but the non-woven fabric will allow the moisture of rain to pass through and protect it from temperature changes.
There is no need to praise glass - its strength and ability to protect well from low temperatures, precipitation, and gusts of wind have long been known. Of course, its price is high, but many summer residents assemble greenhouses and greenhouses from used window frames.
Polycarbonate is a synthetic material and is mostly used in the production of ready-made models of greenhouses and greenhouses. The price of purchased structures is rather high, but an additional advantage is the durability of the products. Sheets of this transparent and strong material with a thickness of 0.4 - 0.6 cm have good heat transfer properties. But in hot weather, its advantages turn into disadvantages: a greenhouse with a polycarbonate coating must be ventilated more often, and the plantings must be watered. There is one more subtlety - you should wash polycarbonate with a simple damp cloth, without soap and household detergents - they cause it to become cloudy.
How to choose polycarbonate
When selecting polycarbonate for a greenhouse design, it is important to pay attention to some details:
- The most suitable thickness of polycarbonate sheet for a greenhouse is from 4 to 8 mm,
- the sheets must be plastic, since when making a polycarbonate greenhouse, in some cases they will have to be bent by hand in order to attach them to metal pipes - supports,
- the excessively low weight of a polycarbonate sheet is the reason why one should abandon such a fragile material, not intended for the construction of a greenhouse structure; the classic weight of a polycarbonate sheet measuring 2.1 m * 6.0 m is from 9 to 10 kg.
From arcs
A greenhouse made of arcs is the simplest design and can be made independently from thick wire or using ready-made arcs.
Such greenhouses are covered either with film or agrofibre. After installing the arcs, just cover them with film and press the edges to the ground.
Made of wood
A greenhouse made of wood can have different sizes, but most often wooden structures are created when it is necessary to create a large greenhouse for cucumbers.
For such greenhouses it is necessary to create a foundation and also calculate the load on the frame. The most reliable are greenhouses with a gable roof, built on a strip or columnar foundation.
The second option is chosen if the structure is installed in a region where there is strong wind.
Dimensions
The sizes of greenhouses vary widely - from mini-greenhouses installed on a balcony to long and narrow tunnel structures. The optimal height of borage greenhouses, as already reported above, is 150–170 cm. The length depends on your needs. Greenhouses are usually made large and tall - small ones do not recoup the investment and effort. They are also distinguished by a more rigid structure.
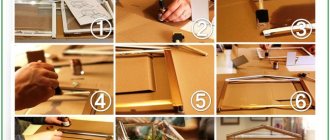
How to make a butterfly borage
To make such a greenhouse you will need the following materials and tools:
- boards 2-3 cm;
- timber 4 by 4 cm;
- rail 2 by 1 cm;
- polycarbonate;
- film;
- screws 5 and 7 cm;
- stapler for construction;
- screwdriver
Instructions:
- Make a box from boards. Minimum dimensions: 30 cm high, 2 meters long and 1 m wide. To make the box stable (especially if it is large), it is better to strengthen its corners with bars.
- Place support frames in the center and on the sides. For this, a beam 6 cm wide and 130 cm high is used.
- Secure the upper frame corners with vertical slats. Instead, you can sew it with polycarbonate.
- Place inclined bars.
- Secure the polycarbonate to the sides of the greenhouse.
- Secure the film on the borage roof. Its free edge at the bottom can be attached to a thin strip secured to the box with hooks. When working in a greenhouse or ventilating it, the film can be easily rolled up and attached to the roof.
But you can make such a “butterfly” without film. Photo of this butterfly borage:
Polycarbonate allows you to make reliable borage, from which you can get a good harvest for many years in a row. The main thing is to take care of high-quality installation and order the material from a trusted manufacturer.
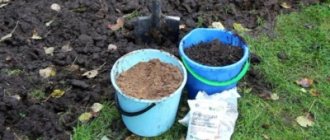
Pre-landing preparation
They begin to prepare the polycarbonate structure for the spring planting of cucumbers in the fall, digging up the soil with humus. You can read more about autumn soil preparation in a greenhouse for cucumbers here. But if you missed the season, pre-planting activities are carried out in March, as soon as the soil becomes pliable. After digging, the greenhouse is washed from the inside. To do this, take ordinary warm water and laundry soap. You can also add chemicals to the solution against pests that plagued the plants last year.
As soon as the structure dries, smoke bombs are lit inside at the rate of one per 10 “squares”. This treatment will help disinfect the soil and kill any remaining pest larvae. During the fire, windows and doors are not opened and people do not go inside. After about 4 days, when the checker burns out, the greenhouse is ventilated and further measures are carried out.
Planting dates for borage
The time at which you should start cultivating the crop depends on the planting method. Seeds for seedlings are sown at the end of February. By the end of March-beginning of April, the seedlings will have formed and will be ready to “move” to the greenhouse - they are more resistant to frost.
With the seed planting method, the timing shifts to approximately mid-to-late April or early May. You need to focus on the temperature in the greenhouse; it should be quite high and constant.
Seed preparation
Before preparing seeds, read the information on the packaging. The manufacturer could carry out the necessary manipulations on his own, and your intervention will only harm the seed.
Before planting, seeds are calibrated, disinfected, and then dried in a warm place and hardened. When sorting through material, it is important to remove spoiled, small or damaged specimens. The remaining seeds are placed in a saline solution for an hour - a teaspoon per glass of water, and then those that float are thrown away. The “good” ones need to be washed under running water, poured into a sieve or wrapped in cotton cloth.
For disinfection you will need one of the solutions:
- faint pinkish with potassium permanganate;
- with hydrogen peroxide at a concentration of 2-3%;
- with boric acid at the rate of half a teaspoon per glass of water.
The temperature of the soaking liquid should be slightly higher than body temperature. The seeds are wrapped in cloth and dipped into the solution: for 15 minutes when using potassium permanganate, for 7-8 - peroxide, for 2 hours if using boric acid. Afterwards, the material is removed and washed well in clean water. Warming of the seed material is carried out for better flowering and protection against viruses. The seeds are placed on a radiator or any other heating element for about an hour, the temperature of which does not exceed 65°C.
Hardening is necessary so that the seedlings are more resistant to changes in environmental conditions. To do this, place the seeds on a damp cloth and put them in the refrigerator for a day. You need to choose a place away from the freezer.
To avoid fungal diseases of seedlings or rot, seeds can also be soaked in Fitosporin according to the instructions, and for better germination - in preparations like Kornevin.
Temperature
Hardened seedlings can withstand a short-term drop in temperature down to -5°C, but seeds, especially in the first days after sowing, need +25-27°C. A fruiting plant will need 18-22°C during daylight hours and 12-15°C at night. The temperature must be maintained at approximately the same level - some varieties of cucumbers do not tolerate drafts and overheating.
Humidity
The air humidity inside the structure should also be constant, at the level of 87-88%. It is raised by installing open containers of water in the greenhouse, and lowered by ventilation.
The soil
In autumn, the soil is disinfected and fertilized with organic matter. For disinfection, special preparations such as “Phytocide” or copper sulfate at a concentration of 7% are used. After a month, the soil is “fed” with rotten leaves or manure.
In early spring, a mixture of two parts peat and part humus, enriched with rotted sawdust of coniferous trees, is added to the greenhouse soil at the rate of a glass per 5 liters. After this, the soil is dug up, smooth ridges are formed and the top layer is loosened.
conclusions
Growing cucumbers (planting / planting / planting and growing borage according to the scheme) in a polycarbonate greenhouse with your own hands has many advantages. The planting material takes root well, grows quickly and begins to bear fruit about a week earlier. The peculiarities of choosing seeds, preparing plants and soil in winter or summer are approximately the same as when working on open ground or a home balcony. But care takes less time and effort. The material of the structure creates excellent conditions for the crop; all that remains is to monitor the proper development of the seedlings, replenish the lack of moisture, nitrogen, potassium or phosphorus and harvest on time.
Other greenhouses and greenhouses for cucumbers are described in this article.