An arched greenhouse is an indispensable assistant for any gardener, both experienced and beginner. It is this design that can be assembled quite quickly if you need to cover the garden bed during frosts. And it’s easy and simple to disassemble if necessary - you don’t have to make any special efforts. An arched structure (both factory-made and home-made) is assembled from arc-shaped elements, which you can make yourself if you wish. What types of greenhouse arcs are there, and what can you make them from with your own hands?
Arcs for greenhouse
What should the arcs for a greenhouse be like?
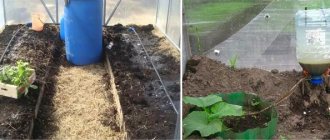
Before we find out what material is ideal for making arcs for a greenhouse, let's talk about what an arched greenhouse is. This is a kind of tunnel, which is made from several arcs in a row stuck into the ground and covered with film or agrofibre. This structure is installed over a bed, which is usually heated not only by the sun, but also by the process of natural processing of biofuel placed under the ground. As a rule, this is a fairly lightweight structure and, if necessary, it can be moved to another, ordinary bed without any additional heating.
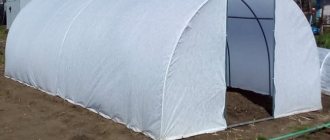
Film greenhouse
The function of a greenhouse is simple and understandable even to a novice gardener - this design allows you to retain heat around the plants and protect them during frosts. Also, a greenhouse is an excellent structure for hardening off seedlings in the spring, when it is already warm outside during the day, but at night it is cool for young plants.
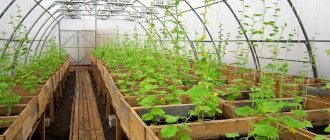
Options for arched greenhouses made from arcs with covering material
A greenhouse can be installed on a foundation, but this is rarely done. In particular, it doesn’t even make sense to place an arched greenhouse on a foundation, since in this case it can’t be moved to another place so easily.
Arc greenhouses are often covered with spunbond
Now it’s time to talk about the arcs - arranged in one row, they will play the role of a greenhouse frame. It is with the help of arcs that the covering material will be held over the bed. We can say this is the main part of any greenhouse. Therefore, it is so important to be careful and careful when choosing arcs. Depending on the material from which they are made, these frame parts can have different quality. However, which of them is better is an open question, since often disadvantages in certain situations become advantages. So what should the arcs for a greenhouse be like? They must have the full properties described in the table below.
Arcs for greenhouse factory
Table. Basic properties of arcs for a greenhouse.
| Property | Characteristic |
| Strength | This is one of the main characteristics. The arches should, at a minimum, not break from simple touches, and even more so not crack and fall apart during rain or snow. Also, if you plan to periodically drag the greenhouse from place to place, the arcs should not crack at the ends. Unfortunately, this is often the case with industrial models, which sometimes cost a lot of money. Also, the arcs should easily withstand even wet covering material. |
| Ease of use | The arches should require as little attention and care as possible from the gardener, so as not to distract him from working in his garden. They must also be light enough so that even a person who does not have great physical strength can move them to another place and transport them, if necessary. |
| Good flexibility | Also quite an important factor for arcs. They should bend well, but at the same time keep their shape. |
| Ease | No one is safe from the fall of a greenhouse, and it may happen that the arcs collapse due to the wind, even if they are sufficiently well secured. If they are made of heavy material, when they fall they will damage all the plantings inside the greenhouse. A light one will break off at most a few leaves of plants. |
| Durability | It makes no sense to make more and more new greenhouses every year; it is much more convenient to use the same one for several years. Therefore, the material for the arcs must be strong and durable enough so as not to collapse in just a season or two of use. |
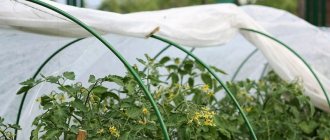
Greenhouse made of arcs, covered with agrofibre
It is worth noting that, based on all of the above, those arcs that combine all these properties as much as possible can be called high-quality. At the same time, convenient should be convenient, inexpensive and durable. If you decide to make greenhouse arcs yourself, then it is important to choose a material that will be fairly easy to process. Otherwise, you will spend too much time and effort to make even the simplest greenhouse. Let's take a closer look at the two main materials from which greenhouse arcs are made.
Arcs for greenhouse mini Agreen
Prices for arcs for a greenhouse
arcs for greenhouse
Kinds
Do-it-yourself technology for welding polypropylene pipes: an overview of methods and nuances
All types of greenhouses contain some essential elements:
- arcs;
- crossbars;
- clamps (for securing the covering material);
- pegs (for driving the structure into the ground);
- material (can be purchased separately).
The greenhouse frame can be made of the following materials:
- strong wire - covered with a hose from the outside;
- PVC pipes are lightweight, corrosion resistant, and durable;
- metal profile;
- polypropylene - should bend easily and take the desired shape.
Covering material can be film or non-woven. Any of them must transmit sunlight, protect from wind and frost, and also be durable to survive at least one season. For normal growth and development of seedlings, experts advise combining both of these materials. The greenhouse is covered with film in the spring, when the warmest conditions for plants need to be created for rapid growth, and in the summer they are replaced with non-woven fabric to ensure access to oxygen and prevent possible overheating.
There are the following types of greenhouses.
Precocious
Characteristics:
- width - from 1 to 1.1 m;
- height - from 1.2 to 1.6 m;
- length - from 3 to 5 m;
- the number of arcs made of steel wire, on the outside of which there is PVC, can vary from 4 to 6;
- number of crossbars - from 1 to 3.
The design is lightweight; if necessary, the greenhouse can be moved when assembled, which significantly saves time and physical effort
Advantages of "Skorospel":
- light and breathability;
- possibility of watering through the shelter;
- easy and quick installation;
- protection from light night frosts, heavy rain, hail, wind and insect pests.
cucumber
Characteristics:
- width and height are 1 m;
- length - 5 m;
- the frame is made of galvanized profile and consists of 7 arches and 1 crossbar. Due to the arc extensions, the height of the structure can be easily increased or decreased;
- greenhouse film.
Such a greenhouse is durable, strong, and does not require special skills during the assembly process. Its disadvantage is its heavy weight - 11 kg.
The “Cucumber” greenhouse is ideal for growing low-growing and ornamental crops
Dayas
Characteristics:
- length - from 4 to 6 m;
- width - 2.1 m;
- height - 1 m;
- the arcs are made of polypropylene, which allows them to be easily bent or reshaped if necessary.
You can grow any vegetables in the Dayas greenhouse; it is often purchased for growing cucumbers on trellises
Advantages of Dayas:
- the material “breathes” and diffuses light;
- retains moisture in the soil;
- protects plants from sharp gusts of wind and unwanted precipitation;
- transmits the necessary spectrum of light for plant growth and protects against excess ultraviolet radiation.
Snowdrop
Characteristics:
- height - from 0.8 m to 1 m;
- width - 1.2 m;
- length can be 4, 6 and 8 m;
- The frame is made of polyvinyl chloride, which can withstand various damages, is lightweight and durable.
It is especially useful to use “Snowdrop” in the spring, which will allow you to sow vegetables much earlier than in open ground
The weight of the largest greenhouse is only 3.5 kg, which is an undeniable advantage among other types.
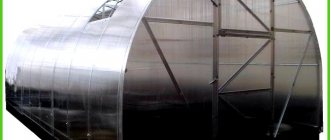
Metal arcs
Previously, in our grandmothers' gardens, one could see arched greenhouses made precisely on the basis of arches made of durable metal. This material was not used in vain - it has a lot of positive properties that should form the basis of a good greenhouse.
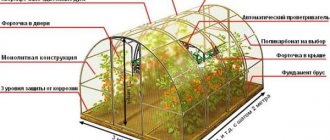
Greenhouse diagram with metal arcs
- Metal is a durable material, especially if it is protected from corrosion by paint or galvanization. But since earlier the arcs were usually made from improvised material (for example, reinforcement), they, as a rule, were simply painted with ordinary paint and tinted as it peeled off.
- The arched metal structure turns out to be very durable - even if something falls on it, it is unlikely to collapse or fail (provided that the arches are well fixed in the ground).
- A greenhouse made of metal will last for decades if you treat it with care and change the coating in a timely manner.
- You can cover the metal frame with absolutely any material.
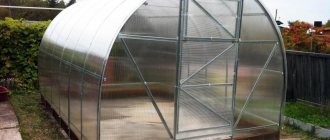
Greenhouses with a metal frame on the site
On a note! Metal arches are very strong, but heavy, and when installing a greenhouse with such a frame, make sure that they are well secured. Otherwise, during a strong wind, the greenhouse may collapse, and the heavy metal will damage and possibly destroy all your plantings.
The heaviness and difficulty of bending are the main disadvantages of metal arches. The second factor is the very reason why metal frames for greenhouses are usually purchased in stores and not made independently.
Construction of a greenhouse made of electric-welded steel arcs
You may need welding skills to make a greenhouse using metal arcs. As a rule, the arcs and the upper (ridge) metal crossbar are connected by welding. Sometimes the arcs are also connected at the bottom using two long metal parts. Then it turns out to be an almost indestructible (within reason, of course) monolithic structure.
Metal frame for greenhouse
Another disadvantage of metal arches is their price. Plastic is much cheaper.
How to make arcs for a metal greenhouse yourself? To do this, you will need a welding machine, metal pipes of the same diameter, and metal crosspieces.
Step 1. According to your idea, decide what length and what parameters each of the frame arcs should be.
Approximate diagram of a greenhouse on metal arcs
Step 2. Cut the arc into two equal pieces. Make such blanks in the required quantity (enough to cover the length of the greenhouse).
Cutting a pipe with a grinder
Step 3. Take a long horizontal pipe and weld tees (at the edges) and crosses to it at an equal distance from each other (approximately 40-50 cm).
Step 4. Take the previously prepared half-arcs and weld them to the crosses and tees so that you get a greenhouse frame. The final design will resemble a spine with ribs of some large animal. It is turned over and dug into the ground. All that remains is to cover the greenhouse with film.
Example of connecting half-arcs of a frame
On a note! It is not necessary to weld the greenhouse frame from metal pipes. You can simply bend them or even purchase metal reinforcing bars and bend them as well. It’s just that such a lightweight greenhouse will be less reliable.
An example of a simple miniature greenhouse on metal arcs
Advantages and disadvantages of designs
All arcs for greenhouses made of metal, wood and plastic have both their pros and cons.
Advantages:
- metal (highly durable. It is good to create complex structures from them. Installation and disassembly is quite easy. They can withstand heavy loads and are resistant to bad weather);
- plastic (low price. Resistant to all types of weather, do not require pre-treatment with paint, suitable for year-round use, durability, light weight);
- wooden (environmentally friendly, fairly high reliability, strength).
Flaws:
- metal (heavy weight and fairly high cost, prone to corrosion);
- plastic (no disadvantages);
- wooden (preliminary treatment with an antiseptic is required to prevent wood destruction).
Plastic arches
Greenhouses made on the basis of plastic arcs can be increasingly seen in gardening areas. The fact is that since plastic has firmly entered our lives, it is used almost everywhere. It is light, cheap, easy to process - what else is needed to build various structures from it with your own hands? That’s why greenhouses on plastic frames appeared at dachas.
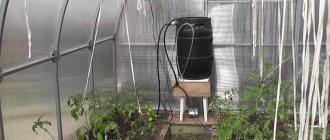
Tunnel greenhouse with plastic arches
Plastic arches are good because they are not afraid of corrosion, which means they will withstand snow, heat, and torrential rain. This explains their durability.
Greenhouse with clips for arcs
Plastic is also very light, and a greenhouse made on the basis of such arcs can be easily assembled, carried and installed by anyone - even a child. True, plastic arcs are usually used only to create small structures.
Arches made of polyethylene pipes
One of the main disadvantages of plastic is some fragility. If you apply some effort, the material will crack and break. Although, again, everything is individual here - there is also such plastic that is not afraid of anything at all.
On a note! Arched plastic-based greenhouses can be purchased ready-made. They are usually inexpensive. The trouble with these greenhouses is that often their arcs crack at the bottom, which sticks into the ground.
How to make arcs for a plastic greenhouse? It's simple - there are two main ways. You will need a regular plastic plumbing pipe for water supply and a hair dryer.
Method No. 1
Step 1. Cut the pipe into required lengths.
Cutting plastic pipe
Step 2. While heating each piece of pipe in the middle, carefully bend it to the desired radius.
Heating with a hair dryer
Step 3. Along the perimeter of the bed where the greenhouse will be installed, insert metal or plastic pins in pairs opposite each other. The distance between each pair should be no more than 50 cm.
Plastic pin for fastening the greenhouse
Step 4: Simply slide the arcs onto the pins.
Step 5. At the top, connect the arcs with one straight pipe, securing it with clamps. She will not let the greenhouse collapse.
The arcs are connected by horizontal ties
Another option for attaching arches from pipes
Homemade fastener from an old hose
Method No. 2
It appeared when gardeners realized that the ideal frame for a greenhouse was a combination of metal and plastic. Here the frame installation system is almost the same, except that a metal rod, turned into an arc, is inserted inside each pipe. It looks like metal in a plastic wrapper. This will protect it from excess moisture.
To increase strength, metal rods are inserted inside the plastic arches
How to calculate?
To make the calculation, it is better to use a regular meter. You will need it to take measurements of the bed. First of all, it is necessary to make drawings of the greenhouse, which will take into account all the parameters. The width must certainly be 30 centimeters larger than the width of the bed to make it warmer. The height depends on the choice of sown seedlings. The length is calculated using Huygens' formula.
The number of arcs will be determined depending on the length of the bed, calculating one element for every meter. For example, if a greenhouse is six meters long, and one meter high and wide, then it will need a covering sheet of 9.5 by 4.5 meters. This calculation implies a small margin of approximately one meter in both width and length. If a few centimeters are too much, they can be twisted and pressed to the ground or secured with clamps.
Do-it-yourself arches from scrap materials
However, arches or arcs for a greenhouse are made not only from metal or plastic. There are other materials and methods that may be suitable in your case.
Table. What can greenhouse arcs be made from?
| Material | Description |
| Tree | Why not a material for making a frame? It also makes excellent arcs. The problem is that you will have to do a lot of work if you want to get exactly the arcs. Such frame parts are stable, but quite light. The main disadvantage is that the tree can quickly rot in the lower part that sticks into the ground if it is not treated with a special product. |
| garden hose | There's an old garden hose lying around at the dacha, but you can't throw it away? Turn it into a greenhouse! It's simple - thread metal arcs inside the hose sections. Yes, in this case the hose does not itself become an arch, but organically complements the metal arch. The rubber coating will protect from moisture. |
| Willow twigs | Very flexible, but short-lived material. Willow twigs can be used as a temporary frame to create a greenhouse. Often they are just inserted into scraps of an old watering hose. |
| thick wire | It bends quickly even with your hands; you can use it to make temporary arches for a greenhouse. The material is quite soft and suitable for creating a warm house for plants in a hurry. Can't handle strong winds. |
| Old hoops | Ordinary plastic hoops, which all the girls in the country twirled around their waists, are perfect for creating arcs for a greenhouse. Simply cut the hoops in half and use pegs to stick them into the ground. At the top they can be fastened with a wooden block. By the way, this method of creating a greenhouse was popular in the USSR. |
| Old cots and headboards | Does everyone remember the old Soviet folding beds and spring beds with metal headboards? It is these backrests, as well as the legs from the folding beds, that can be used to create a greenhouse. True, it will turn out to be U-shaped. |
Polycarbonate greenhouse
The frame serves as a kind of skeleton on which the entire greenhouse structure rests. Therefore, it is necessary to approach the choice of material here with special care. The most inexpensive and common option is a wooden frame. More details in this article.
Step-by-step instruction
Let's consider the simplest method of how to build arched greenhouses with a frame made of PVC pipes and wooden elements under film with your own hands.
You need to prepare the following tools:
- screwdriver;
- drill;
- cord;
- scissors (although you can use a knife);
- welding machine;
- plumb line;
- axe, saw;
- chisel;
- hammer;
- wooden blocks;
- slats;
- nails;
- self-tapping screws;
- polyethylene film;
- level.
to start manufacturing the structure directly from the end walls :
- we knock down a wooden trapezoidal frame;
- we attach the PVC pipe to it using a screwdriver and self-tapping screws;
- We carry out the production of the ends in accordance with the selected design plan. For example, the optimal solution for a medium-sized greenhouse would be ends 3.5 m wide, 5 m long, 2.5 m high;
- similarly, the second end wall is made in the same sequence;
- We cover both frames with film. You need to cut it with a margin for fastening;
- We install the remaining parts of the structure. For this purpose, we drive reinforcement poles into the ground;
- We level the posts and attach the end frames to them;
- we pull the cord on both sides of the structure. This will allow you to install the side ribs evenly, without distortions;
- we drive in reinforcement along the sides of the end walls at intervals of 1 m;
- at the next stage we attach arches made of PVC pipes to it;
- We fix the structural elements using wire anchors and self-tapping screws;
- cover the frame with plastic wrap, securing the ends to a wooden plank.
We assemble the greenhouse ourselves
And finally, we’ll tell you and show you one of the ways to make a greenhouse with your own hands very quickly and easily.
A simple greenhouse for a summer residence
To do this you will need:
- metal-plastic pipe, which is used to equip the heating system in the house;
- several meters of thick plastic film to cover the greenhouse;
- nylon twine;
- hacksaw for metal;
- wooden pegs or beads with a diameter slightly smaller than the pipe.
Prices for polyethylene film
polyethylene film
Step 1. Cut the metal-plastic pipe into equal lengths with a hacksaw. Their length will be equal to the length of the frame arcs.
Cutting metal-plastic pipe
Step 2. Bend the pieces into neat arcs.
Ready arches
Step 3. Saw the glazing bead into pieces approximately 25 cm long and sharpen on one side.
Ready-made glazing beads
Step 4. Insert bead pieces into the edges of the arches. The sharp end of the bead should point outward.
The bead is inserted into the arch
Step 5. Stick arcs in the garden in the place where you plan to install the greenhouse.
The finished arcs are stuck into the ground
Step 6: Stretch the twine between the arches along the sides of the arches.
Twine is stretched between the arches
Step 7. Make the central piece of twine that will run along the “ridge” part of the greenhouse longer, and tie the edges to pegs stuck in the ground. This will help, as it were, stretch the greenhouse and make it stable.
The central piece of twine must be firmly fixed
Step 8. Cover the greenhouse with film. It can be fixed around the perimeter of the greenhouse with boards, bricks, and stones.
The film around the perimeter is covered with earth
This kind of greenhouse can be made in literally 30-60 minutes of your time. Of course, this is not a permanent structure, but if weather forecasters have promised frosts, then this way you can quickly build a temporary greenhouse.
Preparatory stage
Place on site . The greenhouse should be oriented from east to west : this will ensure that more sunlight reaches the plants. You can read more about the rules for locating greenhouses by following the link.
Foundation type . If you intend to use the greenhouse only seasonally, a lightweight structure without a foundation is suitable. For spring-summer - the best option. In all other cases, you can choose:
- strip monolithic foundation;
- strip point foundation;
- prefabricated strip foundation made of reinforced concrete blocks.
As for the laying depth, this parameter largely depends on the climatic conditions of your region.
Method No. 2. More complex, but stronger.
In this case, we will also use plastic arcs for the greenhouse, but the constructed structure will be much stronger.
We prepare plastic pipes (even defective or previously used ones will do) and rods on which we will put the pipes themselves. It is best to use metal rods or construction fittings.
The figure below shows the design in detail. By following it, you will make a durable greenhouse.
The rods must be cut to a length of at least 60 centimeters. We drive approximately 20 centimeters of the rod into the ground, the rest will be on the surface.
When all the rods are clogged, you can put on the plastic pipes.
How to calculate the arc length in advance?
Take regular wire and ask friends or relatives to hold it at the edges of the greenhouse. Next, take the center of the wire and pull it to the required length. When you have the desired arc, trim the edges of the wire and use it as a template.
Greenhouse calculation
Some summer residents have a question about why it is necessary to calculate a greenhouse at all, because it is enough to simply build a base of the required shape and size, install supports and cover the structure with film or polycarbonate.
In fact, correctly carried out calculations are the key to successful construction. Not only the reliability of the finished structure, but also the financial side of the issue will depend on this. With a correct calculation, you will be able to find out exactly what material you will need for construction and how much of it you should buy.
There are many services on the Internet that provide online calculation of all necessary materials. Such online calculators are really very convenient and save a lot of effort and energy for those who are not confident in their own mathematical knowledge. However, to be completely sure that the calculation is correct, it is better to check the data obtained by performing the calculation manually. Next we will tell you how to do it correctly.
Method No. 1. Simple.
- We outline the perimeter of the greenhouse.
- We drive in pins along the entire perimeter of the greenhouse, protruding 15-20 centimeters from the ground.
- We put plastic, pre-bent pipes on the protruding pins.
- To calculate the required number of plastic pipes, you need to know the height of the structure and its length. The distance between each arc must be at least 50 centimeters so that the film laid on them does not sag under the influence of rain and other precipitation.
- When all the arcs are installed, we insert another pipe across it so that it connects the entire structure.
- Cover the structure with film.
- We lay a painting mesh for plaster, made of fiberglass, on top of the film. Thanks to it, the film will be clamped around the edges.