Polycarbonate greenhouses have been in increasing demand and popularity in recent years. Polycarbonate has obvious advantages over film or glass coatings - they are more reliable, do not break or tear, and can withstand sudden temperature changes. In terms of thermal insulation, polycarbonate greenhouses are generally unrivaled. The assembly and disassembly of polycarbonate greenhouses is also easier, although, as a rule, there is no need to disassemble the structure for winter. Polycarbonate is not subject to cracking, and the surface of the greenhouse can be washed simply with water from a hose.
General characteristics of the Perchina-M greenhouse
The Perchina-M greenhouse is perfectly suited for small and medium-sized gardens and summer cottages. It does not require a foundation, which means that the installation of the structure is extremely simplified.
Note: All that is needed to install the structure on the ground is to fix the T-shaped bases of the frame in it and simply bury them.
The letter “M” in the model name means that this version is a modernized version of the greenhouses produced earlier. There is also a more advanced model - the Perchina-M Plus greenhouse. In general, “Perchina” will cover a surface of 6.5 m2 and in general, the small dimensions of this structure allow it to be compactly placed in very small areas.
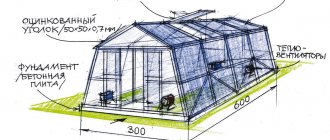
The frames of greenhouses of this type are made from galvanized profiles 0.8 mm thick, and their design is simplified to the limit to facilitate all manipulations performed with them. The frame of the Perchina-M greenhouse is covered with cellular polycarbonate, a very popular greenhouse covering material in modern conditions. Cellular polycarbonate is resistant to both low and high temperatures - in the range from −60°C to +120°C - which allows for trouble-free operation even during severe frosts.
How to grow peppers in a polycarbonate greenhouse
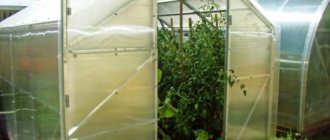
Nowadays, there is nothing surprising about growing peppers in a greenhouse. Pepper grown at your dacha has all the useful substances and vitamins, it is very useful for humans. Peppers are grown in greenhouses in order to avoid unnecessary expenses.
It is important to grow a crop once, learn how to plant peppers and care for them, and new harvests will delight you every year. Before planting, you need to choose a variety for the greenhouse “Perchina-M”. Experts recommend the varieties “orange miracle”, “nochka”, “tenderness”. The choice of peppers depends on your taste, as they vary in color, size, and shape.
Sweet and hot bitter peppers cannot be planted in the same greenhouse. Preparing seedlings should begin in February. The grains must be treated with 1% manganese for 30 minutes. Gardeners recommend treating seeds with a growth stimulant. As soon as the seeds have been prepared, they must be planted in pots and carefully monitor the temperature in the room. The temperature should not exceed +30 °C.
Advantages of Perchina greenhouses from the Volya company
Summarizing the operational characteristics of Perchina greenhouses, we can verify that these structures have many advantages and disadvantages that allow them to be used for a long time without problems. These positive qualities include:
- Simplified assembly and disassembly process.
- Excellent thermal insulation properties.
- Reliability of polycarbonate as a coating material.
- Resistance to a wide temperature range.
- Easy to care for.
- Compactness.
Such qualities can hardly be overestimated in relation to the usefulness and convenience of summer residents and gardeners. Flowers and vegetables, berries and fruits will thrive in such greenhouses at any time of the year.
Design Features
Greenhouses from the Perchina model range are tunnel-type structures and are a lightweight version of a greenhouse, characterized by the absence of a door structure.
A special feature of this structure is the presence of a simplified method of opening and closing the entrance located at the end parts of the tunnel.
The process of opening and closing the greenhouse of the Perchina series is based on the presence of special folding slats, which are attached to the lower end part of the structure. Standard polyethylene film is used as a covering. At the request of the buyer, greenhouses of the Perchina series are equipped with a modern film covering from the Desnogorsk manufacturer.
The frame of the greenhouse structure is supplied in three packages with a total weight of thirty kilograms
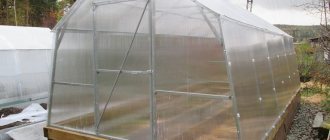
The greenhouse of the Perchina-M model range is intended for use as a covering of modern polycarbonate sheets. Each end part of this greenhouse has a door and a special sealing profile necessary to ensure complete tightness of the greenhouse structure. A design feature is the presence of a special handle that allows you to close the doors not only from the outside, but also from the inside. In addition, the doors in the Perchina-M series greenhouse are equipped with open position locks.
Specifications
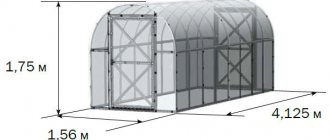
The Perchina greenhouse has the following physical dimensions:
- 1.56 m wide;
- 1.75 m high;
- 4.2 m long;
- total weight - no more than 40 kg.
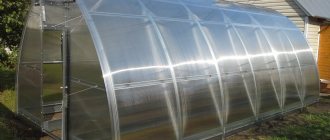
The Perchina greenhouse is equipped with double doors at both ends. The cellular polycarbonate that these greenhouses are equipped with is produced in Russia and has a thickness of 4 mm. It is also possible to equip it with Austrian polycarbonate - at the request of the client - the European material is more rigid and its service life is significantly longer. The basic package includes everything that is necessary for installing the structure, except that you can, if desired, purchase additional specific fittings for installing and fastening polycarbonate sheets.
In general, the “Perchina” polycarbonate greenhouse can be called a new word in the production of this type of structure. Such greenhouses can be used almost all year round, since the microclimate, thanks to polycarbonate coatings, has become much more stable.
general characteristics
Today it is a stable operating enterprise for the production of greenhouse structures. This manufacturer has been producing greenhouses for more than twenty years. Over the years, a large number of buyers have been able to appreciate the quality of greenhouses from this manufacturer.
The assortment is constantly updated. The improvement of all technological processes allows us to produce consistently high-quality and popular products in the form of greenhouses and greenhouses, including the Perchina series greenhouse and the Perchina-M polycarbonate greenhouse.
Each end part of this greenhouse has a door and a special sealing profile necessary to ensure complete tightness of the greenhouse structure
Installation and installation of greenhouses
The greenhouse "Perchina" produced should not create difficulties during installation if you carefully follow the requirements of the instructions included with the kit. Consistently performing several simple steps will ensure quick installation and normal functioning of the greenhouse:
- All parts should be installed in such a way that their side shelves face the direction of the covering.
- After the location for installing the greenhouse has been determined, you should mark the places where the frame supports and install it in the holes dug at these points.
- Next, you should align the position of the frame relative to the ground plane and assemble the doors on it.
- Install polycarbonate plates on the doors and frame.
- Finally, level the soil along the entire outer and inner perimeter.
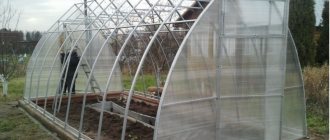
The attached instructions illustrate in detail each of the necessary steps.
Recommendations for assembling a greenhouse
To start assembling the frame, you need to figure out where and what to take.
To do this, you need to know that all the parts in the kit are sorted into four packages:
- Contains assembly instructions, purlins, and even frame parts.
- Contains curved parts (arcs).
- Contains fastening materials/elements.
- Contains a sealing profile.
Note. Thus, initially you need to open the first package and carefully study the step-by-step instructions.
After which you must prepare all the necessary tools:
- For assembly.
- Digging.
- For cutting and measuring distances.
And also additional items:
- For example, chairs that you will use as supports during assembly.
- This is due to the fact that when disassembled, the greenhouse parts do not have sufficient rigidity and require careful handling.
You need to build the frame slowly, dividing it into two parts (which are connected at the end of the process):
- Secure the posts and crossbars with all available screws (that is, every available hole must be used), but do not tighten them all the way.
- Since after preparing the site and installing the greenhouse, the legs, and all other parts of it, will need to be adjusted so that the structure stands level and strong.
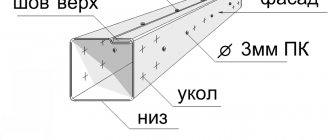
- After assembling the frame, proceed to cutting the polycarbonate. It is better to do this with a jigsaw, in accordance with all the recommendations and layouts given in the instructions.
- Also, it is necessary to mark in advance all parts of the marking with a marker where a protective layer is applied that does not allow the coating to be destroyed under the influence of solar ultraviolet radiation (usually this is the side with the transport film). It is necessary to install polycarbonate with this side facing outwards.
Next, you will need to assemble the door and prepare the components of the turntable. Install all sealing profiles at their destinations and begin preparing the land for the greenhouse.
Recommendations for installing and securing the greenhouse on the ground
As has already become clear, “Perchinka-M PLUS” does not require a separate foundation and can be installed on ordinary soil
To do this, you need to dig a small trench in the shape of a rectangle, each side of which should correspond in length to the wall of the greenhouse:
- For accuracy, you can additionally measure and compare the diagonals of the resulting figure (which will also help align the corners of the trenches). The digging depth is 20-25 centimeters.
- After the place is ready, it is necessary to bring and install the greenhouse itself. If necessary, you will have to deepen/widen some of the grooves. And only after you are sure that the structure is level and has given sufficient settlement (the lower horizontal profile is at ground level), begin to tighten the fasteners and bury the base of the greenhouse.
- Then the door is hung on the hinges, the turntable is installed, the lower edges are dug up (a small embankment is made on the walls from the inside and outside so that air does not leak in), and after a visual inspection it can be stated that the greenhouse is ready!
This is exactly how the “Perchinka-M PLUS” model is assembled and installed. Whether to choose it as your first or next greenhouse is up to you! This is an excellent representative of the “middle class”. For more detailed information, we recommend watching the video in this article.
Some useful tips
As in any business, the process of installation and operation of polycarbonate greenhouses has its own little secrets that are useful to know. In particular, despite the fact that the foundation for these structures, as already mentioned, is optional, it is still advisable to install them on the simplest foundation, from any materials at hand - timber, brick, foam blocks, and so on. Thanks to this, the greenhouse will last much longer.
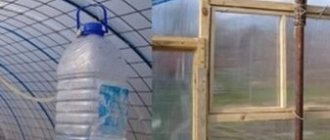
You can also install a simple heating system in the greenhouse - for example, a gas burner or a potbelly stove; even a bucket with a broken bottom will do. In this case, spring work can begin much earlier and, therefore, get the first harvest sooner.
Greenhouses should be thoroughly ventilated regularly to avoid the greenhouse effect, since in humid conditions at elevated temperatures, pests and various pathogens become especially active.
All types and designs of greenhouses - review of modifications with photos and advice on selection
There are a lot of options for organizing closed ground, but which greenhouse design will be the best in a particular case - here you need to thoroughly understand.
Every farmer with imagination can improve the classic version and thus invent his own greenhouse, but if the basic requirements are not taken into account and the calculations of professionals are not taken into account, the early harvest may be in jeopardy.
Main types of greenhouses by design
Basic classical types of construction
Traditional arched shape
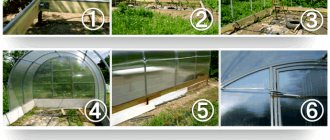
Greenhouses differ from each other in shape, size, presence of a foundation, frame and covering materials. To choose the best option for yourself, you need to consider all existing types of greenhouses and their designs. The difference lies not only in functionality, but also in ease of installation, cost and compactness. Only after assessing all these parameters can you begin to make a choice.
Greenhouse-arch – simplicity of design and installation
The most popular and easy-to-use option is an arched greenhouse, which is a lightweight frame of several arches connected by transverse elements. This type is economical, since the semicircular shape allows you to significantly save coating material.
Small arch covered with film
The versatility of this type of greenhouse lies in the fact that it is equally good both in a mini-format for a summer cottage and in an industrial version for growing vegetables in large quantities. The design is considered one of the most reliable and durable. The main advantages of the arch greenhouse:
- the ability to add or remove any number of sections;
- snow does not linger on the coating;
- You can assemble a greenhouse-arch with your own hands without complex calculations;
- low cost of materials.
This type of greenhouse also has disadvantages, which should not be forgotten:
- it is impossible to use glass;
- The space inside cannot always be used rationally.
It is best suited for low and medium-sized crops. In this case, the entire heated volume is not used. Therefore, this type of greenhouse requires high heating costs.
Large arched greenhouse
For ventilation of arched greenhouses, an entrance door is used, and in large buildings additional ventilation windows and transoms are installed. If the frame and covering are made of lightweight materials, and the greenhouse itself is not very large, during installation you can do without a stationary foundation.
Long reinforcement bars are installed at the ends of the arches, which are attached to the ground. Larger greenhouses require installation on a foundation.
Single-pitch or adjoining structure
For home use, it is advisable to build greenhouses adjacent to another building. Another popular and simple greenhouse design is a lean-to greenhouse.
Such a model can be built near a house or any outbuilding. A lean-to greenhouse consists of one inclined plane adjacent to a supporting wall.
Thanks to this support, the costs of the greenhouse frame are significantly reduced.
Location near a brick wall
The disadvantages of a single-pitch design are as follows:
- insufficient lighting;
- Due to design features, snow often accumulates on the roof, which can damage the coating.
Greenhouse-house - vertical walls and gable roof
A greenhouse with vertical walls and a gable roof is popularly called a “house”. The structure consists of two rectangular side walls and two pentagonal end walls. The roof is made of two inclined planes.
Classic "house" made of polycarbonate
Advantages of this configuration:
- significantly larger usable area compared to a gable greenhouse;
- convenience of placing utility racks and shelves on vertical walls;
- ease of ventilation (it is very easy to place windows and vents in vertical walls).
The main disadvantage of this design is the complexity of installation. To build such a greenhouse you will have to make a detailed calculation. The base is not very wide, therefore, in the absence of a foundation, the structure will not be stable enough.
A large number of joints implies poor sealing. Because of this, cracks can form and, as a result, drafts. To prevent such miscalculations, you need to treat the greenhouse drawing with full responsibility.
Dutch industrial greenhouse
The disadvantage is the difficulty of installing shelves on sloping walls. However, if we take into account the fact that the configuration has better light transmission, this small drawback can be neglected.
An option to solve the problem of a gable greenhouse is to use flowerpots. Since the standard gable structure has a height of more than 2.5 m, hanging pots with plants at the top is very convenient.
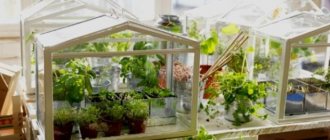
Mini-greenhouses - ideal greenhouses for seedlings
At home, mini-greenhouses are most often used. They can come in different shapes and are made from different materials. You can see greenhouses covered with glazed window frames, which can be found on the farm of any summer resident.
There are several popular varieties of mini-structures for greenhouses. For example, a pyramid greenhouse is a pyramid with a square at the base. There is even an opinion that this form contributes to the concentration of positive cosmic energy with all the ensuing consequences for the harvest. Whether this is true or not is unknown for sure, but the pyramid looks quite impressive.
Rectangular pyramid for better harvest
A cloche is a glass greenhouse structure consisting of two panels. It is mobile and moves around the area depending on which plant needs protection at the moment. The greenhouse effect in this option is not very pronounced, but protection from the wind is provided. And this is also important for young shoots.
Mini-greenhouse for a summer residence
Underground or buried structure
It is known that in winter the ground freezes slowly. At an air temperature of ±1°C, the soil temperature at a depth of 1 meter is about 10°C. When setting up a greenhouse, one cannot help but take advantage of this natural bonus. For construction, you must first dig a hole, 1 to 1.5 m deep, and install a transparent coating on top.
Greenhouse-thermos on site
One of the options for a recessed greenhouse is an improved design - a thermos greenhouse, which provides even greater indoor temperature and illumination even in cloudy weather.
For a thermos greenhouse, you need to build a reinforced concrete foundation. The coating is often double-layered.
Inside, the walls are covered with reflective paint or other material that acts as a solar energy collector.
Free-standing “thermos” from the inside
The disadvantage of this variety is that it is difficult to organize proper drainage in the underground part.
A large in-ground greenhouse takes quite a long time to build due to the need to dig a pit. In addition, you will have to take care of steps at the entrance, waterproofing and protection from pests, which implies additional costs.
Sophisticated Advanced Greenhouses
Considering the designs of greenhouses and their types, one cannot fail to mention such outstanding developments as the American greenhouse according to Mittleider, Ivanov’s solar vegetarian or a dome-shaped greenhouse. These ideas became simply innovative in their time and served as an impetus for the development of farming and agriculture in general.
Unusual greenhouse designs
American greenhouse - the developments of J. Mittleider
The main problem with large greenhouses is lack of ventilation. Often it is provided only by the front door, which is extremely insufficient. Plants become too hot, humid and literally can’t breathe. The solution to this issue turned out to be very simple. It was found by the American gardener J. Mittleider.
Its innovation lies in the fact that the roof of the greenhouse is arranged on two levels.
And at the junction of the two halves of the roof, a free space is formed, where transoms for ventilation fit perfectly. The structure can be arched or gable with vertical walls. In both cases, ventilation is very easy to provide. The frame is traditionally made of wood.
The classic version according to Mitlider - construction
In addition to good air exchange, the advantages of Mitlider's design are as follows:
- simplicity of design and installation;
- reliability, thanks to cross beams and braces;
- the ability to build a collapsible version;
- no condensation due to wooden frame.
Geodesic sphere - dome on the site
The original spherical greenhouse looks very unusual on the site. The structure itself is already a decoration of the garden and can serve as a striking element of landscape design. The greenhouse dome is assembled like a construction set from triangular elements. It is noteworthy that the coating is self-supporting and does not require any supports or frames, including a foundation.
Advantages of the geodetic sphere:
- light weight;
- the shape of the room ensures good air circulation;
- good illumination of the greenhouse from all sides;
- the aerodynamic shape resists even the strongest winds.
The disadvantages of this model are:
- complexity of manufacturing and installation;
- the entire volume is not used, as in the arched version;
- It is difficult to adapt curved walls for shelves and racks.
Geodesic sphere under polyethylene
Solar vegetarian for plants
The greenhouse can be an option for an adjacent greenhouse or built separately. But in the latter case, you will have to build a permanent wall. When building Ivanov’s vegetarian garden, it is necessary to take into account the position of the compass needle. The blank wall must be north - this is a prerequisite.
In addition, the natural slope of the terrain is taken into account. Ideally, the vegetarian garden will be located on a southern slope with a slope of 15 to 35 degrees. If there is no such slope, it will have to be created artificially. The roof of the greenhouse and its floor should be parallel to each other. To ensure the stability of the greenhouse structure, you need to build a strong foundation.
The main secret of this greenhouse is the reflective mirror coating on the north wall. The reflector will double the amount of sunlight. This innovation has a good effect on the harvest and does not require additional costs.
Freestanding vegetarian
Advantages of Ivanov's solar vegetarian diet:
- good lighting;
- good natural heating;
- saving on energy costs.
Design disadvantages:
- complexity of installation;
- high cost of building materials;
- stationarity.
Sliding roof – ventilation without problems
Greenhouses with a sliding roof combine all the advantages of the arched type, but, at the same time, eliminate some of their disadvantages. The design is a conventional greenhouse with a roof of two halves. The roof structure uses a special sliding roller mechanism, which allows you to open the greenhouse if necessary.
Great solution for a greenhouse
The advantages of the system are as follows:
- summer heat is not terrible for plants, this is especially true in spring, when the temperature drops sharply at night;
- good ventilation is ensured;
- Easy to clean the greenhouse from snow thanks to the opening mechanism.
Types of greenhouses by materials
When choosing a greenhouse, you need to consider not only its shape. The material from which it is made plays a very important role. This affects the reliability of the greenhouse, its cost, and many other nuances. Consider the main types of building materials that are used to construct a greenhouse before making your final choice.
Wooden frame - a common option
Types of frames depending on material
The frame is the basis of the greenhouse. It is made from different materials and their combinations. It all depends on the location where the structure will be located, operating conditions, financial capabilities of the owner and the availability of a construction team for the work.
Main frame materials:
- tree;
- metallic profile;
- galvanized pipe;
- polypropylene pipes;
- metal-plastic pipes.
Each of these options is good in certain cases. Wood is a cheap and easy to process material. But its durability is not the highest. The metal is very durable, but it promotes the formation of condensation drops, which is very harmful to plants. The same applies to galvanized pipes, but they are better than steel because they do not require anti-corrosion treatment.
Greenhouse frame made of PVC pipes
Polypropylene pipes are a favorite option for a greenhouse frame by many farmers. This is an affordable and lightweight material. Polypropylene itself is warm, which is a guarantee against the appearance of unwanted condensation. You can even install a small greenhouse from pipes alone.
Installation Rules
These models of greenhouse structures do not require a foundation. The frame is fastened directly to the ground by deepening special T-shaped frame ends made of durable material. The entire assembly process does not take much time, and self-assembly requires the following sequential steps:
- assemble the frame structure in accordance with the instructions supplied by the manufacturer with the product;
- on the area prepared for installation of the greenhouse structure, it is necessary to mark places for the lower ends of the greenhouse frame;
- strictly in marked places, dig holes with one bayonet of a shovel and then install the greenhouse frame in accordance with the dug holes;
- level the greenhouse frame by filling or deepening the holes so that all longitudinal frame parts are straight, horizontal and parallel to each other, and the arcs are installed as evenly as possible;
- fill the holes, trying to preserve the correct installation of the frame structure as much as possible;
- assemble the door structures according to the attached instructions;
- fasten the covering to the installed frame and install the hook brackets in accordance with the additional hole;
- hang door structures with hinges on the frame base;
- level the ground in accordance with the contour of the greenhouse so that the edge parts of the polycarbonate covering are lightly covered with earth and the doors open absolutely freely.
We also recommend that you read the article about species diversity and features of choosing Volya greenhouses.
Choosing the optimal greenhouse size
produces greenhouses of this type in 3 versions:
- “Perchina” is a film tunnel 156 cm wide, 480 cm long, 175 cm high, weighing 21 kg. Under it you can cover 7.5 m² of soil. The frame is made of galvanized steel profile. Supplied in 2 sets of parts: straight ones measuring 125×10×5 cm and arcuate ones measuring 120×25×5 cm. In the set you can purchase a film from Desnogor with a thickness of 150 microns measuring 6×6.5 m.
“Perchina-M” is a modernized version for polycarbonate with the same dimensions in width and height, and a length of 418 cm, weighing 30 kg. Under it you can cover 6.5 m² of soil. The frame is made of galvanized iron. Supplied in 3 sets: straight parts with instructions measuring 125x10x5 cm, arc-shaped parts 125x22x5 cm, necessary elements for assembling the frame measuring 65x10x10 cm.
“Perchina-M plus” is an improved model for polycarbonate, 412.5 cm long, weighing 33.1 kg, the length and width are the same. Under it you can cover 6.4 m² of soil. The frame is made of galvanized iron. Supplied in 4 sets: straight parts and instructions measuring 125.5x13x5 cm, arc-shaped parts measuring 125x22x5 cm, assembly elements measuring 65x10x10 cm, sealing profile measuring 35x30 cm.
How to assemble a greenhouse “Treshka”
The structure must be assembled strictly according to the instructions included when purchasing the product. When working with metal profiles, it is better to wear protective gloves and a work uniform to prevent injuries during the installation process.
Required Tools
All parts are held together with nuts and bolts, so you will need a wrench to securely fix the mounting hardware. To cut polycarbonate sheets, you will need a jigsaw or hacksaw.
Step-by-step assembly instructions
First of all, you need to assemble the frame, the parts for which are marked with numbers. Numbering greatly simplifies the work process, because the installer only needs to connect all the parts together.
Instructions for assembling the frame:
- Connect the power arcs marked as: 4ВК and 4В.
- Attach and tightly fasten the purlins marked with number 2B to the arcs on both sides.
- Attach arcs 4H and 4NK from below.
- Screw purlins numbered 2 to the lower arches on the right and left.
- The racks marked 1 and supports 3 are attached to the lower arches, they are connected by purlins numbered 2.
- Next, the end parts of the frame are installed, marked with numbers: 8, 10, 11-L, 11-P, 9-1, 9-2L, 9-2P.
- The internal struts are assembled from parts 18 and 19. Then they are attached inside the frame base to each arch, using a tie 17 and a spacer 20. The fastening occurs in such a way that one end of the spacer is at the junction of parts 18 and 19, and the other on the 4H arc.
- The side struts and ties numbered 17 are connected by a stiffening brace, which is marked number 21.
- Next, tubular door reinforcements are attached.
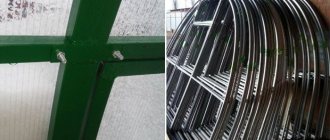
Installation of end brackets for fastening polycarbonate - 4 pieces on each side.
Buy a mini greenhouse at a low price
Until September 15, DISCOUNT on a greenhouse with strong polycarbonate and PROMOTION: join our group and receive FREE polycarbonate cutting and a 50% DISCOUNT on the semi-assembled frame!
| Frame price without polycarbonate | 7600 RUR |
| Price with weak polycarbonate STANDARD 4mm | 11000 RUR |
| Price with strong polycarbonate PREMIUM 4mm UV | 13900 RUR 12900 RUR |
| delivery and assembly strictly on the same day! | 5000 RUR |
| (we deliver ready-made) | 2600 RUR 1300 RUR |
When packaged, the frame consists of two packs of iron profiles, a can with fasteners and a bag with end rubber seals. The dimensions of the first pack with a straight profile are 125x13x5 cm. Weight is 22 kg. The second pack with arcs has a size of 125x22x5 cm. Weight is 7 kg. The jar with fasteners has dimensions of 10x10x10 cm and weighs two kilograms. A bag with a seal measures 35x30 cm and weighs one kilogram.
The mini greenhouse is equipped with two sheets of cellular polycarbonate (of different quality and at different prices at the buyer’s choice). The size of the polycarbonate sheet is 2.1x6 meters. When rolled, you get a roll with a diameter of 60-80 cm and a length of 2.1 m. The weight of two sheets is 20 kg. The mini greenhouse elements are fastened with M4 screws and nuts.