A greenhouse is an indispensable structure in any garden. It allows you to protect seedlings, greens and early crops from frost, ensuring a bountiful harvest even in cold weather. The structure can be of various shapes and sizes, so it will not be difficult to select it for any site so that it fits harmoniously and does not take up useful space. In specialized stores, this design is not cheap. It is not necessary to spend a lot of money on it, because... You can make a greenhouse with your own hands and save money.
Location on the site
Before you move on to building a greenhouse, you need to decide on its location. Especially if it is stationary and not portable. The choice of location determines the size, shape, and amount of material consumed.
When choosing an area for a greenhouse, you need to consider the following:
- Pre-level the area. The structure cannot be installed on a slope. When there are stumps, snags and other obstacles, they will need to be removed before constructing the greenhouse.
- Crops need sunlight. Therefore, you cannot build a warm shelter in the shade. This will adversely affect the development of seedlings and further fruiting.
- Agrotechnical work will need to be carried out in the greenhouse. Therefore, it is necessary that it is easy to reach with equipment so that it opens easily.
- It is recommended to build the structure from east to west. Thanks to this, the plants will receive maximum sunlight. When it is necessary that this occurs only in the morning and evening, the structures must be installed in a north-south direction. This will provide protection from the midday sun.
- If you plan to constantly grow tomatoes or cucumbers in a greenhouse, it is recommended to install another one nearby. This is due to the fact that these crops need to be replanted annually in a new location. Thanks to the presence of a second greenhouse, crops can be swapped every year. When there is no space for so many structures, you can create mini versions of them.
Helpful information! It is best to start construction in mid-spring. There is no more snow, and the plants have not yet had time to reach full growth. You can, of course, build greenhouses any time you want, except in winter (the work will be complicated by severe cold and frozen soil).
Greenhouse for home
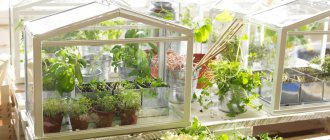
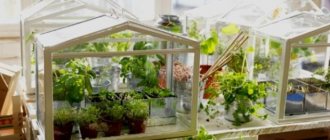
It would seem that in order to grow seedlings of ordinary vegetable crops at home, apart from boxes and pots, no additional shelter is needed. But this is the case if the optimal level of humidity is maintained in the house, and in winter in the heated premises of the living rooms the air is a little “dry” for tender shoots. Two more mandatory conditions for normal growth are good lighting and the absence of drafts. In winter and early spring, if you do not use phytolights, there is a lot of natural light only near the window (on a table, shelf or windowsill), but when ventilating the room, drafts are inevitable. And in order to create normal conditions, it is better to use a home greenhouse, in which plants are grown not on the ground, but in boxes and pots.
Previously, home craftsmen themselves made mini greenhouses for their homes. Now this possibility cannot be ruled out, but there are many ready-made models on sale to suit every taste and budget.
If desired, such a greenhouse can be installed on the veranda or terrace Source akitasmexico.com
And you won’t have to go far for fertilizers Source marzevit.co.il
Types of greenhouses
The most reliable and convenient types of greenhouses that you can make yourself:
| Photo | Design |
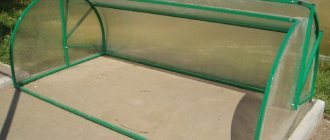
| Breadbox . It opens like a bread box, hence the name. It is convenient because the lid does not fall and does not need supports. | |
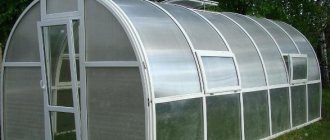
| Arched . A simple and budget-friendly greenhouse scheme. The arcs are stuck into the ground and covered with film or spunbond. Easy to assemble and disassemble without special skills. For manufacturing, you can use pipes after bending. | |
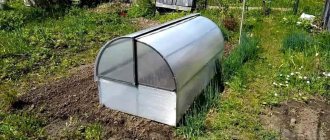
| Thermos . The greenhouse is dug into the ground. There is only a cover on the surface for access to the plants and ventilation. Thanks to this, heat is better retained inside. | |
| Butterfly . Arch or house shapes. A special feature is that the two doors hinge outward, reminiscent of wings. Access is provided from both sides. Doors can be made of polycarbonate. | |
| House (gable) . The boards are connected at the ridge. Covered with film or covering material. This type is quick and easy to install, can be portable, but is not very stable. Therefore, it is most often used as a temporary shelter. | |
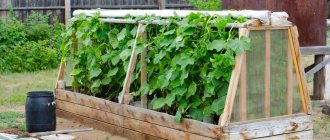
| Single-pitch . The design resembles a chest with a flat lid. To ventilate, props are placed under the roof. |
The listed varieties can be upgraded by adding additional elements.
The most important thing is to think through the entire scheme step by step.
Helpful information! You can find a lot of old things in the attic and barn that are perfect for creating a greenhouse. For example, window frames, old beds, drywall, polypropylene or aluminum profiles, etc. You just need to use your imagination to figure out how to make them a shelter for plants without investing money in it.
Let's look at the most popular materials for frames and shelters. And also, below are step-by-step instructions on how to make a greenhouse with your own hands from various materials.
Estimated estimate for greenhouse construction
| Cement Grade 400 | 50 kg bag | 200 - 300 rub. |
| sand | 50kg bag | 60 - 95 rub. |
| crushed stone | 1 ton | 560 rub. |
| fittings | 1 meter | From 24 rub. |
| brick | 1 PC. | From 8 rub. |
| glass structures | Depending on the project | |
| Wooden beams | 1 meter | From 50 rub. |
| Metal tiles | 1 m2 | From 316 rub. |
| Ceiling insulation | 8 slabs 0.288 m3 | From 278 rub. |
| Door | 1 PC. | 60,000 rub. |
When building this type of greenhouse with your own hands, you must carefully calculate the amount of materials used.
Frames for greenhouses
When making a greenhouse frame, you can use different materials:
- Metal . Durable and strong, but heavy. To build a greenhouse from reinforcement, special tools are needed (to weld metal parts). The material is susceptible to rust, but this can be corrected by galvanizing it. If the structure falls (for example, from corrugated pipes), it will crush the plants.
- Wood , PVC, chipboard. It is easy to create such a structure; you only need basic construction skills. Wooden structures made from timber must be coated with special compounds to prevent beetles from infesting them.
- Plastic, propylene . Lightweight and durable. It bends well and can be used to create structures of various shapes. If a plastic greenhouse falls on crops, nothing will happen to them. The disadvantage is that it cannot withstand the load, bends and cracks.
Attention! To create a greenhouse, you will additionally need furniture corners, screws, clamps, etc. You can also make doors with handles.
Greenhouse made of wooden planks: step-by-step instructions
In this case, the frame will be wood, and the covering material will be film.
| Photos of the process | Explanations |
| When preparing the boards, it is better to treat them with an antiseptic in advance so that they do not rot and last longer. | |
| We assemble the base, fastening the boards with screws and corners around the perimeter. | |
| We mark the distance at which we will place the pegs. It depends on the length of the greenhouse. Usually after 40-70 cm. | |
| We hammer stakes, 5x5 cm, 50 cm long, into the ground with a mallet to a depth of at least 10 cm. | |
| We also attach them to the base using self-tapping screws. | |
| We take planks measuring 5x2 cm, with a length equal to the distance between the opposite bars. We secure them. | |
| We stretch the ropes between the slats so that the film does not fall through. |
Next, we will look at the materials that can be used to cover greenhouses and how to do it.
The nuances of the differences between a greenhouse and a greenhouse
If we consider only the design, and not the technical equipment, then a greenhouse differs from a greenhouse in size and method of arrangement.
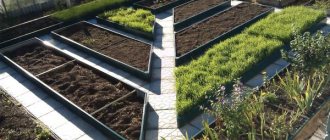
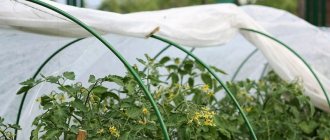
An ordinary greenhouse literally “spreads” above the ground and has a temporary frame of separate sections without a base, which is installed directly on the ground. Its task is to ensure the growth of greens, vegetables and root crops in the spring, when the probability of night frosts is high. More often the frame is covered with film, less often with sheet transparent materials. Maintenance of the greenhouse and care of seedlings occurs “from above” with the covering partially removed. When stable warmth arrives, the greenhouse is dismantled until the next season, and the plants remain in the open ground.
A conventional greenhouse has a more solid design. It may have a small foundation and a stationary place assigned to it on the site. The dimensions of the greenhouse in length and width can be any; the shape and type of the roof also differ for different models, but at the highest point its height should ensure free movement of a person. The most “advanced” samples can have their own heating, lighting, ventilation and irrigation systems, with automatic temperature control and regulation, a timer for turning on the fan, lamps and automatic watering.
The difference between a greenhouse (left) and a greenhouse (right) Source ogorod.radiomoon.ru
The mini greenhouse occupies an “intermediate place”. It is also low and compact, like a greenhouse, and is served “from above” or “from the side”. The translucent material can be film, cellular polycarbonate or glass. Its design is more rigid, although even when assembled it is “mobile” and can be easily moved.
The differences from a greenhouse in the simplest models for a summer house and plot are so insignificant that many manufacturers and sellers call this category a “mini-greenhouse greenhouse.”
A technically equipped mini greenhouse can have its own “life support” systems, including growing plants using hydroponics and aeroponics technology.
Materials for greenhouses
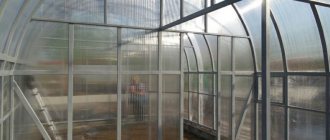
The best greenhouse designs are made from polycarbonate, double-glazed windows and low-density polyethylene (HDPE). They are inexpensive and can even be lying around somewhere in the barn (for example, window frames). Let's consider the characteristics of the materials:
| Options | Polycarbonate | Glass | Film (HDPE) |
| Installation complexity and weight | Lightweight, self-supporting material. When choosing it, you can reduce the number of frame parts without creating a foundation. | It is a heavy material that requires a strong frame and base. | The lightest material presented. It can even be carried away by the wind, so it needs to be attached to the frame. |
| Operational period | It has a long service life of 20-25 years. Manufacturers usually give it a 10-year warranty. The material itself is an element of the supporting structure. After installation, it does not deform or warp. | It will last a long time if it is protected from hail, snow, etc. Such a greenhouse can be placed under a canopy. | It has a short service life (maximum 2-3 years). Polyethylene deteriorates when exposed to sunlight. |
| Soundproofing | It has a honeycomb structure. This muffles wind noise. | If a glass greenhouse is poorly installed, a draft will penetrate inside and the glass will ring and rattle. | Virtually no noise reduction. In strong winds the film begins to rustle a lot. |
| Aesthetics | Looks very modern and attractive. To some extent, it can even become the decor of the site. | When installed well, it looks very aesthetically pleasing. | It looks aesthetically pleasing only at first, then it begins to deteriorate and fade under the sun. |
| Safety | Does not break or crack when dropped or hit. Stronger, but at the same time lighter than glass. | If the glass breaks, it can cause injury. Therefore, during installation work, it is recommended to take care of safety equipment (rubber gloves, thick shoes, etc.). | Completely safe. |
| Care | The accumulated dust is almost invisible. If desired, it can be washed off with plain water from a hose. | After rain, cloudy stains may remain on the surface. They can only be eliminated by using special detergents. | When dirty, this material cannot be washed, because... There will be stains on it that prevent the penetration of sunlight. |
| Microclimate inside | It prevents heat loss, which creates a greenhouse effect. The resulting condensate flows down the walls without getting on the plants. It transmits and diffuses light well. | Retains heat worse than polycarbonate. It transmits rays well, but does not scatter them. If the glass is of poor quality, it can work as a magnifying glass, which is detrimental to crops, because sunburn will appear. | The new material retains heat well and allows the sun to pass through. However, the very next season it becomes thinner and cloudier. |
Spunbond is also often used. This is a breathable covering material. It allows oxygen and necessary moisture to pass through well. At the same time, it does not get wet and does not release heat. Cuts with scissors and can be washed.
Spunbond
Previously, we already looked at frames for greenhouses, and now let's see how to attach the materials that we talked about in the table.
Polycarbonate greenhouse: step-by-step instructions on how to attach the material to different frames
Let's look at fastening polycarbonate to various structures.
Read a great article about building a polycarbonate greenhouse.
Fastening polycarbonate to a metal frame
The metal frame must consist of rafters and purlins. It does not have any protrusions, so attaching the canvas to it will not be difficult. The distance between the rafters should be equal to the width of the polycarbonate sheets.
Step-by-step process for attaching cellular polycarbonate to a metal structure using profiles (click on the picture on the left to enlarge it):
| Materials and diagrams | Instructions |
| Self-adhesive rubber gaskets are placed on the metal beams. If you have a small greenhouse, you don't need to use them. | |
| They take special profiles for polycarbonate and attach them to the metal grill with self-tapping screws and thermal washers. | |
| Polycarbonate sheets protect against moisture, insects, and dirt getting into the cells using a sealing film that is glued to the ends. Perforated at the bottom, sealed at the top. | |
| The sheets are then inserted into the profiles and snapped into place. |
Don't forget to remove the protective film from the polycarbonate.
Fastening polycarbonate to plastic or wooden structures
We make the design as described above. Then we cut polycarbonate sheets according to the dimensions of the distances between the beams.
Important: Cellular polycarbonate is cut with a sharp knife or circular saw. It must be strictly secured at the workplace. These are necessary conditions to avoid denting the stiffeners.
We glue the ends of the sheets with a special tape for protection.
Next, we attach the sheets to the structure:
| Photo | Process |
| The sheets are placed on the structure so that it extends beyond the frame by about 3 cm. Holes for fasteners are drilled with an electric drill. | |
| Washers are placed on the resulting holes, then thermal washers. All this is tightened with a self-tapping screw using a screwdriver. |
The fastening pitch depends on the thickness of the polycarbonate (it is better to use 6-8 mm) and the size of the cut sheet. It is approximately 30-50 cm and lags behind the edge by at least 5 cm.
Pit and foundation
The foundation must be solid and support a fairly solid structure.
- First you will need to prepare wooden panels for pouring cement and dig trenches for the foundation.
- Install the shields and evenly arrange the wire or reinforcement.
- Strengthen the corners with reinforcement of a larger diameter.
- Next, a cement mortar is prepared at a ratio of 1:3, i.e. one part cement and three parts sand. The cement chosen is M 400 or M 500. To ensure a strong foundation, it is better to pour it in the fall. It is better to start the main construction work in the spring.
Article on the topic: Black and white wallpaper for the kitchen: how to choose, what to combine with in the interior, types, wide format, photos, design tips
Greenhouse made from window frames: step-by-step instructions
| Illustration | Description |
| Treat wooden blocks with antiseptic or mastic to protect against insects and rot. | |
| At the marked place for the greenhouse, we lay out a brick foundation on a concrete mortar (you don’t have to do this, but just make a backfill of crushed stone. | |
| From processed wooden blocks according to the size of our frames we assemble a frame for a greenhouse. We place the resulting structure on a foundation made of powder or masonry. | |
| We insert window frames onto the wooden structure. We connect them with loops and screws. We attach a handle to the edge of the frame, located closer to the bottom, to lift the frames, if there were none initially. |
What do you plan to grow in the warm weather?
Based on what crops are supposed to be grown and in what quantities, you should understand what size the greenhouse should be.
After all, greenhouses are divided into two types according to the mobility of the structure:
- Portable
- Stationary
This is a matter of taste, but installing a temporary greenhouse or building a portable one is much easier.
Once it has been possible to determine the planting area, as well as the expected height of the crops, we can judge the future dimensions. When this issue is resolved, it is worth considering the next point.
Attaching film to different types of frames
We already know that frames can be different. Let's look at how to attach film to various materials.
Wooden frame
Attaching the film to a wooden frame is carried out in the following ways:
| Illustration | Methods |
| You can use a stapler, but to reduce the breakthrough of the film, it is worth making a gasket, for example, cutting a tape from old linoleum or from any other strong material. It is better to use reinforced film so that it will last longer even if it is pierced with nails during fastening. | |
| You can secure the film using a strip nailed at the ends. The first method involves fastening the film, that is, piercing it, on the sides and on the roof. With the help of slats, we fasten only from the ends. |
If the film is not reinforced, it is more susceptible to breaks at the attachment points. The rack (second) method reduces cases of film damage.
Metal and PVC pipes
To secure the film to plastic pipes, special clamps are required. They can be purchased in special stores, they are not expensive.
You can make the clamps yourself. Plastic tubes are cut and the side of the same plastic tubes is cut out. To avoid tearing the film, the edges of the homemade clamps are ground off.
If metal clips are used, a gasket made of any material is placed under them so that when heated in the sun it does not spoil the film.
Office clips are used for fastening on narrow frames.
How to assemble a triangular greenhouse
This greenhouse can also be made independently, although its construction takes more effort. Here you should follow the following scenario:
First of all, you need to make a wooden frame of the required size. Afterwards, you should place it on the surface, pressing it tightly to the ground (if there are gaps between the ground and the board, then it is better to fill these gaps with earth). Next, wooden pins are driven into the ground to a depth of 30-40 centimeters. After that, the wooden pins must be connected together with the frame using nails or self-tapping screws.
The next step is preparing the bed itself. Next, two inclined boards are fastened at the top, forming a triangle. To ensure that the structure is reliable and durable, the tops are fastened together with a long wooden beam or pipe along the entire length of the future greenhouse.
The remaining boards are added around the entire perimeter. In this case, it is most convenient to make fasteners using self-tapping screws.
Finally, the film is stretched or polycarbonate is installed:
- If we are talking about film, then it is attached using double-sided tape, as well as screws or staples (in this case, you should use a gasket between the fasteners and the film itself so that it does not tear too quickly).
- In the case of polycarbonate, self-tapping screws should be used. In this case, it is advisable to use a standard roofing screw.
It should be borne in mind that the polycarbonate sheet on one side has UV protection, which must be placed on the outside. As a rule, a shipping film with appropriate markings is glued to the side with a protective coating.
In the case of polycarbonate, you should think about the door that will open. Or you can provide for the possibility of harmlessly dismantling the sheets in order to ventilate the bed or gain access to it. In this case, you can install tight-fitting hooks and clamps on the walls so that you can remove the “door” without consequences.