Why are tomatoes tied up?
Tying up tomato bushes is carried out in order to prevent the stem from breaking due to the heavy fruits that form on the plant. If you do not tie it up, then after the fruits form and grow, the stem will bend and, if it does not break, it will begin to creep along the ground. In such a situation, plants are easily damaged by slugs and other ground-based pests, as well as fungal diseases.
Benefits of proper garter
The following are the benefits that a gardener receives from tying up bushes:
- easier to care for plants;
- when watering there is no risk of water getting on the surface of the leaves, which prevents rotting of the bushes;
- it is much more convenient to form and carry out pinching on tied bushes;
- upright bushes receive more light, which helps the fruits ripen faster;
- free access of air reduces the risk of fungal diseases, in particular late blight.
How to form a bush
All varieties of tomatoes are formed by the formation of lateral shoots. The taller the plant, the more shoots there should be. However, an excessive number of shoots reduces the yield.
The procedure is simple: with hands dipped in a weak solution of potassium permanganate, pinch off excess shoots at a distance of 1-2 centimeters from the trunk.
The shoots need to be pinched. The optimal time for the procedure is morning.
Tying and pinching are fairly simple procedures that can be assigned to any family member.
When to tie up tomatoes
The first garter for tall varieties is done 3-5 days after planting the seedlings. In the future, this event is carried out regularly as the bushes grow. Although some gardeners recommend that the first tying be carried out only after the seedlings have taken root well and form 2-3 new leaves in a permanent place of growth.
What to do before gartering
Before starting to garter the bushes, the tomatoes are pinched. This event increases crop productivity. If you do not remove the side shoots that form in the axils of the leaves, then you may not wait for fruiting, since the plant will begin to form only stems with flowers.
Reference. Stepchildren are carried out once every 10-12 days, not allowing the stepsons to grow more than 5 cm.
Decide in advance on the method of tying the bushes, prepare all the materials necessary for this. If fabric, elastic bands or other garter devices are used for a second season, they must first be washed and disinfected.
Deadlines
Gartering begins when 8-10 true leaves appear and the stem in its lower part reaches a diameter of 1 cm. The timing of tying depends on the early maturity of the varieties.
The timing of the first garter depending on the early maturity group:
- early - 35-40 days after planting in the ground;
- medium - for 50-60 days;
- late - on the 70-80th day.
The number of subsequent garters will depend on the size of the bush and how quickly and vigorously it will grow. If the bush is low-growing and compact, one garter may be enough, and some varieties do without it at all.
Devices and materials for garters
To securely fix the plants, supports and garter material are used. Long wooden stakes or metal rods are used as supports. As for the material for tying, soft fabric or elastic but durable material is suitable.
There is a special device for gartering, which in appearance resembles a combination of garden pruning shears and a stapler, which is equipped with adhesive tape and a cutter. Using such a device, it is much easier to fix the branches of a tomato bush to a support. The plant is not injured in this case.
A simple and inexpensive option is plastic clips that fasten with one click . The devices are reliable and can withstand any weight. They can be used for many years in a row. For fixing plants, you can select clips of a suitable size for stems and branches with fruits.
Reference. You cannot use thin thread, fishing line or other hard materials to secure the stems of the plant, as they can injure the stem or even break it.
Mistakes when tying tomatoes
Many gardeners, without delving into the peculiarities of tomato agricultural technology, make mistakes when gartering them. As a result, the bushes suffer, yields drop, and the taste of the fruit deteriorates.
Typical mistakes when gartering tomatoes:
- The bushes are tied with inappropriate material . Too hard materials cause damage to the stem and shoots. Plants begin to wither and eventually die.
- They use last year's garters and do not disinfect them. As a result, young plants can be affected by pathogenic microbes.
- They tie the ropes lower than necessary, and do not change the garter as the bushes grow . When growing tall varieties, a one-time garter is not enough; it has to be repeated several times during the growing season.
- Install supports that do not correspond to the characteristics of the variety . So, for example, there is no point in tying a tall tomato to a low support, and vice versa.
- Wrap the stems and branches with tape/duct tape . This material secures branches only if they are wrapped tightly. But then the stem and shoots are deprived of the opportunity to grow in thickness. As a result, plant nutrition deteriorates and their productivity decreases.
The garter, for all its simplicity, can significantly affect the tomato yield. When choosing a method for gartering tomatoes, take into account the characteristics of the variety, method of cultivation, financial aspect and other circumstances.
0
0
Copy link
Effective ways to tie tomatoes
When choosing a method for tying bushes, focus on the characteristics of a particular variety, the weight of the fruit, and the height of the bush. It is necessary to decide on the scheme and type of attachment of plants to the support even before planting the seedlings.
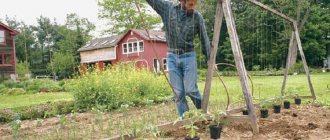
The easiest way to tie tomatoes is with stakes.
Simple stakes are used as support, which are installed near the plants. The height of the support approximately corresponds to the height of an adult plant.
This method is suitable for tomato varieties with medium-sized fruits and for bushes of medium height. Tall or heavy plants may fall along with the installed support to which they are tied.
Wire hook method
One of the most ancient methods. The author of this technology is I. Maslov. To create structures, you will need a strong thread or fishing line, on which small loops are made at intervals of 15-20 cm. This fishing line is attached to the ceiling of the greenhouse near each bush.
Using wire hooks or open paper clips and rubber bands, attach the tomato stems to the looped fishing line. They grab it with an elastic band under the branch of the bush and hook it to the nearest loop.
The convenience of this method is that as the plant grows, it is enough to simply add new hooks and secure the stem. This design is capable of holding even the heaviest bunches. Due to the elasticity of the elastic band, they will lean slightly toward the ground, but will not fall or break.
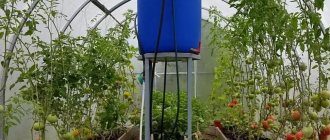
Horizontal garter method
Horizontal fastening (on a trellis) is used for tall plant varieties. Install strong metal posts along the edges of the greenhouse, after which the rope is pulled, maintaining an interval of 30 cm. The structure should look like a strong mesh.
Plastic clips are used to attach to the trellis or all plants are threaded through a rope mesh. You can replace the rope structure with ready-made trellises made of wooden or plastic material (slats).
Reference. When constructing a trellis, it is important to take care of its reliability so that it does not fall under the weight of the fruit.
Using a Grid
A metal or plastic mesh is used as a support, which is attached between the posts of the greenhouse frame. The most convenient to use is considered to be a coarse mesh. On it you can place the stems and branches of plant bushes in accordance with the direction of their growth.
As the plant develops, you can change the place of tying and secure it at a different, more convenient level.
SUPER WAY FOR TIING TOMATOES! Easy and fast!!!
Arranging a trellis - for tall varieties of tomatoes
Another type of trellis is vertical, in which plants are tied to the roof of the greenhouse. To do this, use a rope, one end of which is fixed to the ceiling of the greenhouse, and the other to the stem of a tall tomato bush. Using this method, you can tie up even the heaviest bunches of plants without fear that the support will break or fall.
Reference. To prevent injury to the branches and stems of bushes, the support rope should be chosen wide, soft and durable.
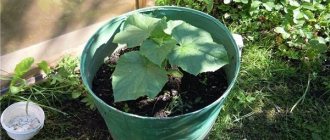
The use of bush holders when growing tomatoes
The use of bush holders, or in other words, a wire frame, is suitable for varieties that form compact bushes with a large number of fruits.
The design uses a mesh with large cells, which is wrapped around the plants in the shape of a cylinder and dug into the ground. With the help of a bush holder you can secure both the main stem and heavy branches with large fruits. At any time, the device can be dug up and moved to another site. The only disadvantage of this tying method is the difficulty of harvesting.
How to tie up plants: basic rules and requirements
Each summer resident has his own tricks for growing tomato bushes. But there are general rules that must be followed.
Classic
It is important not only to fix the stems of the bushes, but also to tie up the clusters with heavy ripening fruits. Deformation of the stems should not be allowed, so the bush is tied to a support before it bends to the ground.
Expert opinion
Stanislav Pavlovich
Gardener with 17 years of experience and our expert
Ask a Question
Special devices in the form of support arcs or trellis nets significantly simplify the process of tying up stems. The clip is an original plastic element that acts as a free loop.
Garter
Soft materials that cannot damage or cut the stem are used as garters. Budget options are twine, jute rope or strips of waste textiles (do not use elastic fabric).
You can buy a specialized tool - a stapler, which will combine the stem and support in a second. The device is easy to adjust so that the tape does not tightly wrap around the stem, but the effect of a free loop is preserved.
Special recommendations for tying tomatoes in a polycarbonate greenhouse
What is the best way to tie tomatoes in a polycarbonate greenhouse?
Despite the fact that the trellis fastening method is considered the most labor-intensive and complex, it is recommended to use it in polycarbonate greenhouses. Polycarbonate is characterized by good light transmission and quickly accumulates heat.
The maximum amount of light is provided to the plants and “heat stroke” is prevented by allowing the branches to be arranged evenly and spaciously on the trellis.
DIY flower trellises
By and large, there will be no difficulties in making them, especially if the dacha has a standard tool for making them, simple materials and a little skill.
You will need a hammer, pliers, a hacksaw, nails or bolts with nuts, a hacksaw or grinder, in more difficult cases, and a welding machine. From materials we will determine wooden bars, mounting strips or their like, steel wire, metal fittings, PVC pipes.
Naturally, we could have forgotten something, but we will definitely notice this in the sequential description of the creation.
So, let's look at several types of trellises for flowers in the garden.
Trellis can be divided not only by type of production materials, but also by direction and purpose
DIY clematis trellises
Everyone knows what clematis is, which means we will not go into detail and describe this plant, we will only say one thing - for its high-quality, beautiful and original cultivation, a trellis is needed. At least, it will be easier to decorate a garden using clematis, organize a hedge, braid a gazebo, and so on.
First of all, we select wooden blocks for the base of the trellis, which, say, will be installed along the fence of a summer cottage
Whether it’s an ordinary fence or an expensive stone hedge is not particularly important, the main thing is that we partially decorate it
Having chosen the bars for the base, we make the correct markings on them..
here you don’t have to pay much attention to accuracy, because if the trellis is 1-2 cm higher or lower, it won’t play any role. And it is worth paying attention to the fact that the bases of this element must be well fixed, that is, dug in, which means that we add 40-50 cm to the required size, which will go into the ground
In total, if we are going to install trellises under clematis 160 cm high, then we will need a beam of 200-210 cm. These are bases, the distance between which will be about one and a half meters. It is this distance that we need to sew up with a mounting strip. This can be done figuratively (diamonds or irregular geometric shapes) or standardly, so to speak, in a checkered pattern. This is where a hacksaw, hammer and nails come in handy.
Trellis can be made on the ground by finding a solid base and knocking it together, or at the installation site, driving the bases into the ground, and only then proceeding to sew the inside of the trellis.
After installing it next to the planted plants, it is advisable to treat the trellis with special protective agents.
We create trellises for clematis with our own hands
DIY rose trellis
Now that we have looked at how you can make a wooden trellis with your own hands, we will choose a different material, because the plant will be more noble. Now we are creating not just a frame for flowers, but a kind of structure that can fit even into small architectural forms.
So, a DIY garden trellis and roses that will climb along it. Here we would immediately like to recall the material that we offered you some time ago, when we described in detail the creation of a greenhouse from pipes. Today we have a similar project, and to build a trellis for roses in the garden, we also want to use reinforcement and plastic pipes.
Initially, we take measurements and mark out the material, then we make sure to add the length to each element, because a certain part will be attached by burying it in the ground. Now that the dimensions have been taken, you have determined the bend of the trellis and inserted the reinforcement into the pipes, you can bend them in such a way as to obtain the element we need. To create a trellis, you will need at least two of them.
Having installed our curved elements of the trellis (base), in the required place, parallel and strictly according to plan, we make horizontal jumpers, so to speak, stiffening ribs, which will increase stability and become special “rose holders”. You can see what we got in the photos below.
Trellis for roses: complex but reliable design
Are the methods of gartering different in open ground?
If low-growing varieties are grown in open ground, then in many cases there is no need to tie up the plants . However, if the bushes produce a large number of fruits that are heavy in weight, then the stems and branches of the plant will still have to be fixed.
To do this, choose any of the above methods of tying in a greenhouse. But not all of them are convenient to use in open ground conditions. The trellis method, both horizontal and vertical, will be very problematic to apply in a garden bed.
Gardeners use the simplest method with stakes or construct bush holders. When tying tomatoes in open ground, choose a reliable structure, since strong winds can knock down the support and the plant. When constructing a cylinder of mesh with large cells around each tomato bush, it is recommended to dig it a little deeper than in a greenhouse. This will give the structure reliability and stability.
Despite the fact that constructing a wire frame for each plant is costly and time-consuming, and it will be more difficult to collect fruits from the bushes, it should be preferred if there are frequent, strong and gusty winds in the region where the crop is grown.
How to grow different vegetables in one greenhouse
A greenhouse is a rather expensive structure. Why not grow different vegetables in it? Let's take a closer look at how to do this correctly.
Tomatoes are native to South America, where the climate is mild with abundant but infrequent rain. They bear fruit at a temperature of 20-25 degrees and do not like heat.
Cucumber once grew in the wild of India, where it is hot and humid, it, on the contrary, likes frequent watering at high temperatures (above 25).
Tomatoes need frequent ventilation, cucumbers do not. They also have different soil moisture requirements. What should I do?
It is possible to grow tomatoes and cucumbers in one greenhouse, but they must be divided into three parts:
- northern cool - plant with cucumbers,
- central - the most ventilated, under the windows, allocate to tomatoes,
- offer southern, sunny and hot flavors to sweet peppers.
It is necessary to note the fact that one crop in the greenhouse feels better, ideal conditions can be created for it, but in the event of a compromise, everyone loses a little.
Secrets of experienced gardeners for gartering tomatoes
When starting to plant tomatoes, study the recommendations of experienced gardeners:
- you should not tie the stems to the supports using a figure eight knot, as this increases the risk of damaging the plants;
- tie up not only the main stem, but also individual branches with bunches of tomatoes - this will protect them from falling to the ground;
- use staking only when growing medium-sized crop varieties;
- It is better to attach tall tomatoes to a trellis;
- To prevent the occurrence of late blight and other fungal diseases, fruits should not be allowed to come into contact with each other or with the soil.
What devices can be used
Fishing line, too thin rope, wire or other hard materials can injure plants, creating conditions for infection to easily penetrate their tissues. As the fruit clusters become heavier and the load increases, they can even cut the shoots. It is better to tie tomatoes using the materials indicated in the table below.
| Device | Features of choice | Application technology |
| Twine (twine) for gartering tomatoes | It is used for hanging or indeterminate varieties of tomatoes on a wire mesh or vertical trellis. It is better to choose hemp or cotton ropes, since linen and polypropylene materials are not as durable. | The bushes are tied to one knot and the stem is loosely attached, so as not to disturb the flow of sap to the leaves and ripening tomatoes. |
| Clothespins (tucks) on springs or metal rings | This option is ideal for beginners because it does not require any experience or special gardening equipment. | Using clothespins, you can tie tomato stems in a greenhouse to any surface, including horizontal slats, the side walls of the building, twine hanging from the ceiling, and more stable neighboring plants. |
| Metal rods | It is recommended for use only by experienced gardeners, as there is a risk of damaging plant roots. | Before use, the rods are cleaned of “burrs”, the loose soil is compacted by hand or mixed with loam. Afterwards, the metal structures are buried in the ground to a depth of at least 30-40 cm. |
Reviews from gardeners
Let's find out what experienced gardeners say about tying.
Galina, 38 years old, Ufa: “I really love tomatoes, I’ve been growing them for a long time and take photos for my website. As for the garter, it is better to prepare everything for this event literally immediately after planting the seedlings. I always use a trellis from which I attach twine to each bush.”
Snezhana, 45 years old, Perm: “If a tall variety of tomatoes is planted, then you need to tie it up right away. When planting, it does not matter whether it is an individual support or a rope that is tied to the roof of the greenhouse. The main thing is that the plants are fixed. I can’t do without stakes in my garden.”
Growing raspberries on trellises
For abundant fruiting of raspberry bushes, the soil should be properly prepared before planting.
The easiest way is to plant all the raspberry bushes in one row. This form will make it easy to care for the plantings and ensure quick harvesting. First of all, a trench is dug, up to half a meter wide. Then, at the site of future planting, you need to loosen the soil with a pitchfork. A kind of groove is formed into which you need to pour about 10 liters of water per 1 m of length. You also need to thoroughly mix about a liter of wood ash with the ground at a distance of 1 m, and also distribute 200 g of complex fertilizer.
Raspberry seedlings need to be laid out at a large distance of at least 25 cm.
The root system must be properly straightened; bends or creases are unacceptable. The roots are sprinkled with some soil, watered generously and compacted well. The soil should settle, adhering well to the roots and filling all the voids.
After planting, the roots of the plants are sprinkled with the remaining soil. If planting occurs in early spring, then it is advisable to cut all seedlings approximately 20-30 cm from the ground. A layer of mulch about 15 cm thick is placed on the bed. The width of the seedlings should be at least 40 cm on both sides. It is advisable to increase the mulch layer during the summer.
All branches can be tied to trellises or clamped with wires. How to make a raspberry trellis with your own hands? The trellises are placed at a short distance from each other; you can make a continuous support by digging the pillars into the ground at a certain distance. You can use metal, otherwise a wooden base is perfect. The wood is impregnated with varnish; you can use special oil.
The ends of the bars that will be placed in the ground need to be tarred. The diameter of the pillars must be at least 15 cm and the length about 2 m. A drill or shovel is used to install the supports. In the second case, the supports may not be stable, so you need to firmly fix the ground after installing them. Trellis should be located along the entire length of the plantings.
Wire is stretched between the trellis posts; three rows can be made with a distance of about half a meter. All raspberry stems will be secured with rows of wire. Parallel rows need to be interconnected every half meter so that the raspberry bushes do not bunch up in small heaps. Each small group or individual bush will be securely fixed on all sides. It is necessary to periodically monitor the direction of growth of each shoot.
You need to care for raspberries after the fruits appear. Periodic watering, loosening the soil, adding fertilizing and timely weeding are necessary. If the soil around the raspberries is properly mulched, then caring for the bushes will be easy.
In spring you need to feed the bushes with a full range of fertilizers. It is advisable to use them before all the snow melts, in order to help. They were better absorbed by the resulting water.
When berries appear on the plants, you need to carry out a second feeding. The third occurs in the fall. You should not add nitrogen to it. You can limit yourself exclusively to a phosphorus-potassium mixture. The dose of fertilizers should not be exceeded, since they do not lead to an increase in yield, but only to an increase in the green mass of the plant.
Pest and disease control should begin in early spring. You should carefully inspect all bushes for damage to the leaves that could be caused by callitsa or agrilus. Damaged stems with leaves should be cut off and burned. The bushes and soil are treated with 4% Bordeaux mixture, which is necessary to prevent fungal diseases. Insecticides help against pests.
Raspberries need to be pruned in a timely manner. Only the strongest, most complete stems are left, the rest can be removed. Proper care of raspberries, timely tying of stems to trellises or timely formation of shoots using wire will help to reap a large harvest.
Photo of a trellis for raspberries.
Dry stream made of stones. Photos and article about it here.
And this article talks about building a pergola with your own hands.
Tips and tricks for gardeners
- It is better to buy seeds of varieties and hybrids that have immune protection and disease resistance;
- trellises of different types make it easier to care for tomatoes, provide access to air and sunlight, since ultraviolet radiation kills infections and pathogens;
- tomatoes love hot weather and sun, so trellises and supports are placed in the direction from north to south, the sun will heat the bushes all day.
- Wide passages should be left between the supports to increase the feeding area and ease of care and harvesting;
- the condition of the trellises must be monitored by covering them with antiseptics and removing them, if possible, for the winter to extend their useful life;
- You should also tear off the lower leaves of tomato plants; in contact with the ground, they can be affected by diseases. To prevent the infection from spreading, they must be removed.
It is necessary to pick off the lower leaves of tomato plants
Although you can buy almost any kind of tomatoes in supermarkets and markets, many gardeners prefer to grow these nightshades themselves, investing their own energy. In constant search for improved methods of cultivation, more advanced devices (for example, trellises), they put a lot of effort into obtaining a decent harvest. This is why homemade tomatoes taste so much better.
0 0 votes
Article rating
What is a trellis?
The word “trellis” is of Italian origin and one of its meanings is “shoulder”. A shoulder to lean on. A trellis is any structure that will support a plant and give it the necessary shape. In fact, a store-bought decorative lattice is also a trellis. But buying one for every tomato bush will ruin you!
The trellis method involves creating a collective (for all bushes in a row) trellis and then fixing the plants on this structure. The grate is usually wooden or made of wire.
Some people confuse the trellis method and the vertical garter method. Meanwhile, the difference is significant: in the first case there is collective support, in the second it is individual.
Benefits of a Garter
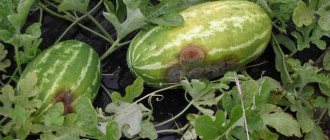
It is better to tie up even low-growing varieties of tomatoes - the fruits, if they are quite large, or the fruits in the cluster, under their weight in a ripe state, gradually bend to the ground and lie on it. But the ground under the bushes needs to be watered regularly when there is no rain for a long time, and if the rains are frequent, the soil may be excessively waterlogged. Due to excess moisture, tomato fruits are more often affected by late blight, blackleg, and begin to rot. And the ripening will be uneven - the side of the tomato facing the sun will sing, but its other side, lying on the ground, will remain unripe and may begin to turn black and rot.
- the garter makes watering easier - the bushes do not like moisture getting on them;
- makes maintenance easier - it’s convenient to quickly and accurately loosen the soil and apply fertilizers;
- Provides ventilation and drying of bushes after heavy rains;
- uniform sunlight ensures uniform and rapid ripening of fruits;
- the bushes will not break from strong winds or bend;
- they are easier to spray, so they will hurt less;
- it is convenient and easy to process fixed tomatoes - hilling, mulching, weeding, pinching;
- mice, slugs and other pests will not be able to damage tomato bushes and fruits.
How to make a tomato support
Reviews:
Dmitry Kovalenko
writes: How many triangles are needed for 150 tomato bushes?
Soldier Soldier
writes: so this is where it came from, to fence a garden
Alexey Filippov
writes: How do you pick tomatoes from the top? You won't climb the structure, will you?
P E
writes: There are so many problems for 7 bushes. It’s easier to just tie it to the fittings
kostyaisaru
writes: We are already putting many of your recommendations into practice. Thank you so much for the interesting and useful content on your video channel!