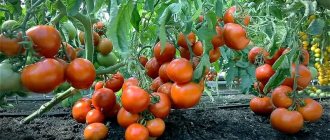
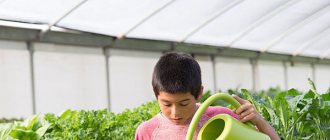
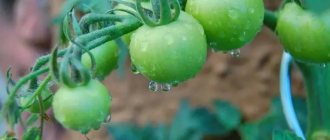
Without tomatoes, the list of self-grown crops would be incomplete. Paired with cucumbers, they have firmly won the minds and hearts of enthusiastic owners of country plots. And believe me, the succulent “seniors” will be happy to generously fill the owners’ diet and supplies with proper care. The harvest will amaze you with abundance, provided that all agrotechnical subtleties are observed. Knowledge of the nuances is extremely important if tomatoes are planted in a polycarbonate greenhouse. After all, the use of plastic covering makes adjustments to the general rules for raising greenhouse pets.
- 2 Standard requirements for tomatoes
- 3 Technology for planting tomatoes in a greenhouse
3.1 Stage #1 – growing seedlings
- 3.2 Stage #1 – greenhouse preparation and planting
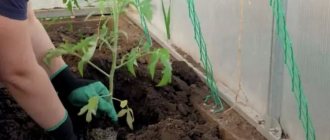
Planting tomato seedlings in a greenhouse
Planting must be done at the right time. This is necessary to obtain strong plants. It is impossible to say the exact time and date, since it depends on the given region and its climatic condition, on the heating of the air at a certain period of the season. You need to prepare a greenhouse, choose the right varieties that need to be planted at one time or another in order to achieve optimal ripening.
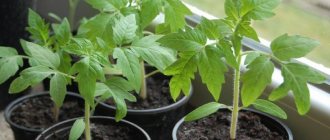
Before deciding that the time has come to plant tomato seedlings, you need to carefully examine them. The sprouts should be:
- Straight with strong, green stems.
- The height of one sprout should be no more than 30-35 cm.
- The age of grown seedlings should be no more than 2 months.
- The foliage should be green.
For planting, you need to choose the best seedlings.
Which varieties are better to choose?
There are early-ripening, mid-ripening and late-ripening varieties. Any one is suitable for a greenhouse. The main thing is that they are all self-pollinating and adapted for closed ground.
Often in such greenhouses there is not very good air circulation, and barren flowers can often be found.
For planting in greenhouses they often use:
- Determinate types of tomatoes , the height of which is about 80-150 cm. With proper care, after 6-8 ovaries, tomatoes devote all their strength to the formation of fruits on the bushes. For example, Rocket, Bely Naliv, Nevsky or Demidov.
- Indeterminate species that grow throughout the growing season. New ovaries, flowers and fruits constantly appear. For example, Cherokee, Wonder of the Earth, Star Gold or Right Size.
Reference. Seeds can be checked for hollowness. They are placed in a 5% solution of table salt and stirred well for 10 minutes. The empty ones will remain floating on the surface, the rest will settle to the bottom.
Below you can watch a video about the most suitable tomato varieties for a greenhouse:
When to do this, optimal timing of transplantation
Proper planting of tomatoes in greenhouses is an important point for a subsequent good harvest. Spring is a good time of year to grow seedlings. It is planted in soil closed from fresh air at the end of April or at the beginning of May. The climate is ideal at this time of year: the frosts have already passed, the weather is warm outside. The soil should be well warmed up by this time.
If the ground temperature at this time is less than +9°, then it is better to wait a few days until the temperature regime is optimal. By this time, tomato sprouts should have at least 8 leaves that are already well developed, and also have about one or more inflorescences. The height should reach 30-35 cm.
Nuances of caring for greenhouse tomatoes
Features of agricultural technology for greenhouse tomatoes:
- prohibition on watering during the first 10 days after planting;
- mandatory ventilation of the greenhouse in hot weather and after each watering with opening of both side and top windows (the crop does not like high air humidity);
- maintaining optimal temperature (22–26ºС) and air humidity (45–60%);
- “help” in pollination (shaking flower brushes on warm sunny days, then immediately spray the soil and flowers with a fine spray bottle);
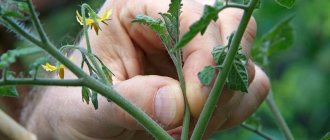
- regular removal of stepchildren, formation of a bush (under optimal conditions, tomatoes grow green mass more actively, plantings thicken to the detriment of the harvest);
Stepchildren take away nutrients from the plant that could be used for fruit ripening, so their removal throughout the active growing season is an absolutely necessary procedure
- application of organomineral and mineral fertilizers containing potassium and phosphorus once every 2–2.5 weeks.
Video: caring for greenhouse tomatoes
The climate in most of Russia is such that greenhouse cultivation for tomatoes, which are originally a southern heat-loving crop, is often the only possible method of cultivation. Shelter allows you to obtain harvests regardless of the vagaries of the weather. Agricultural technology in this case has some features compared to growing tomatoes in open ground. There are nuances in preparing the soil, in the planting scheme, in the timing, and in further care.
- Author: Yulia Golova
27 years old, higher legal education, broad outlook and interest in a variety of topics. Rate this article:
- 5
- 4
- 3
- 2
- 1
(7 votes, average: 4.9 out of 5)
Share with your friends!
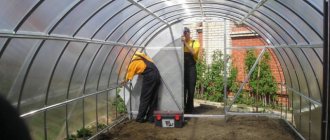
Features of preparing a polycarbonate greenhouse
This type of greenhouse is much better than conventional film. It has a long service life. The polycarbonate material is durable and hermetically stable. Allows you to protect crops from drafts and frost. You can plant seedlings in such a greenhouse earlier than in a film analogue. You just need to provide a reliable heating system.
You can plant tomatoes in a polycarbonate greenhouse 15-16 days after they are sown. But before that, you need to prepare the greenhouse itself. First you need to choose a good place for it. Decide where best to put it.
There should be good lighting there. This will ensure plant growth and good yield. It is ideal to place it on a platform illuminated from all sides, without shadow. But if a shadow falls on one side, then additional lighting can be provided. Proper photosynthesis is the key to a good harvest.
The next step is to choose a watering method. It is preferable to install a large tank with warm water in the greenhouse. It is better to choose drip irrigation, but if this is not the case, then you need to consider a different, optimal type.
Ventilation is also an important component of good yield. If it is not possible to install an automatic ventilation system, then you need to systematically open the windows and let in fresh air.
In a greenhouse, it is important to regulate temperature and ventilation.
It often happens that after planting plants in a greenhouse, frost returns. This can have a bad effect on the growth of seedlings. Polycarbonate has good heat-shielding properties, but sometimes they are not enough. To do this, you can insulate the soil if you make a bedding of hay and straw for the seedlings in advance.
Why is it important to control temperature?
The answer to this question is obvious, since each plant has its own requirements for growing conditions. The temperature regime here will not be an exception, but on the contrary, it is decisive for a healthy and good harvest in the future.
Proof of these words can be seen in your own garden, or better yet, in the field, where in the same area different plants with the same weather conditions react differently. Some feel great in hot weather, while others dry out and require additional help. Or on cloudy, rainy days, some crops grow much faster, and some begin to rot.
Therefore, even in an open area, shaded or sunny open areas are chosen for various plants. And in a greenhouse, the issue of adjustment becomes even more acute, since you need to do it yourself.
How can you regulate it?
Knowing what temperature a particular plant needs and why it is important is not enough to get started. You also need to know how to create these conditions and how to act in emergency situations.
The most expensive but effective method is an automatic adjustment system. It allows a person to save a lot of time and effort. Therefore, if you have the funds, you should use it.
But even this method will not be able to protect against all the dangers associated with a sharp increase or decrease in temperature. This happens when there is a strong hot wind or after prolonged rain.
Several adjustment methods to increase the temperature:
- At night, the greenhouse can be additionally covered with another layer of film. But the distance between the layers should be from 2 to 5 cm. This will create an air cushion that will help maintain the temperature inside and even raise it by 2ºC.
- The second method is based on building another small removable greenhouse inside the greenhouse above the plants. It is covered with perforated film and supported on any flexible base: wire, flexible fittings, vine. It is important to consider that it can be ventilated.
- The last method is mulching the beds. Here you can use grass or covering material. But the mulch must be dark in color to attract sunlight.
Several adjustment methods to lower the temperature:
- Even at the stage of building a greenhouse, there is no need to get carried away with large sizes, especially length. It's better to make two small ones than one huge one.
- In a greenhouse made of polycarbonate or any other material, it is necessary to provide ventilation on the gables. This can help reduce the temperature by 10ºC at the right time.
- Spraying the greenhouse with a chalk solution helps reduce the temperature: 2 kg per 10 liters of water and add 0.3-0.4 kg of milk. Or water the plants abundantly in the morning.
- You can use special frost screens. They can reduce the temperature during the day by 3ºC. Or they also use white shields to reflect the sun's rays.
The main thing is not to get carried away with either increasing or decreasing the temperature, as this can cause additional problems from burns to wilting and disease.
How to prepare soil and beds
Before replanting formed sprouts, you need to properly prepare the soil for this. If the greenhouse is located on a foundation, then in any case it will not be possible to move it to another location. Therefore, you need to periodically change the soil, namely: remove the old one, fill in the new one. In this case, the soil should be chosen as a rule after planting legumes, cucumbers, and potatoes.
If you often plant tomatoes in one place, every year, then the soil becomes fully infected with fungal spores and bacteria that harm this vegetable crop. In order to avoid this, you need to treat the soil with a fresh solution of vitriol.
In just three weeks, many experienced gardeners sow green manure seeds on the surface of the ground. After this, you need to dig up the soil well. This will enrich it with the nutrients contained in this component.
Important! If snow fell into the greenhouse during the winter season, this means that the pests in the soil died. They do not tolerate low temperatures.
The beds need to be prepared in advance, 10 days in advance. They need to be placed along the wall, on both sides. If the width of the greenhouse is large, then you can make a third bed in the middle of the greenhouse. The optimal distance between the beds should be about 65 cm, the width of the bed should be up to 85 cm. If you plant seedlings often, then they will interfere with each other and crowd out neighboring sprouts. At the same time, fertility will decrease.
Tomato roots are very sensitive to cold. Therefore, to keep them warm, it is best to raise the beds 40 cm above ground level. But this factor depends on the amount of soil that is available. But even if there are restrictions in this regard, the ground must still be higher than the passages.
Next you need to prepare the holes. The depth should correspond to the developed root system of the stem. The distance between them should be in accordance with the selected tomato variety and type of bush. All wells need to be treated with a light pink potassium permanganate solution. Not only the hole is watered, but also the soil near it. This will help destroy harmful bacteria that destroy the root and thin the stem.
Two days before transplanting tomatoes, you need to thoroughly moisten the soil and loosen it. It is also better to prepare trellises in advance on which you can tie up the grown shoots.
If you decide to arrange warm beds, then planting time is significantly reduced.
Useful tips
To ensure that tomato seedlings are safely transplanted into the greenhouse, adhere to the following recommendations:
- It is optimal to plant tomatoes in the garden after potatoes and cucumbers. The culture does not tolerate the following predecessors: eggplants, peppers and other plants of the nightshade family.
- If the seedlings are ready for planting, but for some reason it is temporarily impossible to transplant them into a greenhouse, pinch off the tops of the plant. Thus, stop the growth of the culture.
- Some summer residents use the Kazarin method when planting. It consists of minimal watering of the plants, which should provoke the formation of a powerful root system to extract moisture: Plant the seedlings almost horizontally and cover them halfway with soil.
- Do not lift the upper part, it will soon rise on its own, and then tie it to the support.
- After planting, water the plant, using half a bucket of water per square meter. m.
- Next time water the bed in 10-14 days.
Planting tomato seedlings in closed ground and all the procedures associated with this work can be performed by a novice gardener. They are simple to perform and do not take much time. By following the rules for transferring seedlings indoors and caring for young plants, you will get a rich harvest of tomatoes.
What should be the temperature of the earth and air
Tomato seedlings should be planted in a greenhouse when the optimum soil temperature has been reached. If you plant the sprouts in still cold soil, this will not only slow down the growth of the tomato, but can destroy a large number of seedlings.
Even if it seems that the air has warmed up well, this does not mean that the ground also has the desired temperature. In any case, the roots will be much deeper. And this soil cover is always colder than the surface layer. Therefore, you need to take a thermometer and measure the temperature at depth.
You need to check the distance from the surface to a depth of 15 cm. This is the first layer into which the roots of the plant fall. After proper care and good growth, the seedling will take root to a depth of 80 cm. If when measuring the temperature in the region of 10-12 degrees Celsius, then this is a very early period in order to transplant the seedlings into this soil. She will stop growing.
According to experienced gardeners, the optimal temperature for planting tomatoes in a greenhouse is + 13-14 degrees at night and + 15 degrees during the day. This is the optimal temperature to grow good sprouts in an unheated greenhouse.
Standard requirements for tomatoes
The future inhabitants of the greenhouse have their own list of requirements, regardless of the type of room covering. For good growth and smooth development of vegetables:
- Calcium is definitely needed, which will prevent the flowers from falling off and the formation of black spots on the fruits. Enrich greenhouse soil with this microelement during fertilizing with solutions of calcium chloride or calcium nitrate;
- It requires magnesium, potassium, nitrogen, boron, phosphorus, which are contained in the most popular country fertilizer “azofoska” in a form that is most accessible for absorption by plants;
- You need moist soil that can hold water for a long time without drying out. And at the same time, greenhouse soil should not be too heavy. For tomatoes, sandy loam, slightly clayey soil is recommended, in which moisture will be retained, and the humidity level should not exceed 70%, which is preferred by tomatoes. In order to achieve the recommended effect, peat is added to sandy soil, and sawdust and the same peat are added to clay soil, but as a fertilizer.
We must not forget that the life cycle of a bush varies from 110 to 130 days, depending on the personal characteristics of the variety. In order for the plant to have time to go through all the stages of the green and red life path, it is planted in the ground quite early. For the middle zone, the usual period is from the end/middle of the first ten days to the middle of the second ten days of May. By May 15–20, the seedlings should already be established in the greenhouse. For the northern regions, planting dates, of course, shift with a focus on specific climatic conditions.
The lifespan of a variety is an important parameter when choosing a variety of cultivated vegetables. In any case, seedlings are planted only when the ground has warmed to a depth of below 20 cm. Naturally, in the northern regions, conditions favorable for planting occur much later. This means that northerners need a tomato variety with a shorter life cycle than for the middle zone. True, increased daylight hours can help, but you shouldn’t rely on it recklessly.
Preparing seedlings for transplantation
You need to start preparing the sprouts 2-3 days in advance. First of all, you need to remove yellow, unhealthy leaves and a few lower ones. At the same time, they must be cut carefully so as not to damage the stem. To do this, you do not need to cut the leaves close to the base of the trunk, but leave small branches.
Without a leaf, they themselves will thin out over time and fall off. At the same time, removing excess foliage will help the rest of the crown and roots receive the nutrients they need for adaptation. The flower branch will develop well.
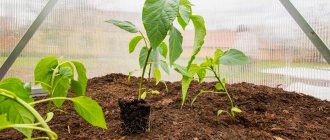
Before planting tomatoes, you need to moisten them well. This will reduce moisture loss from the roots to a minimum. At the same time, you should also carefully remove the sprouts from the pots, leaving the earth ball around the root system intact.
When planting, seedlings are carefully removed from seedling boxes or cups and, without damaging the roots, planted in the ground.
What to do if it has outgrown
Overgrown seedlings will have a height of more than 40 cm. However, when planting, you should not deepen them into the soil as much as possible. Then the sprout will form additional roots on the sides. This will slow down the development of the peduncle. Flowers will fall off.
To grow good tomatoes, you need to choose the method that will be most effective. You can plant it like this:
- Dig a hole 12-13 cm deep. After that, make another one in it. It should be equal to the height of the pot with seedlings.
- In this case, you need to plant the stem in the lower hole. Do not fill the top one.
- After a few days (usually about 10-12 days), the plant will take root. Then you can fill in the outer hole.
If the tomato sprout has grown greatly and reaches a length of about a meter, then you need to plant it using the following method:
- Three days in advance, trim the lower leaves without damaging the stem.
- Instead of holes, make long furrows. Make holes in each one at equal distances.
- Pour water over everything.
- Seedlings should be planted in them by placing each stem in this furrow. Place the root into the hole.
- To prevent a buried sprout from rising to the surface, it should be strengthened underground with aluminum wire, making arcs out of it.
- Cover with soil and compact.
- Tie the upper part to the picket fence.
The soil that contains overgrown sprouts does not need to be loosened or hilled all summer. If, during watering, the stems dug into the ground become bare, then you need to cover them with soil mixed with peat one to one.
Overgrown seedlings also need to be hardened off before planting.
What to do if the seedlings are overgrown
First of all, when noticing the stretching of seedlings, they should be pricked correctly - cut off the upper part of the sprout 20 cm long, which is then planted again in a prepared container for rooting. To speed up the formation of rhizomes, the cut fragment of the bush is placed in the “Kornevin” solution (prepared according to the instructions) before planting. However, even overgrown seedlings can be planted in the ground. There are several main ways to do this:
- At an angle - this is one of the simplest methods that has proven itself well when planting. According to this method, shallow holes are dug (no more than 10 cm), into which humus is placed and water is poured. After complete absorption of moisture, the overgrown seedling bush with the lower leaves previously removed is placed in the hole at an angle (the length of the upper part does not exceed 30 cm). The plant is watered again and mulched. This method of planting requires extremely careful loosening afterwards, since the root system of tomatoes is located very close to the surface of the earth.
- Kazarin's dry method - using this method, furrows 10–15 cm deep are first prepared in the beds, into which humus and a solution of potassium permanganate are added. The soil is well watered, and the lower leaves of the prepared seedling bushes are removed. Plants in trenches are laid almost horizontally, covered with soil and watered again. The essence of the method is the complete absence of further watering throughout the entire season. This method will stimulate the seedlings to actively develop the root system in an attempt to reach moisture. At first, the plant will continue to grow horizontally, but over time the crown will take on a vertical position.
- Maslov method - relies on the ability of tomato bushes to send out new roots along the stem, which is located in the ground. Seedling bushes are placed in pre-prepared furrows 12 cm deep in such a way that not only the root, but also part of the stem is in the soil mixture. Plants are laid strictly from south to north, and already in the process of growth, the tops of the bushes will involuntarily stretch to the south, acquiring a vertical position.
How to properly plant tomatoes in a greenhouse with seedlings, diagram
First of all, planting depends on the height of the tomatoes. When developing a scheme for planting sprouts, you need to consider:
- Will there be stepsoning?
- Attaching the sprout to the picket fence.
- Greenhouse dimensions.
- Irrigation quality.
- Illumination of beds.
Each tomato plant must receive the light and air it needs. Do not crowd in close proximity to other sprouts.
Disembarkation:
- Place a seedling 30 cm long into the hole.
- Sprinkle compost around it.
- Cover with soil and compact.
- Water the planting site.
- Mulch and tie up the sprout.
Arrangement of seedlings in two rows.
Preparing the soil for growing
Many gardeners do not want to poison the future harvest with chemicals and prefer to take care of the soil in advance. The highest quality and most productive soil for greenhouses is considered to be imported soil. Such soil should be purchased by those people who have infertile black soil inside their structure.
Ideally, you should start preparing the soil immediately after the next harvest, that is, about six months before planting the next batch of seedlings. The ideal time to fertilize the soil in a greenhouse is the end of August or mid-September. The preparation scheme is as follows:
- the top layer of soil is removed from the bed, approximately 20 cm;
- a ditch is dug along the entire length of the plantation;
- humus aged 3 years is scattered at the bottom of the ditch;
- The ditch should be filled halfway with humus, and the rest should be filled with the soil thrown away during digging, or with fresh, previously prepared soil.
The choice of fresh soil must be approached responsibly. It should not contain pathogens, weeds or garden pests. Otherwise, the work done will not bring the desired result, and you may not get a high-quality harvest.
In order to saturate the earth with all the necessary microelements naturally, you need to prepare earthworms. Invertebrate insects are capable of passing through themselves all the contents in the soil without harming the soil and evenly mixing the resulting mass with the soil. The soil receives the entire necessary complex of fertilizers (humus).
For each square meter it is enough to populate from 5 to 10 individuals. To do this, dig a small hole, put an earthworm in it and lightly cover it with loose soil. In order to intensify the work of the assistants, they irrigate the plantation with water from a hose or watering can. Watering can be done generously if there are no signs of frost on the ground yet. If a sharp cold snap is expected, the plantation is irrigated with water in the morning. By nightfall, all the moisture will have time to be absorbed inside, and the top layer will remain dry.
For the winter, it is useful to cover the prepared soil with plastic film, which perfectly retains moisture in the soil and insulates it. With additional insulation of humus, earthworms do not go deep into the soil in the event of severe frosts, but produce fertilizer mainly in the upper fertile layers.
A good way to improve the quality and fertility of soil is a bacterial cocktail. Tomatoes respond very well to the nitrogen contained in the soil. The cocktail contains bacteria that enrich the soil with nitrogen, increase plant growth and increase productivity. The concentrated solution is sold in ampoules. One ampoule is enough to treat 600 sq.m. soil surface. The cocktail is prepared as follows:
- Dissolve the contents of one ampoule in 3 liters of warm water. The best quality liquid will be melt or rain water.
- Add 1 tablespoon of honey to the resulting mixture and dissolve well.
- Store the solution in a ten-liter can or jar in a warm and dark place for 3 months. The container lid must be tightly screwed on.
- The soil should be watered with fertilizer one month before the planned planting.
- A glass of solution is added to 20 liters of water and the soil surface is treated.
Where do you grow tomatoes?
In the greenhouse
In the open ground
Planting pattern, to what depth
One of the possible schemes:
- Make beds at a distance of 55-60 cm between each other.
- Raise the beds to a height of 35 cm.
- Make holes: 25 cm deep, 50 cm between them.
- Water the soil with water and potassium permanganate solution.
- Plant seedlings using the method described above.
Another scheme for planting tomatoes in a greenhouse.
If you properly prepare tomato seedlings, treat them with the right products, ventilate them and make the right beds in the greenhouse, prepare the soil for planting, then this will ensure high yields of tomatoes in the future. In this case, the death of individual shoots can be reduced to a minimum. You can grow good plants that are immune to bacteria and fungi that lead to stem depletion.
Care
However, preparing for planting and sowing seeds is only half the battle. How to grow seedlings in a greenhouse or greenhouse, especially if you need them for sale? In order for your seedlings to grow really strong and healthy, you need proper care of the seedlings, which is quite troublesome.
- It is important to carefully monitor the appearance of the plants. If the foliage has turned pale, then it’s time to fertilize. The best recommendation here is ready-made complex fertilizers. Before watering, you need to dilute the mineral mixture in the proportion of 1 teaspoon per 1 liter of water.
- When it is cloudy outside, it is better to keep the temperature in the greenhouse low, to about plus 14-15 °C, so that the seedlings do not stretch out. Elongated seedlings do not need to be watered heavily, let the soil dry out a little.
By following these simple tips, we hope you will be able to grow strong and healthy seedlings that will delight you with delicious fruits all summer and until the end of September.