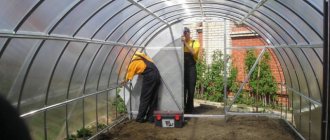
A brick foundation for a greenhouse is a good analogue to tape or piles.
This type of foundation is lightweight and can be quickly erected, and can also withstand heavy loads, which will make it possible to install a heated greenhouse.
Let's consider the pros and cons of a brick foundation, the conditions for its use, what types there are, how to choose the right type, as well as step-by-step installation instructions.
Terms of Use
Most often, a brick base is made for a greenhouse with a heavy metal frame, as it can withstand high loads. In order to prevent deformation of the foundation, it is recommended to place it on a bed of gravel and concrete. But in some cases, brick strip or piles are mounted on a drainage layer or simply on the ground.
Advice. For a longer service life of the brick base, standard red should be used for its construction, as it is more resistant to weather conditions and external factors. To prevent this material from being destroyed by excess moisture, it must be protected with waterproofing.
Foundation requirements for a greenhouse
Everyone knows well that the basis of any building is its foundation. The service life and operational period will completely depend on what it is. That is why it must be reliable.
Much will depend on the size of the greenhouse, because the larger it is, the stronger the foundation should be. It will also be influenced by the soil itself.
The main task that falls on the foundation is protection and support.
In order for him to cope with this, it is necessary that the foundation meet a number of requirements. She must be:
- Resistant to environmental influences;
- Durable, provide support and support to the frame of the structure;
- Correspond to the size and shape of the greenhouse building.
Each of the three requirements is very important; if the foundation does not meet them, then in the near future this may lead to deformation of the entire structure.
Kinds
There are two main types of brick foundations:
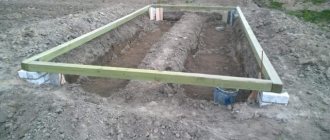
The strip type is the most common type of base, which is most often made of concrete, but sometimes it is mounted from brick or blocks.
This variety can be shallow or deeply buried. In the first case, a lighter structure is obtained that can be quickly installed.The deeply buried type of base helps to avoid freezing of the soil under the greenhouse, which makes it easier to use in winter. The disadvantage of this type of foundation is the increased consumption of material, as well as a longer installation period than that of a pile foundation.
Another disadvantage is that it is difficult to repair. The tape is usually used on soils that have low groundwater levels and medium heaving.
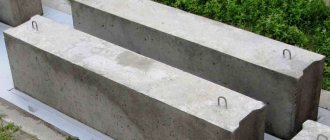
- Columnar view of the base builds much faster than tape, uses less material and is lighter. In this case, it is not a solid structure, but individual pillars that rise above the ground by 15-20 cm (sometimes more). This type of base is used in places where there are small differences in the ground that are difficult to level without special equipment.
A columnar foundation is installed on slightly heaving soil, as it is less resistant to seasonal soil movements. Another advantage of this type of foundation is that it protects the building from melt or ground water, as well as floods that could wash away the bottom of the structure.To install a greenhouse on a columnar base, you will need to use a grillage (the upper crown that is mounted on a pole and evenly distributes the load) made of timber or connect the greenhouse frame from below with metal.
In winter, the structure on poles is used less often than on tape. When building a columnar foundation, fewer materials are used, which makes installation cheaper. If one of the pillars breaks, it can be replaced, since using jacks (or simply disassembling the greenhouse) you can lift the structure for repair work (how is a columnar foundation repaired?).
In some cases, the installation of tape or pillars is carried out on a concrete pad. In this case, a combined base or plinth is obtained. In the second case, this is done to additionally protect the greenhouse from the cold, since brick has low thermal conductivity and good insulating properties.
Criterias of choice
The main criteria when choosing a brick base are:
soil type;- soil freezing depth;
- height of groundwater;
- size and weight of the greenhouse;
- presence of melt water;
- the need to use a greenhouse in winter;
- construction period;
- limited resources.
On a note. If you don’t have a lot of money, and you don’t need to use a greenhouse in winter, then you should use the columnar version, as it is quickly erected and easily repaired.
If the site has heaving soil and the greenhouse is heavy, it is recommended to use tape, as it is stronger and more stable.
Advantages and disadvantages
Brick foundations can be of several types, which is why some of the pros and cons differ. Positive qualities include:
- Fast and easy installation. If tape or pillars are made, then the construction speed is higher than that of a reinforced concrete base, so the fastening solution does not need to infuse for 20-30 days.
- Environmentally friendly.
- Long service life, which can reach 20-30 years with a little care and proper installation.
- High strength, resistance to external factors and weather conditions.
- The cost under certain conditions is lower than that of a reinforced concrete base.
- Low thermal conductivity, which allows you to additionally protect the greenhouse from freezing.
- Beautiful and aesthetic appearance.
- The mass of a brick foundation is greater than that of a wooden foundation, which reduces the wind load on the foundation and also reduces the likelihood that the greenhouse will blow away.
Among the disadvantages it should be noted:
It is difficult to make a recessed foundation, since it is not convenient to do masonry in a narrow trench.- Waterproofing is needed, as over time the brick may begin to crumble.
- Higher costs of money and time than when installing a foundation made of timber or blocks.
- If temperatures are too low, insulation may be required.
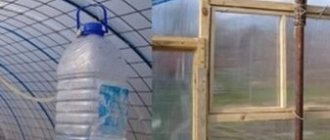
We use tires in construction
Due to the fact that a greenhouse is a fairly light structure, compared to houses, the foundation for it needs to be simple. Sometimes it can be built even from simple improvised means. For example, a foundation made of tires has found its application. They are laid out on the soil surface or in a hole and covered with sand. The use of tires allows you to build both slab and column foundations. For a columnar base, you need to lay out several tires in height.
As you can see, there are many options for building a reliable and durable greenhouse. Much depends on the soil on which the building is planned to be built. However, if there are no problems with the soil, and the greenhouse is not very heavy, you can build a cheap, but at the same time strong and reliable foundation.
Tools and materials
To build a brick foundation you may need:
- shovel;
- drill, screwdriver and hammer drill;
- concrete mixer or mixing attachment for a drill;
- anchor fastenings (for columnar ones additionally U-shaped ones are needed to secure the grillage);
- concrete mortar made of sand and cement;
- wooden beam;
- building level;
- roulette;
- thread and pegs;
- waterproofing materials;
- saw for wood (for a grillage made of timber) or metal (for a greenhouse frame);
- Bulgarian;
- bricks (it is recommended to use red ones, since white ones are destroyed more quickly by moisture);
- spatula and trowel;
- marking marker;
- protection for hands and eyes (if you need to cut bricks with a grinder, you will additionally need a respirator).
Pile element for greenhouse
If the estate is located on uneven and marshy ground, it is better to install the greenhouse on a pile foundation. You can build such a greenhouse with your own hands even without excavation work and the use of special equipment.
Pile foundation technology for a greenhouse:
- Marking the location of piles.
- Driven piles are driven into the ground strictly vertically using a building level. Screw piles are driven into the ground in a circular motion.
- The tops of all piles are sawn off at the same level.
- The upper heads are connected by a grillage made of timber, concrete (formwork will be required) or sleepers.
- Installation of the greenhouse on the base.
Tubing pipes can be used as piles. They have high strength, as they have a wall thickness of 5 to 8 mm. A greenhouse with such a foundation will be protected from adverse processes in the soil and will be able to serve its owners for many years.
Step-by-step instructions for building foundations
Before you start making the foundation, you will need to carry out preliminary work. To do this you need:
Make markings for the future base using thread and pegs.
To do this, you need to make 12 equal sections on the rope, and then, according to the rule for constructing Egyptian triangles, make a figure with an aspect ratio of 3:4:5 from thread and pegs.Repeat for the opposite corner and connect all the pegs into one rectangle. Next, you need to check the evenness of the figure by measuring the diagonals.
- In the marked area, you need to remove 15-20 cm of soil, all bushes, trees, roots or debris.
- Level the future site using a shovel and the remaining soil. When using a columnar base, this procedure can be omitted.
- Make markings for the tape or pillars.
After this, you can begin installing the foundation.
From the video you will learn how to mark the foundation for a greenhouse:
Tape
The depth for a strip foundation depends on the freezing point and the selected subtype: shallow or deep:
- in the first case, this indicator should cover 50% of the soil freezing point;
- and in the second, the laying depth is 30-40 cm greater than this point.
Note! Making a deeply buried brick support is most often not advisable, since it will require a lot of resources and will also reduce strength. Most often, the depth of such a base is 20-30 cm.
To build a brick strip you need:
- Dig a trench of the required depth and width of 25-30 cm.
- Pour 5 cm of gravel and sand into the bottom of the hole, then compact them.
- In some cases, to strengthen the structure, a concrete screed 10-15 cm thick is made, which must be trimmed during the pouring process so that the masonry does not warp later.
- Lay a layer of waterproofing. To do this, you can use bitumen mastic and rolled roofing felt. All joints between sheets must be carefully sealed with liquid insulation.
- Make a leveling layer of brick, which should cover the entire bottom of the ditch, which is subsequently filled with cement mortar on the sides.
- Start laying the brick strip. If a concrete pad was used during the installation process, it will take 20-30 days for it to dry, which is why the construction period will be longer than with simple installation.
- It is necessary to additionally lay waterproofing on the concrete layer (if there is one), and when pouring it, insert anchors that will hold the lower crown of the brick.
- Laying the strip foundation should begin from two corners, and the brick itself is connected using concrete mortar. The next rows are installed in a checkerboard pattern (so that the vertical connections do not coincide between two adjacent crowns).
- It is recommended to make the joint thickness in brickwork no more than 1-1.5 cm.
- Let the solution dry, then use a hammer drill to make holes in the brick for the anchors, secure the bolts with the solution, wait a couple of days until it dries and begin installing the greenhouse.
Columnar
To make a columnar base you need:
Make holes for the posts. Their depth is most often 30-50 cm, and their width depends on the size of the brick (usually 40x40 or 50x50 cm).- Compact the soil on the bottom and walls, then make a drainage pad of sand and gravel (10-15 cm). It also needs to be compacted and waterproofing laid on top.
- Start installing the pillars. The masonry should be done in a checkerboard pattern, and also from whole bricks, and not their halves.
- The height of one column should exceed the ground level by 15-20 cm.
- Attach U-shaped or anchor fastenings to the posts to which you want to secure the grillage.
Gravel filled trench
A fairly simple and effective option for installing a foundation for a greenhouse yourself is a trench filled with gravel. To do this, it is necessary to make recesses, which can be made from pipes, in the areas in which the pins are structurally placed to bury them in the ground. To do this, perform the following actions:
- An area of the required size is prepared, leveled, and all vegetation is removed from the area allocated for the installation of the greenhouse.
- Markings are made in accordance with the known dimensions of the greenhouse, a trench is dug, having a depth of no more than 20-30 centimeters.
- The horizon is leveled.
- The trench is first filled with sand, and then with gravel, and everything is compacted together to the ground level.
- The horizon is checked again. If everything comes together, then this type of foundation for a greenhouse can be considered complete.