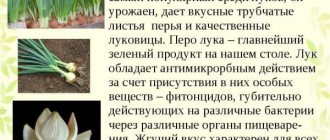
Usually onions are obtained from sets, but some summer residents like to plant onions, grow and care for seedlings at home.
This way, they are confident in the quality of the crop, can independently determine the variety and regularly receive planting material. Dear readers!
For you, we have created communities on social networks in which useful articles and interesting ideas are published several times a day! Subscribe and receive useful content in a convenient format! In addition, this method of growing crops is much more economical than purchasing seedlings every year.
Today's article will talk about choosing an onion variety, planting seeds and caring for onion seedlings.
How to choose an onion variety for planting?
Why grow onion seedlings? Usually onions are grown from sets. These are small bulbs that are planted in beds in the garden. But sets are very expensive. In addition, some of the purchased planting material may be of poor quality.
Growing onions from seedlings is a great way to get sets for practically nothing. After all, seeds are not very expensive. In addition, you can collect the grains yourself.
The second reason for this method is that in some Russian regions the summer is very short, so to grow some varieties it is better to sow seeds for seedlings.
There are also varieties from which large heads can be obtained in just one season.
The variety is selected taking into account several factors:
- Vegetable ripening time. Onions can be early-ripening (about 90 days), mid-ripening (110 days), late-ripening (about 130 days).
- Small-nested or multi-primed (aka family).
- Head size.
- Taste qualities.
REFERENCE. The choice of variety is made based on preferences and objectives.
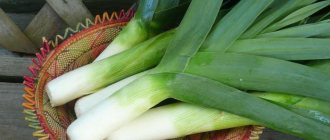
In general, you can grow absolutely any variety through seedlings. But it is better to grow large-fruited varieties with unusual taste qualities. For example, Stuttgarter Riesen or Exhibition.
It is also worth paying attention to the following varieties: Nezhenka, Lukich, Strigunovsky, Krasnodarsky 35, Karatalsky, Master, Farmer, Red Baron, Shaman, Kaba, etc.
Summer season
After planting, the crop requires care according to the rules of the summer season. What to pay attention to:
- watering is done as the soil dries out;
- Fertilizers are applied before the beginning of July - no later;
- a special moment for feeding is before the formation of bulbs;
- Pest control can be carried out with herbal mixtures containing wormwood, dandelion leaves, tomato, and hot pepper;
- The harvest of seed onions begins in the first half of August;
- you can dry the bulbs in the garden, then transfer them to a hot and dry place until the tops dry out;
- storage conditions largely depend on the variety, but before putting the bulbs, for example, in the basement, it is necessary to sort them out and remove low-quality ones;
- The best storage method is canvas bags or boxes located in a cool and dark place.
Important! Different varieties may have features of care, watering, and fertilization. As a rule, a successful variety has many fans who are a source of valuable, time-tested advice.
How to choose the time for sowing onions for seedlings, table of dates by month?
When planting onion seeds for seedlings at home, you must definitely pay attention to the lunar sowing calendar.
As you know, seeds are planted for seedlings during the rising moon. But this rule applies to crops such as tomatoes, peppers, eggplants, cabbage, and cucumbers. That is, those vegetables whose fruits grow above the ground.
Onions are classified as root vegetables. And root crops are planted on the waning moon.
ON A NOTE. This is the rule here. When the moon wanes, juices and nutrients move to the root, which causes onion seedlings to be planted on the dying moon according to the lunar calendar.
For convenience, we have collected the recommended dates for planting grains by month in one table.
| Month | Favorable numbers |
| January | 1, 2, 3, 4, 5, 6, 7, 8, 9, 10, 11, 12, 29, 30, 31 |
| February | 1, 2, 3, 4, 5, 6, 7, 8, 9, 10, 28 |
| March | 1, 2, 3, 4, 5, 6, 7, 8, 9, 10, 11, 12, 29, 30, 31 |
| April | 1, 2, 3, 4, 5, 6, 7, 8, 9, 10, 11, 28, 29, 30 |
| May | 1, 2, 3, 4, 5, 6, 7, 8, 9, 10, 27, 28, 29, 30, 31 |
However, there are a number of dates when it is not worth planting grains. We are, of course, talking about full moons and new moons. This is definitely a bad time to carry out sowing work.
In 2022, we will refrain from planting seeds at home on the following dates:
- In January – 13, 28.
- In February – 11, 27.
- In March – 13, 28.
- In April – 12, 27.
- In May – 11, 26.
Recommended by topic
Growing April 6, 2021
How to grow asters
Read more
Growing January 20, 2021
When, where and how to plant a Christmas tree after the New Year?
Read more
Growing October 26, 2020
Mixed beds: where, what and with what to plant
Read more
Growing April 6, 2021
How to grow asters
Read more
Luk March 22, 2021
Planting onions in spring
Read more
Growing January 20, 2021
When, where and how to plant a Christmas tree after the New Year?
Read more
Conditions for planting onions
So, you bought or collected grains and decided on what day you will plant. Now a few words about what conditions onion seedlings need at the stage of planting grains.
The germination of the seed fund, as well as the quality of the seedlings, will depend on how good the care conditions you create. And the healthier the seedlings, the stronger the adult plants will be.
What soil is needed for onion seedlings?
The quality of the soil is important, since for the first 2-2.5 months of life at home, it is the substrate that will be the source of the main nutrients for the seedlings.
It’s better not to invent anything with the soil, but to buy a regular substrate for seedlings in the store. This is neutral soil, quite loose and nutritious.
ON A NOTE. A mixture of turf, organic matter and humus is also suitable for onion seedlings.
What container is needed?
Onions are not grown at home in peat tablets and individual cups. It's simply not profitable.
It is optimal to use large containers or cassettes. Cake trays will do.
IMPORTANT! Don't forget about drainage holes. They are needed to remove excess moisture, the excess of which leads to the onset of putrefactive processes.
Temperature
Beginning summer residents should pay special attention to the temperature regime when growing onion seedlings at home.
Unlike most other vegetables that are grown in seedlings at home, onions do not like high temperatures.
Optimal indicators for caring for this crop are +15 +17 degrees.
ON A NOTE. At the same time, during the period when there are no shoots yet, the temperature needs to be maintained a little higher (+20 +22).
Humidity
At home, air humidity is usually very low due to working radiators. Therefore, it is very important to increase it regularly. But do not allow the humidity to be above 70%. Excess moisture leads to the development of blackleg.
If you do not have an automatic humidifier, then this care problem can be solved using a spray bottle.
Just remember that the water must be settled and warm (at least room temperature).
Lighting
It is also worth saying that onions are a very light-loving crop. It requires up to 16 hours of ultraviolet radiation per day!
This means that you will have to organize additional lighting for proper care. You can use LED strips of the required spectrum.
It is better to purchase these in advance in any online store. LEDs are much more profitable than other phytolamps, as they last longer and consume much less energy.
IMPORTANT! There should be at least 30 cm to the upper tip of the onion feather, otherwise there is a high risk of ultraviolet burn.
FAQ
Where is the best place to buy onion seeds for seedlings? You need to purchase seeds from well-established distributors, whose seed material is, although more expensive than in amateur markets, but a self-respecting company will not risk its reputation by selling you low-quality seed material.
At the same time, markets often sell expired seeds, which are difficult to distinguish by eye from those suitable for sowing. If you buy seeds online, team up with friends and neighbors, place a joint order and arrange for the package to be sent to one address.
This way you can save on shipping. Upon receipt, separate the seeds as ordered. How to grow leek seedlings in a snail?
By growing seedlings in a snail, you have the opportunity to save space, and caring for seedlings “Moscow style” is much more convenient. However, this method also has a drawback: due to the density, the plants receive an unequal amount of light, and therefore develop unevenly.
Sowing of nigella for seedlings in a snail is carried out at the end of February or at the beginning of March.
Spread a plastic tape of the same width as toilet paper on the table, place 1-2 strips of toilet paper on it, moisten its surface and, stepping back 1 cm from the edge, spread onion seeds along the length of the tape in 4 cm increments. Place another layer on top. paper, spray it with a spray bottle and cover with more plastic tape. Roll it all up, secure it with an elastic band, place it in a transparent plastic container filled with 1.5-2.5 cm of water so that the edge with the seeds is at the top, and place the snail in a warm place. Why do onion seedlings fall?
This usually happens when seedlings are affected by blackleg. Not only onion seedlings suffer from this fungal disease: blackleg can affect any seedlings. The disease develops in conditions of low temperature and high humidity indoors against the background of insufficient lighting. Paying attention to the root area of a laid-down seedling, you will find blackened areas of tissue, pulling the plant in a ring. Diseased seedlings cannot be cured. You will have to transplant the still healthy plants into fresh soil, treating them and the soil with a fungicidal solution.
To avoid infection with blackleg, use only sterile soil for growing seedlings, and soak the seeds in Mikosan-N solution before sowing.
For preventive purposes, spray the emerging shoots with a solution of the same Mikosan. And make sure that the growing conditions meet the requirements of the crop. Onion seedlings turn yellow - what is the reason?
After onions form their first two true leaves, the cotyledon leaves wilt, giving your crops a yellow-brown appearance. Don't panic, these are not symptoms of the disease, but a physiological effect.
Thin the seedlings in increments of 2 cm, and at the stage of formation of 4-5 feathers, carry out another thinning, leaving a distance of 5-6 cm between the plants. To do this, rake the soil near each seedling to the roots to make it easier to remove the entire plant. Removed seedlings can be used for food.
At an older age, onion greens turn yellow for other reasons: from insufficient watering, nutrient deficiency, vagaries of weather, diseases (rust, bottom rot, bacterial rot) or from an invasion of pests - onion moths, onion flies, thrips and secretive proboscis.
The tips of onion seedlings are drying up - what to do?
Onion feathers are very sensitive to light, and if there is insufficient lighting, the tips of the feathers begin to turn yellow and dry out. Keep the seedlings in a well-lit area and rotate the container regularly so that all seedlings receive an equal amount of light.
Make sure that the seedlings are watered sufficiently, but not excessively: the earthen ball should not dry out, but there should not be any liquid dirt in the roots. The best way to moisten onion seedlings is bottom watering, through a tray, so the seedling container must have drainage holes. And the height of the container or cups must be at least 8 cm.
Regularly moisten the air with a spray bottle and do not neglect fertilizing.
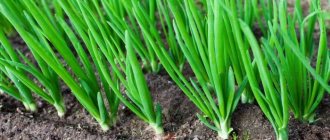
In addition, you need to regularly trim the greens when they reach a height of 10-12 cm. Pruning stimulates the development of the root system and the growth of the bulb, and after this procedure the greens become denser and juicier. Onion seedlings grow poorly - what to do?
In order for onion seedlings to grow well, the following requirements must be met:
if you are not going to pick seedlings, sow nigella in a dish 8-10 cm deep, since even small turnips have long roots;
When picking or transplanting onions, do not allow their roots to bend. Also, do not cut off the leaves too much: this will weaken the developing turnip;
the bulbs should not be located too close to each other in the seedling container so that the plants have sufficient nutrition area and equal access to light;
do not overheat the seedlings: the optimal temperature for good growth is 10-12 ⁰C;
protect seedlings from drafts.
How to grow a lot of onion seedlings in a small container?
Cut a two-liter plastic bottle to half its height, make drainage holes at the bottom, pour enough prepared soil into the improvised container so that it does not reach the top edge by 5-6 cm. Lightly compact the substrate, water it, spread the seeds over the surface and seal them . Cover the bottle with a plastic bag and place in a warm place. When the seeds begin to germinate, remove the bag and transfer the onion to an unheated room. Care for the seedlings as usual.
When the onion leaves reach the top edge of the dish, water the soil generously and carefully remove the entire seedling bush from the bottle, place it in a bowl of water so that the soil is removed from the roots, then carefully separate the bulbs, trying not to damage their roots, and plant the seedlings.
You can pick them out in separate cups, or you can transplant them into one deep container, keeping a distance of 3-4 cm between the seedlings. Why do onion seedlings wither?
If, after transplanting into the ground, the onion leaves begin to turn pale and wither, this means that they are suffering from too much light. At home, no matter how hard you try, the seedlings do not receive the same lighting as in the garden, so after transplanting into the garden, the leaves begin to evaporate more moisture, while the roots, which have not yet had time to grow stronger, are not able to water the plants. And no matter how you water the onions, in the sun the leaves will wither and get burned.
To prevent this from happening, the seedlings must be protected from the sun for the first time after transplanting into open ground.
Place a frame over the bow and throw an old sheet, spunbond or other agrofabric over it. You can make a frame from slats, stretch fabric over it and install it in such a way that in the afternoon the shadow from the improvised screen falls on the onion plantings. After a while, the onion feathers will restore turgor, and the shading can be removed. But the burns, unfortunately, will not go away. What varieties of onions can be grown as an annual crop?
The varieties Exibishen, Centaur, Shaman, Agro winter, Crimson ball, Danilovsky 301, Annual Khavsky, Odintsovets, Early pink, Zolotnichok, Vostorg, Lyubchik, Mayak, Lugansky, Chalcedony, Globus, Siberian annual, Farmer grow better from varietal onions in annual crops , Olina. The most popular hybrid varieties are Sanagro, Mustang, Mars, Stardust, Spirit, Copra, Red Baron, Cortland, Alonso, Candy, Daytona, Esaul and Albion.
If you need spicy onions, then sow Copra, Red Baron, Carmen, Oporto, and if sweet, then give preference to the varieties Veselka, Mavka, Penguin, Serpneva, Amphora, Antonina, Belyanka.
Of the semi-sharp varieties, the varieties Krasnodarsky 35, Kaba and Karatalsky grow better than others in annual crops. How long does Exhibition onion last?
This variety of onion, truly royal in taste, will be stored for no longer than 4-5 months, despite all your efforts. It should be stored in a dry place at a temperature not exceeding 8 ⁰C. When stored in this way, the onion does not rot, only its covering scales fade slightly.
However, inventive gardeners have learned to prepare it for the winter by freezing.
You need to finely chop the onion, put the shredder in a bag and quickly freeze it. This preparation will allow you to season soups, borscht and main courses with onions in winter. Unfortunately, frozen onions are not suitable for making salads. From what pests and how should onion seedlings be protected?
Onion fly. This pest lays larvae that gnaw passages in the bulb, causing young plants to die and the bulb of mature plants to become deformed. Fly larvae are destroyed with the drugs Muhoed, Medvedtox and Zemlin.
Onion thrips is a sucking insect that damages leaves, causing them to bend, dry out and turn yellow. It is impossible to treat onion greens against thrips with insecticides, since the chemicals accumulate in the bulb. They repel the pest from onion plantings using tobacco dust, ash and naphthalene. You can plant onions next to the carrot bed: thrips cannot stand the smell of this vegetable.
Onions are also affected by mites, secretive proboscis and nematodes, but they can only be combated by preventive measures and conscientiously fulfilling all agrotechnical requirements of the crop.
How to plant onion seeds correctly
Now let's talk about how to plant onion seeds using different methods of growing them at home.
There are several ways to plant onion seedlings. In general, they are very similar, and caring for seedlings will be the same in any case. However, let's look at each of them separately.
Seed preparation
Seed preparation is the same for any planting method.
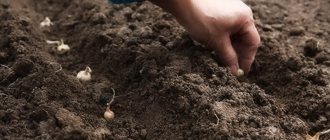
Step 1. Soak the seeds in water (30-40 degrees) for 8 hours. You can add 1-2 crystals of potassium permanganate.
Step 2. Soaking in a growth stimulator (Epin, Zircon (according to instructions), aloe juice (2 drops per 100 ml).
Step 3. Wash the seeds and dry them.
Containers
We pour soil into the containers, make grooves 1 cm deep at intervals of 5 cm. Sow the seeds at a distance of 1 cm. Cover with soil.
If you are planting in cassettes, then you need to place 2-3 grains in each cell.
Wrap the container with cling film and place in a warm place (20-25 degrees). We are waiting for the sprouts to appear. After which the cover is removed.
"Snail"
You can use disposable diapers or a laminate backing (for example, Plenex).
First, you need to cut the diapers about 10 cm wide. Next, lay the second layer of toilet paper, which we spray with a growth stimulator.
We step back a couple of centimeters from the edge and lay the grains in 2 cm increments. Pour a thin layer of soil, moisten it, cover it with a second layer of diaper and roll it up.
We wrap the roll with a rubber band and place it in one container. Cover with film and leave to germinate in a warm place.
Pre-sowing seed preparation
In order not to waste time and energy on pre-treatment of seeds, it is better to purchase planting material from reputable, trusted manufacturers who carefully sort, disinfect and control it. If you are confident in the quality of the seeds, then it is preferable to sow them dry. The weak ones simply will not sprout or will hatch very late, which will allow them to be culled.
According to reviews, the germination of onion seeds leaves much to be desired. Therefore, many gardeners consider it correct to pre-soak them, placing them in a damp cloth, and regularly spray them with warm water, preventing them from drying out.
When the first nigella hatch (in 1-3 days), you can start sowing
If the planting material is of questionable quality, it is considered advisable to cool the wet seeds in the freezer at a temperature of −2…+2 ℃.
The preparation of independently collected seeds, especially those stored for more than 1 year, is carried out according to the following scheme:
- Soak in saline solution (1 teaspoon of table salt per 1 glass of water). Floating specimens are discarded, the rest are washed with clean water.
- Immerse in a saturated solution of potassium permanganate for 15 minutes. Then washed in clean water.
- Wrap in a damp cloth and keep in the freezer of the refrigerator for three days.
- Soak for 2-3 days in a solution of nutrients (1 tablespoon of ash is brewed in 1 liter of water and left for 1 day).
- Germinate at a temperature of 20…24 ℃. Hatched and sprouted seeds are sown for seedlings.
To disinfect and prevent diseases, it is recommended to heat the seeds for 20 minutes in a thermos with hot water (53 ℃). Then dry the nigella until fluffy on a paper napkin and sow immediately.
Care and cultivation of onion seedlings at home
Having dealt with planting onions, now we need to talk about growing and caring for seedlings of this vegetable.
REFERENCE! Onions are an interesting crop. After all, when growing, you can get not only seedlings. You can grow onions at home. This way, even in winter, you will have fresh herbs that can be added to soups and salads.
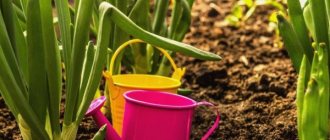
How to water onion seedlings
It is necessary to irrigate onion seedlings at home using drip irrigation. It is better to use a regular medical syringe.
Do not forget that water must be settled for moistening.
How to feed onion seedlings
If you grow onions at home solely for further transplanting into beds and do not plan to cut the greens, then you can carry out complex fertilizing.
It is recommended to use ammonium nitrate at the rate of 10 grams per 10 liters of water for the first feeding and a potassium-phosphorus-nitrogen mixture for subsequent feedings (2 grams of superphosphate, 1 gram of urea and 0.5 grams of potassium chloride per liter jar).
Picking
Picking onions is quite a troublesome task, but important when caring for seedlings. They pick when the feather grows to 3 cm. They usually pick into a larger container.
First, a few hours before picking, moisten the soil with a spray bottle.
Then the procedure begins. Soil is poured into a new container and grooves are made. Then, using a toothpick or wooden ice cream stick, carefully remove the plant from the old container and transfer it to the new one.
After all the seedlings are picked, they are carefully irrigated.
Loosening
Loosening is an important agrotechnical technique both during cultivation at home and after transplanting to a permanent place.
It is necessary to loosen after each watering. This is done so that the earth does not “clog”, that is, does not become heavy. The second reason to loosen the soil is to provide air access to the roots.
Creation of seed material
To collect the seeds, cut off the so-called boxes on which they are formed, along with the arrow, calculating so that the shoot is 30 centimeters.
The quality of seeds in one box may vary. The ripening process occurs unevenly: first the upper ones, later the lower ones. The appearance of black seeds is a signal to start collecting.
The seeds are small, and a special technique is used to collect them: the boxes are tied into bouquets and hung in a shady and well-ventilated place. A cloth or paper is laid out underneath them, where the seeds are collected as they dry. Thus, nature itself selects the most mature seeds. They are then checked by filling them with water. High-quality seeds are dried, ventilated and stored in paper bags, and it is important that the room is dry. Don't forget to note the collection date.
Important! The shelf life of the seed is 3 years.
Disease and pest control
When growing onion seedlings at home, fungal and bacterial infections pose a danger to the vegetable. There is no need to be afraid of the onion fly unless you purchased infected seeds.
If rot occurs, diseased seedlings must be destroyed and the soil in the container treated with fungicides. For example, pour a solution of potassium permanganate or Fitosporin.
IMPORTANT! To prevent the development of diseases and the appearance of insect pests, carry out pre-sowing treatment of onion seeds.
Feeding seedlings
If the soil mixture is prepared correctly, there is no need to additionally feed young plants.
If there is the slightest doubt about the quality of the soil or weak seedlings, it must be nourished. To do this, one feeding 14 days after the appearance of feathers is enough.
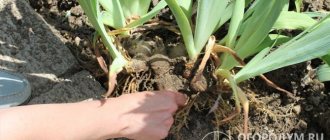
Planting onion seedlings in open ground
2 months after pecking the first shoots and caring for them at home, onion seedlings can be safely transplanted to a permanent place in open ground.
ON A NOTE. After growing at home, seedlings are planted when it gets warmer. Usually not earlier than May. The day for the procedure is chosen to be dry.
The transplant process is quite simple.
First, we pay attention to preparing the bed.
- We dig up the soil.
- We make grooves (depth 2 cm). The distance between adjacent grooves is at least 30 cm.
- We irrigate the furrows generously.
Now let's move on to the seedlings.
- We sort the seedlings. We throw away any that are very weak or damaged.
- For the remaining ones, we shorten the root part and feather by a third.
- Soak in a solution of mullein and clay.
- We plant the plants in 8 cm increments.
- Water and mulch.
Pre-winter sowing
This method has a significant number of supporters.
The beds begin to be prepared immediately after harvesting and digging up the soil. Sowing is done later, almost during the coldest months. The seeds are carefully selected: they must be large and dry. After embedding, mulch is applied on top to a depth of 1.5 centimeters.
Autumn soil, well saturated with moisture, allows the shifts to be saturated, but not to germinate. This helps them spend the winter under the snow without any damage to germination and begin to grow with the first warmth. As a rule, a soil temperature of +3-4 degrees Celsius is sufficient.
Common mistakes
- Planting too deep. Planting should be done in holes and grooves no more than 1 cm deep.
- Lack of lighting. Onions love light very much. At home, seedlings must be provided with additional lighting.
- Temperature too high. Caring for onion seedlings at home involves growing them at a temperature of about 16 degrees. Higher rates will cause the seedlings to begin to stretch.
- The seedlings are not thinned out. In order for seedlings to develop well, they must be thinned out. Remove weak and diseased seedlings. This is a very important point in caring for onions.
The soil
Proper soil preparation is important for harvesting. If the seeds fall into the soil at a greater depth than required, they may germinate with their roots upward. The composition of the soil is also important. The best option is loamy soils subject to the application of mineral and organic fertilizers.
The place should be well lit and warm. An effective agronomic method is to place onions in beds where cabbage, tomatoes, and cucumbers were previously grown. The above-mentioned crops enrich the soil with nitrogen and contribute to abundant onion harvests.
The soil for the beds is prepared in the fall: they dig it up, add compost and mineral supplements. The prepared substrate is watered with a solution of copper sulfate.
In the spring, it is additionally recommended to add ash. Too much fertilizer will cause abundant green growth, and this may affect the size of the roots. Experienced gardeners experiment with several options until they find one that suits the soil perfectly. A few days before planting the seeds, the ground is covered with transparent polyethylene or dark film.
Important! The reception has a double effect: it warms the soil and prevents the growth of weeds.
A method for treating a finished bed with the preparation “Baikal EM-1” is described. The product contains strains of beneficial microorganisms. When used, the culture receives protection from fungi and pathogenic bacteria. The process of humus formation is stimulated.
Important! The bed should be about a meter wide and no more than 10 cm high, otherwise the soil will dry out quickly.
Answers to frequently asked questions
When to plant onion seedlings in different regions of Russia?
In the middle zone, planting is carried out in the second half of March, in the North-West - in early April, in Siberia - in mid-April, in the Urals - in the last ten days of March, the first ten days of April.
At what age should seedlings be planted in the garden?
Depending on the variety, seedlings are transplanted to a permanent place at the age of 60 to 75 days.
Do I need to feed onion seedlings after transplanting them into the garden?
The first fertilizing is carried out with nitrogen fertilizer (for example, urea) 2 weeks after transplantation. Next, potash and phosphorus fertilizers are used.
If you are growing onions for feathers and not for turnips, then you can continue nitrogen fertilizing later.
Do I need to pinch onion seedlings?
Periodically pinch the onion to 2/3 of its height. The first pinching is carried out when the vegetable releases the third feather.
Is it possible to sow onion seeds directly in open ground?
When it gets warmer, you can, but then you won’t be able to grow bulbs in one season.
How often should you water?
Watering at home is carried out as the soil in the container dries out.
Is hardening necessary?
Yes, since hardened seedlings tolerate planting in open ground better.
Other seed materials
You can also plant onion sets. The material for its production is “chernushka”. These are the seeds that are formed after the flowering of the onion. You can easily get them yourself. Bulbs with this ability to reproduce are formed only in the second year, but it is quite suitable as seed material for onion sets.
You can plant seeds at the end of April, and this is an advantage over seasonal onions. If frost occurs in late spring or the temperature drops, the nigella will withstand this test, while the bulbs will stop growing.
It is necessary to choose a place for future planting and prepare it in advance, so work on forming the beds begins in the fall. Finding the right place for gardening is a whole science. What is known about onions?
Important! You should not sow nigella in an area where garlic has previously ripened. Also, legumes should not be planted nearby. Useful predecessors are cabbage and nightshades.
Not everyone agrees with the opinion that a bed with carrots would be a good neighborhood for onions. For example, watering of onions is stopped at the beginning of August, but carrots require active moistening further. Actively growing carrot tops shade the onion bed, and this is fraught with the development of diseases.
The place should be accessible to sunlight and well ventilated. Loose soil promotes necessary aeration. Stagnation of liquid in the garden bed leads to rotting of the bulbs.
Preparing the soil itself involves digging it up, loosening it, and clearing it of weeds. Traditionally, mineral fertilizers are applied. In this case, the choice is made in favor of potassium-phosphorus compounds, but there is disagreement regarding organics. Some experts believe that manure should not be applied - it stimulates the growth of the green arrow, depriving the turnip of nutrients and slowing down growth. In spring, nitrogen fertilizers are added to the complex.
Important! It is recommended to change the planting site every 3-4 years.