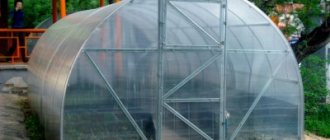
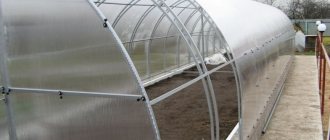
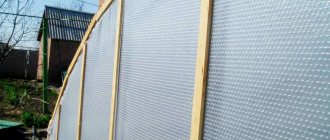
Polycarbonate is a popular building material from which greenhouses, canopies, gazebos, decorative partitions in rooms, as well as advertising structures are made. The material is popular due to its good performance characteristics. These include strength, good light transmission and durability. At the same time, sheet panels can be bent, which makes them in demand not only for the manufacture of straight, but also arched structures. They do not withstand snow loads well, so the roofs of buildings must be made sloping. This is especially true for areas with snowy winters.
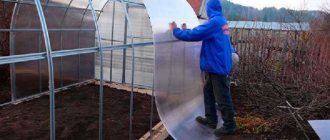
When using panels as cladding for structures, it is necessary to take into account that this sheet material must be correctly fixed to the frame. Fastening polycarbonate is a fairly simple job, and the tool for doing it is available in almost every home. You can quickly learn how to attach polycarbonate to metal frames; for this purpose, below is a description of almost all methods existing today. With a properly selected design, high-quality installation of sheet material and its sealing, the structure will serve flawlessly for many years.
Types of polycarbonate fastening
Fastening polycarbonate to the frame can be done in four ways: point, profile (using special profiles), galvanized tape (suitable for arched structures) and mixed (considered professional).
Spot
More often they use a point method of attaching sheets to a metal frame. To do this, use self-tapping screws and washers for fastening polycarbonate. Moreover, ordinary self-tapping screws are used extremely rarely in installation (only in warm rooms).
You need to fasten polycarbonate to metal using roofing screws with a gasket (also called EPDM washer), as well as self-tapping screws with a rubber thermal washer or screws and thermal washers with a leg. The screws used in fastening must be for metal, because only such hardware can reliably cut into an iron profile and fix the sheet material.
It is necessary to disassemble in detail each of the above types of fasteners in order to understand how best to attach polycarbonate to a metal frame.
A roofing screw with an EPDM washer is the simplest and most affordable fastening of polycarbonate sheets to a steel frame. To avoid the consequences of frequent wetting, this self-tapping screw is coated with a very reliable anti-corrosion layer. It comes with an EPDM washer, which looks like a rubber gasket with an iron cap. This washer allows you to hermetically close the hole under the screw and evenly distribute the load on the sheet.
Due to the small diameter and thin gasket, the screws are sometimes overtightened during the screwing process. Therefore, dents appear in the area of the fastenings, which violate the tightness of the hole and moisture, dirt and microbes penetrate into the honeycomb panels. When using roofing screws in installation, there is no need to make holes in the panels and iron frame, but experts still recommend drilling them. To install colored SPC, it is better to use painted screws.
A self-tapping screw with a rubber thermal washer is also a reliable fastener for sheet panels. It looks like a roofing screw, but is equipped with a large and rather thick silicone or rubber thermal washer. When screwing a screw into a sheet, the thermal washer is flattened by pressure and at the same time evenly transfers the load to the material. This reduces the risk of overtightening the screw and causing a dent.
A metal self-tapping screw and a thermal washer with a leg are a new type of fastener, specially designed for sheet cellular panels. Thermal washer for polycarbonate looks like a washer with a cylindrical leg, which fits into a hole drilled in the cellular panels and rests against the frame. The leg contains a self-tapping screw that is screwed into the iron, and the thermal washer head evenly presses the sheet to the metal. When choosing this type of fastener, you need to take into account that the length of the leg should be selected depending on the thickness of the material. To seal the fastening, a special sealing ring is placed under the thermal washer, and the top is sealed with a cap. Thanks to this technology, the washer does not cut into the sheet and it is impossible to tighten the screw.
Holes for self-tapping screws for fastening polycarbonate must be made 2-3 mm larger than the width of the thermal washer leg, so that after thermal expansion of the sheet the attachment point does not deform. High-quality thermal washers are made of polycarbonate so that it has the same expansion coefficient as the casing.
There is another type of fastener - universal thermal washers . They don't have legs. This worsens the quality of fastening, but at the same time you do not have to look for a thermal washer with a leg of the required length. This fastening is often used in wooden structures, when working with which you need to remember how to fasten polycarbonate to wood. In some cases, the casing material breaks under the gasket (if the screw is overtightened).
Self-tapping screws for thermal washers come with hexagonal and round heads. In addition, they can be used with a regular or Phillips screwdriver. The quality of the connection is the same, but it is still more comfortable to work with a hex head - when working with a screwdriver, the bit practically does not slip off the screw and therefore the sheathing material is less likely to be damaged.
Mostly, self-tapping screws with a width of 4.8 - 8 mm are used, but the length depends on the thickness of the sheets and iron. The selection of screws using an example looks like this: in the arrangement of greenhouses, panels with a thickness of 4 mm and a galvanized pipe with a cross-section of 20×20 and a thickness of 1 mm are used. In this case, it is better to fasten the cellular polycarbonate to the frame using roofing screws measuring 4.8×19 mm, and if you overlap the material, it is better to use screws measuring 4.8×25 mm.
This method of fastening honeycomb panels has a drawback - protruding screws are often visible from inside the structure, which do not fall on the frame elements.
Profile
In addition to point fastening with self-tapping screws, sheet material is attached to an iron frame with polycarbonate and aluminum connecting profiles, which are rigidly fixed to the frame. After that, sheet material of the required length is placed in them, while its width should not be more than 1.05 m. Sheets with a width of 0.7-1.05 m are more often used; for this, the sheet material is cut into pieces, with virtually no waste. This method is used to attach polycarbonate to wood and metal.
Profiles are divided into two types:
- detachable;
- one-piece.
A one-piece profile is a monolithic connecting profile for fastening polycarbonate, the cross-section of which is similar to an I-beam. The ends of this profile are slightly bent inward, so they form a secure latch. The meaning of installing a one-piece connecting profile is simple - the sheet is inserted into the grooves of the profile and secured with latches. Then the profile for fastening the polycarbonate is fixed to the iron frame with roofing screws or screws with thermal washers.
Features of the material
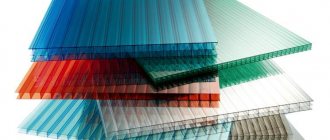
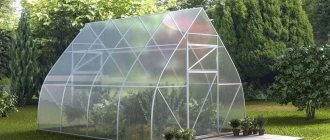
Polycarbonate has a cellular structure; it consists of several sheets connected to each other by jumpers. These jumpers serve as stiffening ribs, giving the sheets high strength. Thermal insulation qualities are ensured by the number of layers in the material; there are from two to four. Polycarbonate transmits up to 90% of light, has flexibility, and its strength indicators are higher than those of glass. Polycarbonate also has a high level of resistance to damage. The material is often used in the construction of arched structures and in the construction of greenhouses.
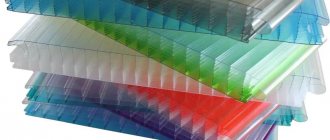
Options for the color palette of polycarbonate sheets:
Each polycarbonate sheet is covered with a film that reliably protects it from the destructive effects of ultraviolet radiation.
On the front side there is an additional selective coating that transmits only a certain spectrum of light.
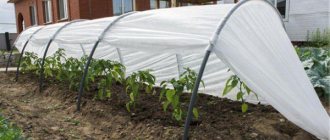
This material is ideal for covering greenhouses.
To equip a greenhouse structure, the following types of polycarbonate are used, which have their own characteristics:
- Honeycomb slabs have high reflective qualities. The coating is based on aluminum plating. This impregnation protects the greenhouse from the formation of the greenhouse effect and creates shade. Cellular polycarbonate is produced in transparent, translucent, green, blue, silver and other colors.
- Cellular polycarbonate transmits the optimal spectrum that promotes the development of plant crops. The material does not allow the penetration of harmful radiation. Only during installation it is important to lay it on the correct side. Otherwise, the climate for plants will be disastrous, and the polycarbonate itself will be destroyed, since there will be no protection from ultraviolet radiation.
- A good option for polycarbonate is sheets coated with polarizing mica particles. But the material can only reflect infrared radiation and transmit the main stream. The lighting in the greenhouse will be normal, but the air inside will warm up less. This polycarbonate is able to ensure constant maintenance of the microclimate in the greenhouse in the summer. They produce sheets that have a golden or pearlescent tint.
The quality of installation work depends on many factors. Most companies carefully develop technology for fastening polycarbonate so that the material can be used in a greenhouse for as long as possible.
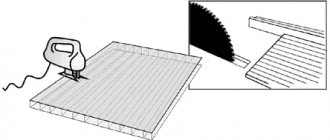
During the construction of a greenhouse structure with polycarbonate, you will have to cut the sheets.
This manipulation must be carried out carefully and slowly.
After all, how correctly the sheets are cut will determine the quality of the greenhouse building in further operation.
Polycarbonate is a fairly thin and pliable material. You can work with it with a wood hacksaw or a stationery knife.
For those who do not have experience in handling polycarbonate, it is better to seek help from professionals.
But cutting sheets can be done with your own hands, if you do not violate the technology and take into account a few simple rules.
First you need to prepare the necessary tool: a hacksaw, a circular saw or a saw.
Rules for working with polycarbonate:
- The protective film on the material must not be damaged.
- It is recommended to remove sawdust generated during operation using compressed air.
- To ensure that there is less polycarbonate waste during the work process, you need to create a cutting plan.
- The blade is cut along the voids, this reduces the risk of sheet breakage.
Polycarbonate sheets are used for arched greenhouses. First, they create a plan for cutting the roof of the greenhouse and cut out sheets for the roof. Then they cut out the sheets for windows and doors. After this, the material is cut out for the walls.
The end parts of the polycarbonate sheets are sealed with sealant. The outer layer must have a protective coating. Manufacturers print text reminders, drawings, diagrams and even comics on sheet packaging about how to properly attach polycarbonate to a greenhouse.
How to attach polycarbonate to a greenhouse without making serious mistakes:
- The frame (structural sheathing) of the greenhouse must be leveled and firmly fixed in a monolithic or soil foundation.
- The top bar installed at the top of the greenhouse must be positioned strictly horizontally.
- The sheathing elements must be parallel to each other.
- The sheets are fastened mechanically: the polycarbonate is screwed on with roofing screws and thermal washers. If the polycarbonate is monolithic, then only self-tapping screws can be used.
- Since polycarbonate sheets have a protective film of various shades, you need to take a close look at them before installation. In 100% of cases, well-known manufacturers glue instructions onto a protective film on the top side of the sheet. The installation process is described in detail there, attention is drawn to which edge is the front, and a lot of other useful information. And it's written in 6 languages. The colors of the protective films on each side are different, but the manufacturer describes in detail what color the front side is.
- To avoid damaging the polycarbonate, the film is removed before installation or after installation work.
- They produce polycarbonate models with the same film on the back and front sides. This means that they have the same UV protection on each side, so the canvas can be installed on either side.
Before screwing the polycarbonate onto the greenhouse, experienced craftsmen decipher the symbols on the packaging film, then mark the outer side of the sheet with red symbols, and the reverse side with a blue (or any other color) marker. It would seem like a trifle, but this makes it much easier to fix and control the sheets on the sheathing using color marks.
External side - how to determine?
There are strict restrictions when installing polycarbonate. The produced polycarbonate material is endowed with special sensitivity to ultraviolet radiation. If the sheets are not laid correctly, then such plastic will last up to five years.
When installation is done correctly, high-quality polycarbonate is used for more than 15-18 years without losing its basic characteristics.
The outer side of the plastic is covered with a film by the manufacturer to protect the material. When purchasing a low-quality, inexpensive model, the sheets can block ultraviolet radiation by no more than 70%. But high-quality models block ultraviolet radiation up to 99%.
To hide the destruction of the slab, unscrupulous manufacturers can coat the material with a milky or smoky tone. When constructing a greenhouse building, you should not save money. It’s better to save yourself the trouble right away by buying high-quality plastic that will last up to 20 years.
Standard polycarbonate sheets use a polyvinyl chloride film, often completely transparent. When purchasing polycarbonate, you can ask the seller which side to attach the sheet to. But you can clarify this point yourself. The main thing is to pay attention to the characteristics related specifically to the outside:
- On the outside, the honeycomb walls are half a millimeter thicker. You can measure the thickness with a caliper.
- The protective film is tougher and harder on the outside. You can determine these qualities of the material by touch.
Which side to mount the polycarbonate towards the sun:
- If the outer and inner sides are marked, then it does not matter, since these polycarbonate sheets have double-sided protection.
- When only one side is marked, then it is this side that turns towards the sun.
When choosing a side, it is important to remember that incorrect installation of the slabs will lead to destruction of the polycarbonate and breakage of the wooden frame.
Accessories for fastening polycarbonate
Let's take a closer look at the components for fastening polycarbonate.
Profiles
For all methods of fastening polycarbonate to metal, profiles are used, and they differ in the material of manufacture and configuration: one-piece, detachable and end.
Connecting one-piece profiles for fastening polycarbonate (HP) are made of polycarbonate, they can be matched to the color of the honeycomb material. The result is not only a strong connection, but also a beautiful one.
The design of the connecting split profile (NSP) consists of a cover and a base. It uses legs rounded inward, so to fix the material, the profile is pulled between the sheets.
End profile (U-shaped) - needed to cover the ends of the honeycomb panels so that dirt, dust and moisture do not get inside the cells.
Ridge profiles allow for floating fastening, which is necessary for arched structures.
Solid corner profile - this plastic sealing profile securely connects two sheets at an angle of 90°. They can be used to connect panels of different thicknesses.
Wall profiles secure the sheets to the wall and protect the ends facing the walls.
You can easily purchase polycarbonate profiles in Anapa in specialized stores that sell building materials and construction equipment. You can also order them online.
Thermal washers
Thermal washer for fastening polycarbonate allows you to securely fix the sheets to the frame. Its design consists of 3 elements:
- a convex plastic washer with a leg that fills a hole in the sheet;
- sealing ring made of plastic polymer or rubber;
- plug protects the self-tapping screw from moisture.
The self-tapping screw for fastening polycarbonate is most often not equipped with a thermal washer, so it must be purchased separately. Thermal washers for fastening polycarbonate gently and reliably press the sheet to the frame of the building, while protecting the material from moisture penetration. They allow the building to look aesthetically pleasing. Moreover, the steps for fastening polycarbonate directly depend on the expected snow, wind and other loads.
Thermal washers come in three types:
- polypropylene;
- polycarbonate;
- made of stainless steel.
For any polycarbonate greenhouses, a thermal washer is an integral element of fastening the coating, because this type of structure must be well sealed.
Mini washers
Mini washers differ from regular thermal washers in their small size. They are used in confined spaces and when it is necessary to make the fastener less noticeable if it is located on a clearly visible part of the sheet. They are also made from different materials. The use of such washers for fastening polycarbonate allows you to make the entire structure more attractive and beautiful.
Galvanized strip
Galvanized tapes for fastening polycarbonate are intended only for arched structures. Thanks to them, the material remains intact, since there is no need to drill or cut it. They allow you to tighten the sheets anywhere, which is necessary for fixing carbonate sheets over long distances.
Stubs
A type of profile for cellular panels is the L-shaped plug with micropores, it is very similar in appearance to the panel guide. This profile must be used with cellular material - it reliably closes the holes at the ends of the sheets, while preventing moisture and dirt from getting inside the panels. It is important to remember which side to attach the polycarbonate to the structure.
The plug profile can be not only L-shaped, but also F-shaped. And in this case, it is also similar to a guide for cellular panels. For arranging heifers, the first option is mainly used, because the ends of the sheet polymer are buried in the ground. Both options are suitable for roof installation - everything will depend on the roof structure and the materials to which the PCs are attached.
Thanks to these plugs, it is possible to prevent a decrease in the transparency of the cellular material, because dirt and moisture will not get into it. During the greenhouse effect, water passes from a liquid state into steam, so it penetrates into the cellular material, making it cloudy. It will be extremely difficult to get rid of it, which is why safety plugs must be installed at the ends of the panels.
The tightness of the plugs can be increased by using a transparent film with micropores.
How to prepare the panel for installation
All the benefits of the material can be reduced to zero if the sheet is not prepared for installation.
The following rules must be observed:
- When installed in single- or double-pitch structures, the stiffeners must be vertical; in arches, they must be parallel to the bend. Horizontal arrangement of channels is allowed only in dry rooms.
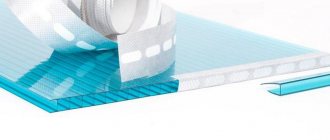
- Open upper cuts should be protected with sealing tapes, lower ones with perforated ones.
- The ends can be further reinforced with L- or U-shaped end profiles. To drain water, make holes with a diameter of 3 mm in the lower profiles in increments of 300-400 mm, and when installing, leave a gap of 3-4 mm to the edge of the sheet.
- Correctly orient the panel in relation to the sun.
- Remove the protective film after installation. You cannot overexpose it, because when heated it sticks firmly to the surface of the sheet. It will be very difficult to remove it later.
- Polycarbonate can be bent mechanically only to the cold bend radius recommended by the manufacturer. You should not reduce it because of the risk of breaking the sheet.
- Cut the panels with a sharp tool - a circular saw or jigsaw, firmly securing them to the work surface to prevent deflection.
General installation rules
The installation of panels is divided into the following stages; all of the specified methods of fastening polycarbonate are used in their work by professionals.
The first stage is cutting the panels
The procedure for attaching polycarbonate to wood begins with cutting the material. Cellular panels with a thickness of 4 - 10 mm are cut with a regular knife; a hacksaw is also often used as a cutting tool. But for fast and accurate cutting, you need to use electric saws with a stop, equipped with a blade made of hard alloys. In this case, the teeth of the circular saw should be small.
What tools are needed?
Before you start attaching cellular polycarbonate to the frame of the structure, you need to cut the sheets in accordance with the dimensions of the greenhouse. To fix the material on the surface of the structure, various types of fasteners are used.
And to cut the panels and cover the metal frame of the greenhouse, you will need the following tools:
- jigsaw (or sharp knife, band saw) - for cutting sheets into individual parts;
- tape measure - it is used to measure the length and width of each fragment;
- electric drill and metal drills - for making holes in the structure frame;
- self-tapping screws, washers and bolts with nuts - press the skin to the surface of the frame;
- building level - needed to level the surface of the coating;
- staircase - for covering the roof of a building with polycarbonate;
- screwdriver - for quickly tightening fasteners;
- hand hacksaw for metal - used to divide connecting profiles into sections of the required length;
- vacuum cleaner - for collecting dust and small parts after finishing work.
Did you know? The largest number of greenhouses is located in Holland - the total area of indoor greenhouses in this country is about 10,500 hectares.
Features of corner connection of panels
If you need to install and fasten polycarbonate sheets at right angles, then you need to use corner profiles. They will allow you to securely connect the panels and make the corner connection almost invisible.
Point Connection - Tools
The main tool you will need for point mounting of polycarbonate on a metal frame is a cordless screwdriver with a set of attachments and drills. It is not recommended to use a powerful drill instead - its power is excessive for such work, and therefore overtightening of the screws, as well as slipping and damage to the attachments will be regular. In addition, the drill is too heavy and inconvenient for installing polycarbonate.
Cordless screwdriver
It was already mentioned above that, in addition to attachments for self-tapping screws, you will need metal drills for a screwdriver. To create holes for thermal washers in polycarbonate, use products with a diameter 2-3 mm larger than that of the fixing leg. If you plan to work with a frame with a wall thickness of more than 1.5-2 mm, then it is advisable to stock up on drills for creating preliminary holes in the metal - this way you can significantly make your work easier during the direct installation of the SPC. The diameter should be slightly smaller than that of self-tapping screws.
Advice! Thin sheets of cellular polycarbonate tend to vibrate when drilled, so before doing this it is better to fix them with clamps.
As for the rest of the tools, you will need:
- ladder;
- roulette;
- level;
- spare battery for screwdriver;
- construction knife with retractable and replaceable blade.
Features of installation of monolithic polycarbonate
Sometimes monolithic polycarbonate is attached to metal using an iron frame made in the form of a frame. The frame must have special grooves up to 25 mm deep. Sheets in the frame are fixed in two ways:
Wet method. In this case, a special silicone-based putty or sealant is applied to the edges of the frame and seal. This method can be used for wooden and iron structures. Compact structures are sheathed with monolithic polycarbonate using glue or special tape. External work is carried out with glue, which is not afraid of adverse atmospheric influences. If good transparency of the fastening is required, then you need to use polyurethane glue. Before applying it, the surfaces are degreased with alcohol.
Dry method. Use screws, bolts, nuts, self-tapping screws and press washers. In any case, be sure to use rubber gaskets or plastic profiles that do not contain plasticizers. Do not glue the sealant directly to the panels. Fastening elements must be placed in increments of 50 cm. It is recommended to retreat from the edge of the material at a distance of at least 2 cm.
This type of fastening of monolithic polycarbonate is used for covering canopies and large structures.
Important! Whatever fastening method you choose, you need to remember at what distance to fasten the polycarbonate (monolithic - after 50 cm, cellular - with point fastening after 30-40 cm).
Cellular and monolithic: what is the difference
Polycarbonate belongs to the group of thermoplastics. When heated, it turns into a viscous-flow state, and when cooled, it turns back into a solid state. Polymer granules are used as raw materials, including recycled ones. In production, 2 product options are obtained by melt extrusion - monolithic and cellular polycarbonate.
The material is produced in the form of sheets of standard width 2050-2100 mm, length 6 or 12 m and various thicknesses. With the same chemical composition, both types of polycarbonate have different structures:
- Cellular is a layered panel 3.5-40 mm thick with through channels of square, triangular or rectangular cross-section filled with air. The thicker the polycarbonate, the higher its rigidity and strength.
- Monolithic is a homogeneous material with a thickness of 1.5-20 mm. The sheet profile can be flat or wavy. It differs from a cellular one in its heavier weight, high impact resistance (almost 15 times), better light transmission, sound and heat insulation. Its price is slightly higher.
Different thicknesses of cellular polycarbonate
Color options for monolithic polycarbonate
Both materials transmit up to 80-91% of sunlight, which allows them to be used to create greenhouses, greenhouses, canopies, roofs, billboards, lightboxes, etc. Thin plates are easily bent and placed in arched structures with a bending radius of 700 mm.
When painted with colored pigments, the material acquires improved decorative qualities. Colored polycarbonate has found application in creating spectacular facade or roofing inserts, transparent canopies, fences, decorations, and interior design.
Protective coatings
Sheets of cellular slabs are covered with a protective film, which does not need to be removed during installation work, otherwise the light-conducting qualities of the polycarbonate will deteriorate. This protective film protects the material from damage and premature aging. The film is not removed until all work is completed.
Video description
You will see how to properly install a greenhouse made of cellular polycarbonate in the video:
The profile itself comes in several types:
- connecting;
- one-piece;
- end;
- detachable.
All options have their own characteristics and characteristics that must be taken into account when choosing the type of design.
The boards can be mounted in aluminum, plastic or polycarbonate profiles. The profile itself has a different cross-section and is marked in Latin letters. The slabs installed in the grate can be secured with sealant. But in strong winds this will be a weak connection. It is important to choose a high-quality sealant that will retain its elasticity and strength for several years.
To know how to properly attach polycarbonate to a greenhouse, you need to remember several important rules:
- sealant is used only on the upper slopes;
- avoid any bending of the sheets when using thermal washers - this leads to the appearance of holes and loss of the tightness of the structure;
- arched structures are secured from below with perforated tape, which will protect against air escape, ruptures and damage to the sheets themselves;
Perforated tape Source prom.st
Materials that do not destroy polycarbonate
Polymer materials that are compatible with polycarbonate include:
- ethylene propylene rubber;
- polychloroprene;
- polyethylene;
- polytetrafluoroethylene (Teflon);
- neoprene;
- silicone;
- rubber sealant.
Polycarbonate, used as a construction and finishing material, can come into contact with the following materials:
- wood;
- rubber and caoutchouc;
- thermoplastic elastomers or thermoplastic elastomers that do not contain PVC;
- glass;
- metals.
Tools and equipment
To carry out work on fixing the panels, you need tools, main and auxiliary equipment. The choice depends on what frame is attached to and how the material is mounted, as well as on the complexity of the design.
To carry out the work you need:
- screwdriver;
- electric drill (with drills for wood or metal);
- electric jigsaw for cutting polycarbonate;
- a vacuum cleaner for collecting small chips and dust from the honeycombs after cutting;
- device for cutting aluminum profiles;
- self-tapping screws;
- bolts with nuts;
- various washers;
- rubber, plastic, silicone gaskets for washers (umbrella or flat);
- ladder;
- metal ruler;
- measuring tape (roulette);
- level.
Prices for self-tapping screws
self-tapping screws
Materials not compatible with polycarbonate
The following polymer materials are incompatible with polycarbonate:
- polyvinyl chloride (PVC);
- nitrile;
- all types of polyurethane.
There are also some chemicals that are not compatible with this material. They are:
- solvents, especially acetone;
- alkaloids;
- acids;
- solutions of salts and fats;
- ammonia;
- some types of adhesives and dyes.
Moreover, their influence directly depends on the duration of contact with the material, their concentration and temperature.
Briefly about the main thing
Understanding the correct installation of polycarbonate slabs is very simple. The manufacturers themselves provide relevant information on the packaging. But if it is not there, then you can always decrypt the data. However, this is far from the main problem when working with such material. The plastic is quite fragile and requires careful handling. If you do not have experience working with it, then you should hire specialists. And even with the highest quality installation of the structure, polycarbonate requires annual maintenance, which ensures its durability.
Frame
You can make a frame for monolithic and cellular polycarbonate from many materials. A wood frame looks very elegant, but when choosing this building material, you need to know that it must be glued, otherwise the entire structure will crack and deform. In addition, almost every year the frame will need to be painted and treated with special protective compounds against insects and diseases. At the same time, you need to remember how to securely attach polycarbonate to a wooden frame.
A frame made of thin-walled profile pipes, which has a long service life and increased strength, is considered more unpretentious.
Aluminum and steel materials are suitable for the frame under sheet cladding. Moreover, the sheathing can be made from steel and aluminum directly on the construction site, using a reliable type of fastener. The aluminum frame is distinguished by its anti-corrosion properties. If its design is correctly calculated, then it will retain its physical and aesthetic properties for many decades. But it is very expensive, so it is rarely chosen.
For quick construction and saving money, you can build a thinner sheathing and cover it with thick sheets. In this case, there will be fewer screw fastenings, which will speed up the installation process. You can also save money and purchase a thin covering, but then the lathing will have to be more frequent.
The choice depends on the following aspects:
- roof type;
- the area where the structure is installed;
- arch size;
- span dimensions;
- thickness of sheet material.
In any case, savings must be effective. For example, if you do not take into account the snow load and install sheets that cannot cope with the mass of snow falling in the region, then the surface will not withstand the overload and savings will lead to large losses.
If they are sheathing an already built structure that cannot be changed, then the thickness of the material is selected based on the frequency of the frame sheathing: the thinner it is, the thicker the material should be chosen.
Some useful tips
- Polycarbonate, with its advantages and characteristics, is plastic. And over time it ages, and cracks appear on the surface. Honeycomb sheets often have dirt and plants trapped inside. When the ends are not sealed, moss and insects are soon found inside. And you will have to fight them with antiseptics.
- When the polycarbonate in a greenhouse is not laid correctly towards the sun or a mistake is made, there is no need to disassemble the entire greenhouse. A simpler option is to cover the greenhouse with a protective film, which is used for restoring car paintwork.
- Monolithic polycarbonate is more reliable, but also more expensive. Small cracks easily appear on it due to sudden temperature changes. Over time, droplets of water and stains appear on the surface of the canvas. Cracks are removed with solution 646, which melts the surface.
- It is important to choose the right type of greenhouse and fastening elements, taking into account the characteristics of the region.
- In some regions, you will need not only a reinforced frame, but also strong fastening of polycarbonate sheets due to constant and strong winds.
- When using carpentry fasteners, it is recommended to first perform several screws on the scraps. This way you can correctly select the required force and tool speed.
It’s easy to figure out the correct installation of polycarbonate sheets. The manufacturers themselves inform the buyer with instructions on the packaging. If it is not there, then the data is decrypted. Polycarbonate is a fragile material and requires careful handling during installation. When you don’t have the skill to work with it, it’s better to hire a professional. But even with high-quality installation of polycarbonate in a greenhouse, it requires annual maintenance, which will ensure its durability.
Choosing a step is the most important stage in frame construction
When installing the frame under the panels, you need to more accurately select the pitch of the sheathing, which depends on the amount of bending of the material, its thickness and the angle of the roof. The roof slope angle cannot be less than 30°. Knowing all the nuances of constructing the frame, you can quickly set the pitch of the sheathing (it is equal to a hundred times the thickness of the material).
For example, for a sheet with a thickness of 4 mm, the step will be 40 cm, for 8 mm - 80 cm. In other words, the greater the thickness of the material, the smaller the step of the sheathing. It should be noted that thick cellular polycarbonate is faster to fasten because the fastener spacing is smaller and the material bends less. For regions with snowy winters, the sheathing pitch is reduced by 10-15%. When a frame with such a step is expensive, it is better to do something different: design the structure in such a way that the snow quickly melts off the roof. To do this, use a roof slope of 30 - 50°. At these degrees, the cellular panels are securely fastened, and the snow melts well.
During the installation process, be especially careful about fastening, which is done using washers. If there are few of them, then the sheet material will not be securely fastened. Given its large windage, there is a possibility of the sheet being torn off by strong winds. But you also don’t need to install a lot of washers, because this will increase the load on the panels, and they may not withstand hot weather and become deformed. The same can happen in a snowy winter, when wet snow freezes onto sheets of material and the load on the frame exceeds the maximum permissible limit, as a result of which the sheet material breaks. But in any case, you need to use washers to ensure the fastening is secure.
How to properly fix cellular polycarbonate
An easy way to perform a quality installation is to follow the rules for installing self-tapping screws. How the polycarbonate will be fixed depends on their shape and size of the spacer washer:
- The thin rubber washer holds the sheet well and is easy to install. But when working with a screwdriver with an attachment, it is important to be careful not to push through the honeycomb fabric in the greenhouse. The lining is thin, and often beginners, without having time to slow down the screwdriver, easily pierce the surface of the polycarbonate sheet.
- Reinforced PVC washer. It is attached in the same way as a regular washer. The risk of damaging the polycarbonate sheet laid on the greenhouse is very high.
- Enlarged silicone washer. It’s difficult to press a leaf with it. The washer is made of soft material and is easily deformed, preventing the screwdriver from driving the screw deeper than normal.
It is difficult to fasten a self-tapping screw with a head for a cross-shaped bit. When the hexagon bit holds the self-tapping drill relatively level in the metal frame, the cross bit under load overturns the fastener.
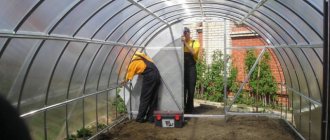
Temperature recording for installation work
You can work with this unique building material at any time of the year. But experts still do not recommend installing this sheet material in cold weather at temperatures below - 15°C, because it may break when bent.
Working with this material in cold weather requires special care, because in winter it is very fragile. When installing in cold weather, future expansion of the material must be taken into account because it will expand after heating. If this is not taken into account, then the panels installed in cold weather in the spring may come out of the grooves and the entire skin will be deformed. In this case, you need to remember how to properly attach cellular polycarbonate.
External side
The installation of polycarbonate has strict restrictions, which are associated with the sensitivity of the slabs to ultraviolet radiation. If installed incorrectly, plastic will last for several years, but properly installed high-quality material can be used for more than 15 years.
Removing the protective film from the outside of the plastic Source zavodecoteplic.ru
The outer side of the slabs is covered with a transparent film to protect the material. Low-quality, inexpensive polycarbonate models can block no more than 70% of ultraviolet radiation, and high-quality models can block up to 99%. To hide the destruction, slabs are sometimes covered with smoky and milky tones. But it’s better to immediately purchase high-quality plastic and save yourself from unnecessary problems.
Standard boards use polyvinyl chloride film. It is completely transparent. You can learn how to attach polycarbonate when purchasing it. You need to ask a specialist for help or do it yourself, paying attention to the following characteristics that relate to the outside:
- the thickness of the honeycomb walls is measured with a caliper - on the outside they are 0.1 mm thicker;
- the film is harder and tougher on the outside; a good specialist can determine it by touch.
Polycarbonate – which side to mount it towards the sun:
- If both sides are marked, it does not matter since polycarbonate has two-sided protection.
- If only one side is marked, then it is this side that needs to be turned towards the sun.
It is important to remember that incorrect installation of slabs can lead to destruction of slabs and breakage of wooden elements.
Arched greenhouse Source teplica-exp.ru
Cleaning polycarbonate after installation
After installation work, the surface of the casing must be cleaned of dust and dirt. In this case, taking into account the adverse effects of acids, neutral compositions are selected. It is better to use soap solutions; cleaning the canvas with them will not be difficult. Do not use abrasive compounds or strong solvents. Moisture, drying oil, wax and oil that have penetrated into the honeycomb negatively affect the material. Due to the good properties of the panels, they can be used for cleaning with steam and jets of water.
Did you manage to solve your problem using the recommendations from the article?
Yes!
46.39%
No. More answers required. I'll ask in the comments now.
38.56%
Partially. There are still questions. I'll write in the comments now.
15.05%
Voted: 804
Tips and tricks
With all the advantages and benefits, polycarbonate remains just a soft and pliable plastic, prone to aging and cracking. Honeycomb sheets, moreover, have the unpleasant property of accumulating plant microspores and dirt inside the channels. If the ends of the polycarbonate are not covered with tape during fastening to the greenhouse frame, then insects and moss may soon appear inside. You can combat green plaque by periodically cleaning with an antiseptic solution.
If the builders incorrectly laid the polycarbonate with the wrong side up, this is not yet a reason to dismantle the greenhouse. Instead, you can cover the surface with a protective PVC film used for restoring the paintwork of cars.
Monolithic polycarbonate is considered more reliable in terms of greenhouse operation. But thermal stress due to temperature changes can cause tiny cracks to appear, resulting in water droplets with dirty stains appearing on the ceiling and walls. The problem can be eliminated quite simply; you need to treat the cracks with solvent 646 several times to melt the surface and eliminate the source of leakage in the greenhouse.
One of the problems that one has to face when attaching polycarbonate is the inconvenience of screwing self-tapping screws into a round metal pipe. In order for the fastener to properly enter the metal, the axis of the drill must be perpendicular to the metal surface. Only then can the honeycomb material be secured without the risk of breaking through the thin surface. In this case, an L-shaped attachment to an electric drill is very helpful. With one hand we press the shelf against the steel pipe, with the other we drive the self-tapping screw and washer into the polycarbonate. Marriage almost never happens.
If you plan to fix the polycarbonate sheet on the sheathing with ordinary carpentry fasteners, it would be correct to make several training approaches on scraps in order to select the applied force on the screwdriver and the number of revolutions to fully enter the greenhouse frame material.
Minimum bending radius during installation
The diameter of the roll during transportation is one thing, but the minimum bending radius is the maximum bending of the sheet allowed by the manufacturer already on the structure, be it a greenhouse or a canopy. Each thickness and brand of polycarbonate has its own bending radius. The picture shows the average radius values for each sheet thickness.
IMPORTANT! Violation of the minimum bending radius leads to a reduction in service life
up
Choosing the thickness of polycarbonate for a greenhouse and canopy
The answers are very simple. For garden standard greenhouses, polycarbonate sheets with thicknesses of 4mm, 6mm and 3.5mm (in order of popularity) are used. For canopies, thicknesses of 8 and 10 mm in cellular polycarbonate or 5 mm, 6 mm and 8 mm in monolithic polycarbonate are popular.
IMPORTANT! For fences and enclosures, the optimal thickness of premium grade polycarbonate is 8 mm with double-sided UV protection. A popular brand for pick-up is the “crushed ice” sheet structure.
up
What to consider before starting work
It is not enough to know how to properly cover a greenhouse with polycarbonate: this work is preceded by the construction of a frame, the strength and geometric parameters of which determine the reliability and durability of the entire structure. Therefore, before starting work directly related to laying the coating, it is necessary to make sure that there will be no problems with the supporting system.
To do this, the frame is strengthened, if necessary, by installing additional vertical or horizontal ribs or slopes. Then, using a square and a tape measure, they measure the main dimensions, make sure that the posts and veins correspond to the vertical and horizontal levels, and that the edges on which the joints will be parallel are parallel.
Even minor distortions can seriously complicate installation Source academdacha.ru
See also: Catalog of garden house projects
Since the air channels of the material are open in the cross section, they must be closed before installing the sheets. Otherwise, dust and debris will get into the cavity, and insects will crawl in. Therefore, the upper sections should be sealed using a special tape and end profile, and the lower ones should be glued with perforated tape, which will not prevent moisture condensing from draining from the cavities. That is, before you cover the greenhouse with polycarbonate with your own hands, you need to purchase both types of tapes. For arched structures that do not have upward-facing sections, only punched paper tape is sufficient.
For reference! These accessories solve another problem: by closing the air inside the channels, they do not allow it to suddenly heat up or cool down under the influence of external conditions. This process occurs more smoothly, which has a beneficial effect on both the condition of the plants and the integrity of the protective UV layer.
Gluing punched paper tape to the end Source i.ytimg.com
It is also recommended to purchase connecting profiles and fasteners, which will be discussed below.
Storage
You can preserve all the properties of cellular polycarbonate if you comply with some requirements:
- The panels must be stored flat (not hanging down) on a flat surface, at a temperature range of 0 to 25°C, in a dry place, avoiding moisture.
- The original packaging must be retained until the start of the cladding work.
- Avoid exposing polycarbonate to ultraviolet rays, otherwise the material may lose its color.
- Avoid any mechanical impact on the panels to avoid their breakage.
It is worth mentioning that before installation work, the frame must be treated with special compounds to prevent rotting (corrosion) and other undesirable phenomena.
Wet fastening of canvases to a wooden frame
This method of fixation is mainly used for fastening monolithic polycarbonate sheets. The operating procedure is practically no different from the procedure for installing glass in a wooden frame.
Step 1. Polycarbonate sheets are cut so that there is a gap of 2 mm on each side between them and the wooden frame.
As in the case of drilling, you need to press the polycarbonate tightly to the surface, avoiding tension and vibration
Step 2: Apply sealant to the grooves of the wooden frame.
Sealant for polycarbonate
Step 3. The canvas is placed in the frame and pressed lightly. Other fabrics are strengthened in the same way. The sheets are additionally fixed with wooden or plastic strips.
Profiled polycarbonate
Profiled monolithic polycarbonate is a relatively new material on the market. It is used in the construction of various structures, including commercial ones. More details in this article.
Proper fastening of polycarbonate using a profile and professional fasteners will help create not only a strong, reliable and beautiful structure. Structures made with your own hands on a personal plot in accordance with all the rules of the art of construction will delight the owners for many years.
Prices for sealant for polycarbonate
sealant for polycarbonate
Aluminum fastening systems
Aluminum profiles allow you to assemble very durable structures using sealing gaskets. During assembly, the aluminum strip is attached to the base, and seals are placed in the grooves on top.
Polycarbonate sheets are laid on top, onto which top strips with rubber gaskets are attached. Secure with roofing screws. A decorative cover is secured on top.
Why is it important to fix polycarbonate correctly?
Honeycomb panels diffuse light well and have good thermal insulation.
But they can demonstrate their effectiveness only if they are installed correctly. If you mount polycarbonate horizontally on a greenhouse or veranda, condensation will not come out of the honeycombs. Over time, mold will form there, and the slabs will have to be removed and disposed of. The front side of polycarbonate has UV protection, absorbing up to 99% of radiation destructive to plastic. It is worth laying it the other way around, and after 3-4 years the slab will become cloudy, crack and become brittle.
The coefficient for metal and polymer is different. When the temperature changes, the slabs must slide along the frame. To prevent the flooring from being scratched, a soft pad is placed under it, and the fasteners are made floating.