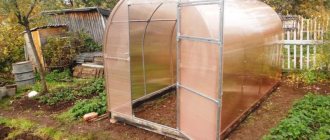
The Kremlevskaya greenhouse has long been known among specialists as an effective, practical, and very promising structure. It attracts with its durability, relative ease of assembly, and increased wear resistance. Several models of this greenhouse are known. Today we are faced with the task of finding out their key advantages, characteristics and types, as well as providing a detailed algorithm for assembling the structure.
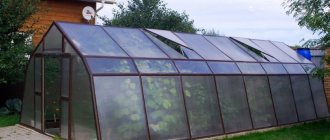
Greenhouse "Kremlevskaya"
Pros of the Kremlin greenhouse
Professional gardeners claim that Kremlin greenhouses are able to increase the volume of the constructive area, since the metal pipes are located in the same plane as the arc elements.
Experts highlight a number of positive qualities in this design for home use. They include:
- Strength. Metal arches installed at a certain pitch ensure durability and increase the wear resistance of the structure. The greenhouse arcs are made of a metal pipe, the elements of which are connected to each other using special jumpers. As a result, it is possible to achieve stability and stability of the structure under seasonal loads;
- This type of greenhouse has the ability to cope with increased load. On average, greenhouses can withstand up to 500 kg. These parameters depend on the size and area of the product;
- When disassembled, the entire structure does not take up much space;
Installation can be carried out by novice craftsmen. To do this, just read the operating instructions. On average, the work process will take up to 5 hours.
Reviews about the greenhouse
People speak positively about the greenhouses of this line. Consumers like that the greenhouse can be easily transported in disassembled form, and can be installed quickly and easily. At the same time, the design turns out to be reliable and stable. The welded frame elements are of impeccable quality, which determines the reliability and durability of the greenhouse. There is no need to finish or change anything during assembly. The entire installation work takes about 3-4 hours.
The price of the greenhouse immediately includes the price of two windows. With such transoms, good ventilation can be ensured, and this has a positive effect on the cultivated crops. There are doors at both ends. This also creates comfortable working conditions.
All modifications of the Kremlevskaya greenhouse are equipped with two windows
You can personally evaluate all the advantages of the “Kremlin Greenhouse” by choosing the most suitable model from those presented in the assortment.
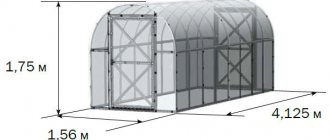
Parameters of the Kremlin greenhouse
- The length can be from 3 to 15 m;
- The height of the product is no more than 300 cm;
- The step between the arcs is 2 m;
- The surface of the greenhouse is decorated with cellular polycarbonate.
Each consumer independently decides to increase or decrease the structure to the required dimensions.
Why choose cellular polycarbonate
Cellular polycarbonate appeared on the market not so long ago, but has already gained great popularity among amateur agronomists. It is durable and practical, as a result of which it is gradually displacing glass and film from the market. Polycarbonate panels contribute to better light dispersion inside the greenhouse, thereby illuminating every corner. The material is much stronger than glass, which can be broken even by a slight blow from a stone or garden tools.
Glass with a thickness of 4-6 mm has a service life of up to 50 years, while polycarbonate with the same thickness will last more than 10 years without loss of useful characteristics. However, polycarbonate sheets are much stronger and it takes a lot of effort to damage them. Polycarbonate has low thermal conductivity, can withstand temperatures from -60 to +80 degrees, and is flexible, which allows you to create any architectural forms of structures.
Types of the Kremlin greenhouse
Before purchasing, we recommend that you decide on the type of greenhouse, device and technical characteristics.
There are several modifications of the Kremlevskaya greenhouse:
Luxury design
This variety is considered basic. Its configuration includes two volumetric windows, two doors, and the end parts are made of a non-separable type. The presence of vents ensures the normalization of the microclimate inside the space. Metal arches with jumpers are used as support;
Bogatyr
This design has a 25mm larger profile of metal elements. The distance between the metal arcs is 70 cm. As a result, this distance makes it possible to increase the greenhouse’s resistance to seasonal loads;
Star
This category of greenhouse complex has been discontinued. In terms of its technical features, it is similar to a luxury model. The arches are located at a distance of 1.5 m from each other. This position ensures the strength and endurance of the structure. Steel pipes are used to create the frame;
The president
It was also discontinued in production. A stainless metal pipe was used as a frame. The unusual design and four windows ensure the creation of a comfortable microclimate inside the enclosed space;
Zinc
Its device is similar to a luxury model. The supporting frame is made of galvanized steel. Thanks to this material, it is possible to increase the performance of the product;
Arrow
This type of greenhouse complex has also been discontinued. The main difference between such an installation is the design of the arcs. The elements are connected at the top points, thereby resembling an arrow. The roof structure is sharp.
In winter, such a structure provides additional protection from mechanical loads.
The Kremlyovskaya greenhouse can withstand a load of up to 350 kg. Experts recommend taking into account the thickness of cellular polycarbonate. High-quality material must be at least 5 mm.
Advantages of the new product
The most important indicator that consumers usually pay attention to is the strength of the structure. This is the main trump card of the Kremlin Farm. Manufacturers managed to achieve this quite simply: a double galvanized pipe was used to make the frame base - 20x40 mm on top and 20x20 mm on the bottom, so the greenhouse building can withstand a snow load of hundreds of kilograms.
The advantages of a greenhouse structure of this brand also include:
- Ease of maintenance: the walls are installed in a vertical position, which makes it easy to reach any corner without bending. In addition, tall crops can also be planted under the walls - they will be able to grow vertically, which is not the case with other types of buildings.
- Wide doors. This allows you to bring in or take out from the greenhouse everything you need - fertilizers, soil, garbage, boxes of seedlings and much more.
- Windows are built into the doors, walls and ceiling, so it is always possible to organize effective ventilation and not depend on winds or other weather conditions.
Stages of assembling the Kremlin greenhouse
We invite you to familiarize yourself with the step-by-step instructions that will allow you to assemble the Kremlin greenhouse with your own hands.
To do this, it is recommended to adhere to the following steps:
- A small stand needs to be installed first. It will be used as a foundation. Experts allow the installation of a greenhouse on the ground. However, it is important to understand that due to the lack of support, the structure may become deformed. In the lower part, the metal trim quickly becomes covered with rust, as a result of which the metal part may break.
- The end part is carefully sheathed with transparent polycarbonate. As a rule, these materials are provided in the kit.
- Next, they fix the vicious farm.
- After which you can move on to covering the side parts of the structure.
Assembly instructions
Let's look at the step-by-step instructions for assembling the “Kremlin” greenhouse. If we briefly describe the algorithm, it will look like this.
- First of all, install a light stand. It will then play the role of a foundation. It is allowed to place the greenhouse directly on the ground. However, it is necessary to understand that due to such a simplification the design will suffer, since the lower trim will begin to quickly become covered with rust. Metal corrosion certainly cannot be avoided.
The greenhouse can be installed without a foundation
The assembled frame of the “Kremlin” greenhouse
Now we will take a closer look at each stage of installation of a greenhouse, known for its efficiency, durability and increased strength.
Assembling the foundation
As noted earlier, a foundation is not a requirement. The foundation is assembled in several stages.
Step 1. First of all, you need to correctly select a site for placing a greenhouse. It is advisable to choose a space protected from the wind, located in an area of good sunlight.
Location of the greenhouse according to cardinal directions
Step 2. First, the selected area is marked using the “Egyptian triangle” method.
Marking the base using the “Egyptian triangle” method
Step 3. Then bricks are installed in the gaps (in the corners). The step should be 2 m.
Step 4. It is important to properly prepare the bars. They are treated with an antiseptic composition, coated with oil or varnish, and painted.
Timber foundation
Step 5. Bolts are screwed into the beams at a pitch of 50 cm. It is with the help of these bolts that the strapping will then be installed. The size of the timber is 50 by 100 mm.
If the owner decides to build a more powerful wooden base for the greenhouse, the timber is laid in two or even three rows like well crowns
It is necessary to ensure the reliability of all connections so that the structure can withstand increased wind loads.
If you follow the recommendations, monitor the reliability of installation and the strength of all connections, the greenhouse will be durable, reliable, and will have increased strength.
Example of a polycarbonate greenhouse foundation
Prices for timber
timber
Assembling the ends
Polycarbonate must first be cut. To do this, you must first select the most suitable area, as flat as possible. A sheet is placed on it. The ends of the Kremlevskaya greenhouse consist of a door and two outer elements.
The end parts are laid out on polycarbonate
Parts of the end are transferred to polycarbonate
First of all, the side segments are cut out. It is necessary! Otherwise, a polycarbonate sheet may simply not be enough.
Cutting polycarbonate
Individual segments of the greenhouse structure are characterized by minimal weight. In this regard, they are used as patterns. For high-quality cutting, you will need a good, extremely sharp construction knife or grinder.
Cutting polycarbonate
Cutting polycarbonate itself is simple and will not require you to spend a lot of time and effort or any special skills. But, like any other important task, you need to carefully prepare for it. Read more here.
Here is a specific algorithm for assembling the end parts of the greenhouse.
Step 1. The side rounded segment of the end is applied to the polycarbonate sheet. A right angle is maintained.
Step 2. The first element is cut out. Cut the sheet carefully; with a good knife, polycarbonate will be cut very easily and with minimal effort.
Step 3. Be sure to leave an allowance of 5 cm in the process of cutting all segments of the greenhouse.
Step 4. Then you need to turn the side end element over and attach it to the opposite corner of the polycarbonate. All that remains is to cut the segment in the same way.
Cutting polycarbonate using a grinder
Step 5. Then you need to make parts for covering the second end of the Kremlevskaya greenhouse.
Step 6. If you want to use polycarbonate as rationally as possible, using material sparingly, you need to apply the pattern to the sheets that have already been cut, connecting the upper parts.
Step 7. The next step is to cut the polycarbonate for the door.
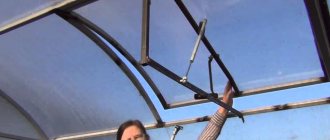
Step 8. At the final step, the frame for the front end of the greenhouse is mounted. The window frame is fixed on the hinges with self-tapping screws. The door is also fixed to the side segment of the greenhouse with self-tapping screws.
Parts of the ends are laid out on a flat surface
The parts of the ends are connected with self-tapping screws 5.5*19
The door is attached to hinges
To install the lock mechanism you need to use self-tapping screws
Attaching the window to the door
Attaching an additional hook to fix the “Open” position
Assembled end frame
Sheathing the end
The ends must be carefully sheathed with prepared polycarbonate elements, which are fixed using special self-tapping screws for working with roofing and thermal washers.
Thermal washer for polycarbonate
Remember! Simple fasteners cannot be used. This is due to the technical characteristics of polycarbonate. Outdoors, under the influence of atmospheric conditions, the material has the ability to shrink and expand. With a rigid type of fixation, the casing wears out very quickly.
Scheme of fastening polycarbonate plastic sheets
The outer sheets are attached so that there is approximately 2 cm of polycarbonate overlap at the bottom
The polycarbonate cut is attached to the door and window
Next you need to fasten the handles and the eyelet to fix the window hook
Then you need to trim off the excess edge of the polycarbonate sheets, except for the bottom
The next step is technological holes for the door and window
Some craftsmen still take simple self-tapping screws for installation and leave 1 mm gaps between the heads of the screws and the polycarbonate sheets. But this is not the best option, because it is quite risky. The diameter of the fastening rods should be slightly smaller than the diameter of the holes in the polycarbonate.
Finished end
When the end is ready and sheathed, it must be installed, maintaining a strictly vertical position. Special holes are drilled in the lower jumper to ensure reliable fixation using bolts.
Prices for thermal washers
thermal washers
We mount and sheathe the frame
At the final stage, the frame of the “Kremlin” greenhouse is mounted and covered. Trusses are installed in 1 m increments for the basic model. Be sure to ensure alignment with the level in your hands.
Base elements
Base assembly
The base is almost ready
Half-arcs
Half-arc connection
The arcs are installed on a finished base located in small trenches. Here and below the option without arranging a foundation is illustrated
The arcs are fixed with self-tapping screws
Then it remains to perform high-quality installation of horizontal jumpers. Fastening is carried out using special T-shaped systems.
Horizontal jumpers (ties)
The jumpers are connected by T-shaped spider plates
Installation of spiders on arches is carried out with the middle stream down
Installation of spiders at the ends is carried out with a middle stream to the sides
After installing the base frame, the rear end of the greenhouse is assembled.
When this stage is completed, the frame is completely assembled
When the end is already in place, the trusses are sheathed with polycarbonate sheets. There is no need to cut anymore. Polycarbonate sheets are quite flexible, so they can be easily bent, bending them completely around the arch.
Sheathing the frame with polycarbonate
The frame is covered with polycarbonate sheets
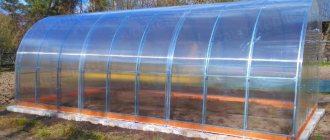
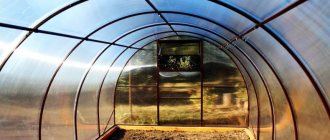
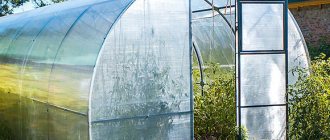
Ready-made greenhouse “Kremlevskaya”
To prevent the window from opening inward, screw a self-tapping screw into the frame to secure it.
Instructions for assembling the Kremlevskaya greenhouse. Downloadable file (click the link to open the PDF in a new window).
Assembly instructions
Construction of the foundation for the Kremlin greenhouse
The foundation is considered not a mandatory requirement in this case. This element can be assembled by following several steps.
These include:
- Initially I am cultivating the site for installing a future greenhouse. Experts recommend quiet areas in the garden area. The amount of sunlight affects the rate at which crops grow;
- After this, the area must be marked using the Egyptian triangle technique. The photo shows calculation instructions;
- Now you need to install bricks in the marked gaps. They are placed in the corner parts. The step between stone elements will be 2 m;
- Now you need to prepare the bars. Their surface is treated with antiseptic impregnations. After this, they are coated with a protective varnish or painted with oil paint;
- Self-tapping screws will help secure the wooden elements to each other;
- Next, metal arcs can be installed on the surface of the wooden frame. We will fix iron jumpers between them.
Then we proceed to fixing the polycarbonate. Special grooves provided by the design will help secure the material.
Caring for the greenhouse correctly
The greenhouse comes with a 1-2 year warranty. Of course, its service life is much longer. If you want to achieve the best result and maximize the service life of the structure, you need to follow simple tips.
So, every year, carefully wash the structure with a weak soap solution. This is done before the start of the season. Use only soft napkins and rags. The use of chemical cleaning agents and hard brushes is prohibited.
Cleaning the greenhouse
Snow should be swept away from all areas where it lingers. The greenhouse copes well with mechanical loads, but there is another problem. When snow melts, an ice crust forms on polycarbonate surfaces. This may negatively affect the material.