Types and methods of ventilation of greenhouses
There are two types of ventilation in greenhouses: natural and forced. Natural involves ventilation using vents, transoms, and doors. Forced operation uses fans that provide air inflow and outflow.
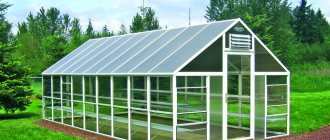
Timely ventilation contributes to a great harvest
Advantages and disadvantages of manual ventilation
The easiest way to ventilate: if it’s hot, open the windows, if it’s cold, close them. The advantage of the manual system is that it is economical, but there is an unexpected complication. Draft negatively affects the development of any plants.
Another disadvantage is the need for constant presence. What if the greenhouse owner only comes for the weekend? The only way out is an automatic greenhouse ventilation system, created with your own hands, which will give you the opportunity to be away on your own business.
Manual ventilation requires constant attention
If the greenhouse has correctly positioned windows, it is easy to “teach” them to open and close without your participation.
Automatic ventilation and its types
The automatic system provides the following advantages:
- the windows open during a given temperature increase and to the desired height;
- For each crop, different climatic conditions can be created.
All automatic ventilation devices are divided into 4 categories:
- Hydraulic mechanisms.
- Bimetallic system.
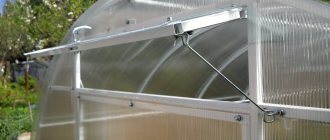
- Automated windows.
- Ventilation using electrical appliances.
Attention! The air inflow into the room must be equal to the outflow. This requires transoms located on both sides of the greenhouse, at different distances from the floor.
Automatic ventilation – some advantages
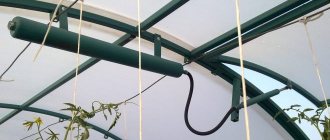
Hydraulic ventilation
The greenhouse uses the basic principle of hydraulics: when heated, the liquid expands, and when it cools, it contracts.
In self-made automatic greenhouse ventilation systems, practitioners use air or water, which expands and pushes a piston. That, in turn, moves the rod that raises the transom. Let's consider 2 automation options. The first is a thermal drive from a hydraulic cylinder using air expansion. The second is a system of plastic bottles or glass jars with water.
Hydraulic ventilation is the most complex of all types
Interior arrangement
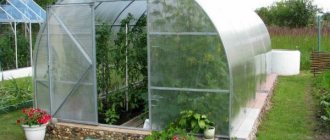
To create optimal conditions for growing various crops, the beds in the greenhouse need to be raised above the soil level by 20-30 cm and fenced off with boards or borders. For ease of maintenance, arrange paths and cover them with non-slip materials. Now it’s a matter of organizing watering, ventilation and heating.
Automation
Devices for automating the maintenance of greenhouses allow you to maintain the desired parameters in the room without 24-hour human presence. Now you can buy ready-made kits for organizing ventilation, lighting and drip watering of plants.
The ventilation mode is started using hydraulic cylinders mounted on the windows or transoms. Inside the device there is a substance called cyclohexanol in a liquid state. It responds to temperature fluctuations by creating a certain pressure in the cylinder. As a result, the piston closes or opens the door, thus regulating the temperature in the room.
Automation can be electrically driven, where air parameters are monitored by sensors. In order for the devices to work, the greenhouse must have an uninterrupted power supply.
Drip irrigation is the best alternative to a watering can or hose. It can be organized either manually or automatically. From the supply pipe, water enters the droppers and then into the soil directly to the roots of the plants. For many crops, this is the most favorable method of watering, since the risk of the spread of fungal diseases is significantly reduced.
Heating
If the greenhouse is intended to be used all year round, heating will be required. It must be economical and at the same time effective.
The cheapest way is to accumulate solar energy. The rays, passing through the translucent coating, heat the soil and are then stored inside due to the low thermal conductivity of polycarbonate.
water heating
Other options - heat guns, water pipes, radiators and infrared heaters - work in any weather and in any climate. The disadvantage is the significant cost of electricity or fuel.
Gas heating
The biological heating method is affordable and effective. During decomposition, organic matter can heat up to 70°C. Branches or loose mulch are placed on the bottom layer of warm beds, biofuel is placed in the middle, and nutritious soil is covered on top. The reaction releases a lot of methane, so the room needs to be ventilated regularly.
Reliable automation with pneumatic drive
You can equip automatic ventilation of greenhouses with your own hands. The simplest option is a pneumatic drive from a hydraulic cylinder.
List of required materials
For installation you will need a couple of days, tools and several components:
- a piece of plastic pipe in the form of a cylinder with a length of 300-350 mm and a diameter of 200 mm;
- a piece of plexiglass with a thickness of 5 mm;
- wooden stick for making a rod;
- soccer ball camera;
- thin hose 1.5 - 2 m long.
Attention! A plastic pipe can be replaced by any cylinder made from scrap materials. For example, from polycarbonate left over after installing a greenhouse or greenhouse.
Pneumatic greenhouse ventilation
Preparing to install the cylinder
- Take a pipe and make two sealed plexiglass plugs for it. The top one will serve as a guide for the rod.
- Make a piston from plexiglass. It should be 1-2 mm smaller than the internal diameter of the cylinder.
- The rod is made of wood or a piece of plastic pipe (size 32). If you choose the wooden option, then a stick 500 mm long and 40 mm in diameter needs to be sanded and coated with an antiseptic.
- Drill holes in both plugs. On the bottom – with a diameter of 10 mm. On the top - such that the rod fits in it.
Pneumatic cylinder assembly
- Glue the bottom plug to the cylinder.
- Place the ball chamber inside, tightly connected to the hose.
- Pass the hose through the plug. Secure the rod in the center of the piston. Insert the piston into the cylinder so that it presses the ball.
- Pass the rod through the top plug and seal it tightly to the cylinder.
Advice . If you secure the guide with tape, you can remove it and service the device in case of a malfunction.
The pneumatic cylinder, created from a hydraulic cylinder, is completely ready. When air flows through the hose, it will inflate the ball, which will lift and push the piston and rod.
Stages of work on installing the receiver
The assembled part is only half of the automatic ventilator. For it to work properly, you need to connect the hydraulic cylinder to a container with air, that is, to the receiver. The larger the receiver, the higher the air pressure inflating the ball.
Receiver from a canister
A large paint can or canister with a capacity of 20 liters is suitable as a container for air. The main thing is that they are hermetically sealed.
- At the bottom of a tightly closed canister, you need to install two pipes.
- Connect one of them tightly to the hose entering the hydraulic cylinder.
- On the second, put a piece of hose 100-150 mm long. Pump air into it and turn it off when the rod extends a little.
The receiver is ready! When the air pressure increases, it flows through the pipe into the hydraulic cylinder, and the rod opens the transom, providing automatic ventilation of the greenhouse.
How to properly install a finished mechanism
The automatic device should be connected to one window that opens along a horizontal axis. It is important to install the receiver so that it is not exposed to sunlight. It is best to hang it under the roof of the greenhouse, covering it with foil or other protective screen.
The pneumatic drive connected to the receiver should be installed next to the window. A rod attached to the window will raise the frame as soon as the greenhouse gets hot. And it will go down when it gets cold.
The invention should be calibrated by adjusting the pressure inside the system using a free hose. Calibration allows you to achieve the opening and closing of the window at a certain temperature.
Advantage of the device: the unit can be constructed independently from scrap materials.
Minus: the hydraulic cylinder is designed for light horizontal transoms.
How to arrange beds
How to arrange a greenhouse inside, where to start? Correctly located beds will help to equip the greenhouse in the right way; an example is shown in the photo. Many people think that the beds can be arranged in any way, as long as it is beautiful and comfortable for the gardener to collect the fruits. But this is a general misconception. If the beds are arranged haphazardly, the crop may not grow at all.
There is another option for designing beds. The beds can be beautifully arranged according to the cardinal directions. Many gardeners place their beds from north to south, which is correct. But it turns out that this placement is not suitable for all plants. The location of the beds from west to east is the most advantageous arrangement. In this case, ultraviolet rays completely illuminate the plants from morning to evening, which gives them the opportunity to develop much faster.
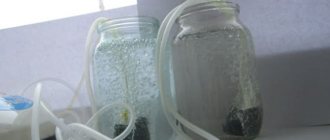
Automatic ventilation by bank method
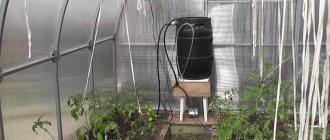
Ventilation in a greenhouse is not difficult to do with your own hands, even if there are no pipes, pieces of wood or plexiglass. Just two glass jars are enough and the window will open on its own.
Materials for making automation from cans
Advice. Following the example of glass jars, you can make a system from plastic bottles with a capacity of 5 liters. and 800 ml.
Installation of a banking device requires the availability of available materials:
- 2 glass jars (3 l, and 800 ml);
- 1 metal cover;
- 1 polyethylene cover;
- brass or copper tube 300 mm long and 5 mm in diameter;
- medical IV tube 1 m long;
- a wooden beam for counterweight, similar to the size of the frame;
- 2 nails 100 mm;
- wire;
- sealant.
Automatic can ventilator
Installation of a two-can system
When all the necessary components and tools are ready, you can proceed:
- Pour 800 ml into a three-liter jar. water. Roll up with a metal lid.
- Drill a hole in the lid and insert a brass tube into it, so that it does not reach the bottom of the jar by 2-3 mm. Secure the tube and seal the joint with sealant.
- In a jar with a capacity of 800 ml. you should pour 200 ml. water, close the lid. Make a hole in the plastic lid and insert the tube from the dropper into it, not reaching the bottom by 2-3 mm.
- Nail a wooden beam onto the lower frame outside the window. Secure the smaller jar to the upper frame with a nail and wire. Attach a large jar higher or place it on a shelf above a small jar. The device is ready!
Now, as soon as the air in the dish heats up, it will displace water from a three-liter jar into a small one. The smaller container will become heavier, drop down and open the window. And vice versa.
The advantage of automatic ventilation is that it is easy to make and does not require any material costs.
Disadvantages of the device:
- suitable only for windows opening along a horizontal axis;
- Periodically you need to add evaporated water.
Bimetallic ventilation system in action
Operating principle of a bimetallic device
Metals, like liquids, expand when heated. From them, it is also possible to install a ventilation system for heifers, which operates on the difference between the expansion coefficient of two metal strips. A simple and effective device - an automatic device for ventilating a greenhouse made of boards and metal
Attention! Any automation needs protection from direct sunlight. The mechanism should be heated not by the sun, but by the air.
To build the device you will need:
- wooden beam;
- board;
- metal strip;
- nails;
- hinge.
Sequencing:
- The metal sheet and board should be fixed vertically to the floor.
- Insert a wooden beam in the middle between them.
- Fasten the entire structure.
- Attach the metal strip to the window using a hinge. Ready!
Metal that responds quickly to increased temperature will flex and open the frame under the force of expansion. Once the sheet cools, it will return to its original state.
Conclusion
In an artificially created climate, everything must be provided for in advance, including ventilation. Thanks to it, you will be able to control the humidity in the structure and temperature, which will have a beneficial effect on crop yields. Today you learned about two main types of ventilation and now you can choose the one that is most suitable for you (see also the article “Galvanized steel ventilation - a universal solution”).
Sources
- https://foundmaster.ru/ventilation/kak-organizovat-ventilyatsiyu-v-teplitse.html
- https://bouw.ru/article/kak-sdelaty-ventilyatsiyu-v-teplitse-iz-polikarbonata
- https://AeroClima.ru/ventilyaciya/v-teplitse/
- https://tutknow.ru/building/uchastok/8899-kak-sdelat-ventilyaciyu-v-teplice.html
- https://parnik-teplitsa.ru/avtomaticheskoe-provetrivanie-teplicy-svoimi-rukami-78
- https://TopVentilyaciya.ru/ventilyaciya/teplitsy.html
- https://gidroguru.com/ventilyaciya/808-ventilyaciya-v-teplice
[collapse]
The success of automated windows
The automation that opens and closes the windows works on the principle of engine oil expansion. Such factory-produced mechanisms can be purchased online and in traditional stores. When purchasing, you should pay attention to important points:
- Price. A mechanism with a closer costs from 1600 to 3500 thousand rubles. You need as many of them as there are windows in your greenhouse.
- Check the weight the unit is designed for.
- Find out if the model you like can be adjusted to a specific temperature. Not all devices have this feature.
If you do not want to automate the vents using factory mechanisms, then organize ventilation in the greenhouse yourself using improvised devices.
Film curtains and nets to help you
In order to lower the temperature of a greenhouse with forced ventilation, special film curtains and shading nets are used.
Film curtains can be:
- Curling
- Rising
There are also two options for twisting and lifting curtains. Curtains can be controlled using:
- Hand winch
- Electric winch
Shading mesh
Shading a greenhouse can be quite effective and does not require much expense. The only negative is that someone has to close and open the curtains if there is no automation.
In addition to shading synthetic film curtains, shading nets are used to regulate the intensity of solar radiation. They cover greenhouses and greenhouses outside.
Ventilation from trunk support
An automated window is not a problem if you have instructions and a little skill. The main element will be a support for the trunk, removed from the Moskvich.
Automatic window in a greenhouse
Hydraulic cylinder and hydraulic tank from car parts
Your task is to mount a solid mechanism capable of raising several transoms at the same time. It will consist of two parts. The first is a support for a car trunk, modified to meet new needs:
- It is necessary to saw off the bolt built into the stop. Drill a hole in the center and bleed air from the cylinder. Drill the hole to 9 mm.
- Push the rod in so that the piston does not reach the hole by 30-35 mm.
- Degrease the cylinder cavity. Secure it in a vice with the hole facing up. Drizzle oil onto the piston so that it does not touch the walls.
- Fill the cavity with epoxy glue. Once it is dry, you should pull on the rod to tear the piston away from the glue.
- Drill a 9 mm hole in the glue and cut a thread in it (step 1.25).
The second part of the device is the hydraulic tank. It can be built from a pipe:
- The pipe (diameter 40 mm, length - 300) must be plugged on one side with a welded metal plug. And on the other - a plug with a thread for an M10 bolt.
- The threaded plug requires a gasket made of oil-resistant material.
- Drill a 9 mm hole in the welded plug and cut an M 10 thread in it, pitch 1.25.
Door opener
Refilling and installing an automatic opener
By connecting the cylinder and hydraulic tank with a brake hose, you get a powerful opener. All that remains is to fill the hydraulic tank with cold spindle oil and install the automation:
- Having poured oil into the hydraulic tank, you need to move the rod to pump it throughout the entire mechanism. Then tighten the full tank with a threaded plug and close it with a bolt with a washer and a lock nut. Calibrate the mechanism using the adjusting bolt.
- Now the tank is under the ceiling (with a protective screen, of course), and the cylinder is under the window. When the oil expands, the rod will extend and the window will open.
Plus of the device: The mechanism is designed for heavy weight. You can connect several vents to it using homemade levers.
Forced ventilation with fans
Forced ventilation of greenhouses is used for large areas. The principle of operation is several fans for air inflow and outflow, located at different ends of the greenhouse. The fans are controlled by a single-channel, two-channel and three-channel thermal drive (one channel for each mechanism).
Forced ventilation in a greenhouse
Automatic ventilation from computer parts
Usually they buy fans, but domestic DIYers have also found a way to build automatic ventilation in a greenhouse with their own hands.
Conditions: greenhouse 3x8 m. There are two vents on the end sides. Natural ventilation is not sufficient for a greenhouse of this size. The only thing left is to build a compulsory one.
The following materials are required for work:
- 2 old power supplies from the computer system unit;
- bimetallic thermal relay;
- car battery;
- wires.
Computer cooler