Mistakes made when installing greenhouses
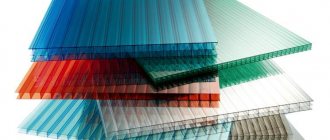
The advantages of polycarbonate greenhouses include:
- resistance to mechanical damage and moisture;
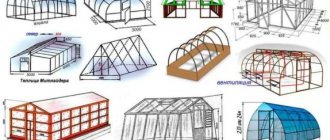
- the ability to mount structures of a certain shape;
- high light transmittance;
- long service life - up to 20 years.
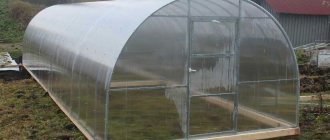
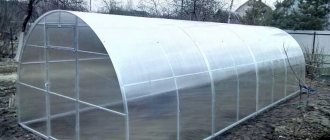
A polycarbonate greenhouse can last up to 20 years
Advice! To minimize the loss of heat and light from polycarbonate greenhouses, the north side of the structure can be made of reflective and opaque material.
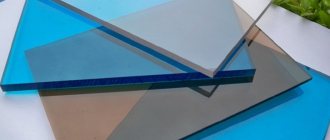
The disadvantages of polycarbonate greenhouses include their complete transparency, which makes it easy to lose light and heat.
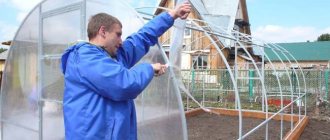
When installing polycarbonate greenhouses, the following mistakes are most often made:
- Incorrect location of the greenhouse. To ensure that the greenhouse warms up well and the plants receive a sufficient amount of light, it is recommended to install greenhouses taking into account the cardinal directions. A correctly chosen place for arranging a greenhouse should be well lit during the day or at least in the first half of the day. Tall trees and buildings located at a distance of 3 m from the future greenhouse will protect it from the wind.
- The period of the year chosen for installing the greenhouse. To avoid deformation of polycarbonate during installation, it is recommended to install the structure at an air temperature of 10-12° C.
- Preference for a collapsible design over an all-welded version. A greenhouse with a collapsible frame has one advantage - it is easy to transport. A greenhouse with an all-welded frame is stronger, more reliable, lasts longer, and is faster and easier to install.
- The use of lightweight structures reduces the strength and shortens the service life of the greenhouse. The use of a reinforced frame does not require mandatory maintenance of the greenhouse in winter.
- When arranging a greenhouse, it is important to take into account the angle of inclination of the surface of the polycarbonate sheet. If an arched greenhouse shines in the sun, this indicates that part of the light is wasted, reflecting from the surface of the polycarbonate sheet and not reaching the plants. Therefore, when choosing the type of greenhouse, it is recommended to give preference to structures with a flat surface.
- Choosing low quality polycarbonate. You can check the quality of polycarbonate by weighing it. If a standard sheet measuring 600x120 cm weighs less than 10 kg, this is a low-quality lightweight material that is not suitable for the construction of greenhouses.
- Saving on fittings - using self-tapping screws instead of polycarbonate thermal washers.
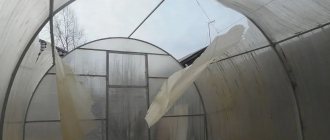
If the greenhouse is installed incorrectly, it may collapse in winter.
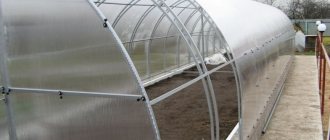
Reliable and durable frame
The frame of eco-friendly greenhouses usually has a prefabricated design, which is very convenient if transportation and assembly are required. The structure can be placed in a different place every year and stored in storage for the winter.
As practice has shown, structures that are not “welded” last 2-3 times longer, and solid arches significantly improve stability. The country eco-greenhouse is made of eco-zinc, galvanized pipe, which is made using innovative technology without welds.
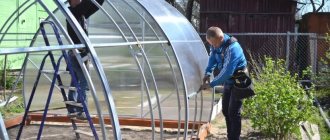
How to do the preparatory work correctly
To create a durable and strong polycarbonate greenhouse structure, a number of preparatory measures should be carried out.
1. Select and clear a site for future construction. To install a greenhouse, you should choose open areas that provide maximum sunlight. The perimeter of the cleared area should be 1.5 m larger than the greenhouse itself on each side.
Attention! A properly installed greenhouse is oriented east to west with the end walls facing south and north.
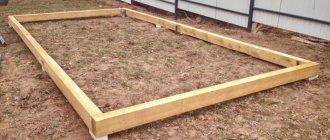
2. Pour the foundation. To do this, dig a trench under the foundation up to 25 cm deep, at the bottom of which make a cushion of sand 5 cm thick. Line the walls of the trench with waterproofing material, lay reinforcement, broken brick or rubble, and then fill the trench with cement mortar.
To make the greenhouse as reliable as possible, you need a base or foundation.
3. 2 weeks after pouring the cement, waterproof the foundation, after which the construction of the base can begin.
Advice! Installing a greenhouse on a foundation provides up to 15% heat savings, reducing the cost of heating it. The choice of foundation type is not important.
Installation of a greenhouse without errors
As soon as all the necessary work on the foundation has been completed, you can begin assembling the frame. When purchasing a ready-made frame, it comes with instructions describing the installation process.
Attention! When using a non-reinforced greenhouse frame, you need to be prepared for the fact that the structure may break during heavy snowfall. The greenhouse will last much longer if you use a frame profile with a cross-section of 40×20 mm and a wall thickness of 1.5-2 mm for its frame.
Main stages of frame installation:
1. Assemble the end posts, fasten the door frame and the corresponding spacers. When installing a greenhouse, thermal washers should be used as mounting hardware.
Installation of a polycarbonate greenhouse
2. Fasten the ends to the foundation plinth. When installing a greenhouse on a foundation, it is better to choose structures with fastenings in the form of “nickels”, which are mounted to the base using anchor bolts.
3. Connect all the arcs to the ends, strengthen them with longitudinal struts. If necessary, install additional supports under the frame.
Attention! In order for the greenhouse structure to be as strong as possible, the distance between adjacent sheathing elements should be no more than 50 cm.
4. Check the reliability of all fastenings. Treat the metal profiles at the joints and at fastening points with anti-corrosion agents or paint them. If there are wooden parts, they should also be treated with an antiseptic, and then varnished or painted.
5. Attach polycarbonate sheets to the profile using thermal washers, taking into account thermal gaps. It is recommended to lay the sheets overlapping, overlapping up to 8 cm of the previous sheet and sealing the seams with aluminum or galvanized self-adhesive tape. On the inside, it is recommended to strengthen the joints with a special perforated tape. The use of such tape will protect against drafts and ensure condensate drainage.
Fastening a polycarbonate sheet with a thermal washer
The sheets are attached to the frame taking into account the location of the UV-protected surface and the direction of the air channels. The protected side should face outward, towards the sun, and the air channels should be positioned vertically.
6. Seal the edges of the polycarbonate sheets with film with vapor-permeable inserts.
7. In order to use the greenhouse in early spring for growing seedlings, it can be equipped with heating by running communications from a common heating system or installing a stove and laying pipes under the shelving around the perimeter of the greenhouse, and leading the chimney to the street. For ease of use, a polycarbonate greenhouse can be equipped with an automatic watering system and lighting.
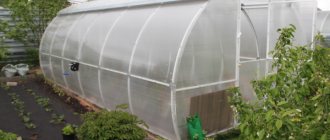
If there is heavy rainfall in the region, the frame of the greenhouse must be strengthened
My testing. Greenhouse “Lucky Season” - installation and equipment
Greenhouse “Lucky Season”
During the May Day holidays, many gardeners were busy putting their plots in order, burning leaves and branches remaining after winter, as well as installing greenhouses and planting seedlings. In our Samara region over the weekend, nature finally showed itself in the right direction and brought temperatures over +25 for summer residents. Personally, my arms and neck were even burned, and it was just a crazy contrast after the five-centimeter snow that fell last weekend and did not allow us to install greenhouses then.
Unpacking the parcel
So, on Saturday, first of all, I took out of the packaging bag the “Lucky Season” greenhouse from the manufacturer of the same name, awaiting installation.
Thanks to its excellent improved characteristics, which have no analogues among other greenhouses, I expect the best results from it during operation. Greenhouse packaging By the way, as a gift for the greenhouse, I received a wonderful plant protection product “Fitosporin-M” and a bag of lettuce seeds. Present
One of the main advantages that a good quality greenhouse should have is ease and convenience of installation, on which the convenience of its operation throughout the season depends in the future. If installing a greenhouse takes minimal time and evokes only positive emotions, then the resulting greenhouse will be pleasing to the eye and, most importantly, will not require much effort and additional time spent on constant “finishing” in the future.
Ads by
I'm starting to install
The “Lucky Season” greenhouse is well packed, strong frame arches are additionally tied with rope, and tightly packed accessories in the form of fixing clips and stainless steel! the pegs are located inside the covering material, and not in a “suspended” state, like many analogues. All accessories are carefully hidden inside.
The pegs really command respect. Since I am a lover of outdoor recreation with a tent, I know firsthand the feeling of disappointment when the pegs from strong gusts of wind constantly pretend to be birds and sometimes even fly into the sky.
Greenhouse equipment: clips, stainless end and main pegs
But, unlike a tent, in this case, wind resistance is one of the most important properties of a high-quality greenhouse, because the seedlings located in it must be guaranteed to be protected from such phenomena as the tearing of the canvas, or even the entire structure, from its place. Neighbors, in the old-fashioned way, use bricks and pipes to avoid tearing the greenhouse or canvas (if the arcs are not sewn in) out of place, each time rearranging these bulky but reliable “fastening elements.”
The shape of the main pegs guarantees the wind resistance of the “Good Season” greenhouse
Yes... it was done wisely, the shape of the pegs simply doesn’t give the wind a chance. In addition to the fact that the pegs inside the arcs work to expand, ensuring a strong fixation of the arc on the peg, one curved end reliably fixes the peg itself, the length of the working part of which is 21 cm, and the total length is 34 cm, in the ground. The earth, of course, after final installation, will need to be compacted around it. I prepared the soil under the greenhouse using a walk-behind tractor and a rake.
The pegs are also securely fastened inside the frame arches
I was also pleased with the end pegs , with the help of which I secured the covering material, whose density is 50 g/m2, to the ground. The material itself is of excellent quality, and the arches are sewn into it very smoothly and efficiently, I really liked it (not a blunder). Look for yourself - how could it not be a work of art? Especially in comparison with many, many. Quality of material and workmanship of arch pockets
Many people, out of habit, use greenhouses by making them themselves, that is, by cutting arcs to the desired size and purchasing fabric separately. It seems to be nothing complicated and, as they say, if there is a desire, there will be time. That’s true, but in practice, sewn-in arcs simplify the process and, most importantly, improve the quality of greenhouse installation significantly, and in strong gusty winds the material will never run around on the frame. My greenhouse is three meters long (it could be purchased in various lengths, from 3 to 8 meters) and it can be placed almost anywhere without suffering from lack of space on the site, which is what I did, placing it next to a temporary “kindergarten” for cabbage under glass.
Since the height of the “Good Season” greenhouse with an arc length of 2.3 m is 95! cm, I set the arcs wider and got a height sufficient for myself, which was 88 cm. I will immediately note that this height was the first time I encountered among the greenhouses that I saw . For me this is a clear plus.
And the maximum height of the greenhouse is 95 cm. All analogues I know are 80 cm. I was very pleased with the clips included in the greenhouse kit. It may seem that these simple devices are just an additional accessory, which, it seems, you can do without, but their usefulness factor is simply off the charts (tested several times).
The usefulness of clips cannot be overestimated
In addition to the fact that they can ensure uniform tension of the covering material on a frame of arcs, they will play an invaluable role when watering seedlings, reliably securing the material “rolled up” on the arcs during watering or ventilation, if necessary. And at this time the ends will also be securely fastened with the help of U-shaped end pegs.
The end fabric is also easy to secure with a peg
My first conclusions:
So, the “Lucky Season” greenhouse fully met my expectations at the first stage of operation: - easy, convenient and at the same time high-quality installation, - very well-made pegs, - the presence of clips that make it easy to make any evolutions with - excellent dense covering material, - into which 20 mm arcs are already sewn (hard and durable, corrosion-resistant LDPE pipes are used as arcs, which bend easily and do not become brittle in the cold) . My greenhouse “Lucky Season”, length 3 m
Testing will continue!
The following “photo report from the scene” will provide a detailed comparison of the ease of installation of the “Good Season” greenhouse with two other similar greenhouses also installed on the site.
I planned it in such a way that all three greenhouses during the season will participate in a common experiment on ease of use, and I will show all this and talk about everything step by step.
The second stage will be devoted to planting seedlings in greenhouses, then I will analyze the convenience of caring for them (seedlings).
And for today my test is finished. See you at the new stage!
Useful tips
- To ensure that the greenhouse covering lasts as long as possible, it is recommended to choose polycarbonate sheets with a thickness of more than 4 mm. The best option is polycarbonate sheets 6-8 mm thick, with UF protection (protection from ultraviolet radiation) and a warranty period of at least 10 years.
- Treating the lower part of the frame with anti-corrosion paint or bitumen solution will extend the life of the greenhouse structure.
- Experts do not recommend using polycarbonate sheets marked Eco or Economy to create greenhouses, as crushed recycled raw materials were used in their manufacture, and not primary polymer. And this affects the strength and quality of the resulting product.
- When installing the frame, it is recommended to secure each arch with reinforcements. The stability of the greenhouse as a whole depends on the amount of the latter.
- In summer, the polycarbonate covering of the greenhouse gets very hot, which causes gaps to appear. To prevent their occurrence, 10 cm strips of polycarbonate should be implanted at the points of contact between the walls and the roof.
Installing a greenhouse with your own hands is not an easy task. Exactly following the instructions for installing a polycarbonate greenhouse, taking into account the recommendations presented in this article, will allow you to correctly and without errors install a strong and reliable structure that can last a long time.