The emergence of flexible and transparent polymer materials has become a real breakthrough in greenhouse construction, which previously used fragile glass or short-lived polyethylene film as a coating. But without knowledge of installation technology, it is impossible to cope with such a task as covering a greenhouse with polycarbonate so that it effectively performs its functions and lasts a long time. Even experienced collectors make mistakes in this matter, so a short educational program on the topic will be useful to all owners of suburban areas.
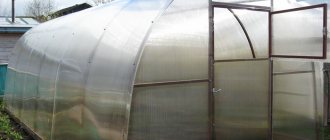
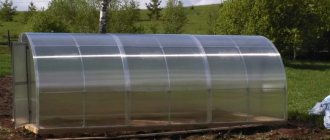
The result of using low-quality material and violation of technology Source teplica-exp.ru
Features of the material
For the construction of greenhouses, polycarbonate sheets having two layers are used.
A standard sheet is 2.1 meters wide and 6 or 12 meters long. Three- and four-layer sheets of material are used extremely rarely in greenhouse construction, since there is no need for special structural strength of the material for covering greenhouses. Each sheet of material has partitions, between which there are spaces (cells). For this reason, this type of polycarbonate is called cellular or cellular.
The longitudinal chambers in the material plates are located in one row, so polycarbonate made of two layers is also called single-chamber.
There is air in the cells of the material, which contributes to the excellent preservation of accumulated heat in the polycarbonate greenhouse.
But these cells also make the material unstable. In hot weather it can expand, and in cold weather it can return to its previous state. The changes are small (one meter of material can narrow or expand by only 2.5-3 mm), but during installation this fact must be taken into account. Otherwise, the greenhouse covering may warp due to temperature changes.
Note: It is very important to know how to correctly position sheets of material during installation. It is recommended to install them vertically so that condensate can drain well through the longitudinal channels. In this case, it is also important to place the polymer sheet with the outer side protected from ultraviolet rays facing outwards. This will protect the greenhouse from premature damage.
The advantages of polycarbonate, which allow it to be used with great success in the construction of greenhouses, include:
- Greater strength compared to glass.
- Good light transmittance.
- High dissipative performance.
- The ability to mitigate temperature changes in a greenhouse.
- Flexibility and elasticity.
- Long service life.
- Affordable price.
- Easy to care for.
- Fire safety.
Selecting the sheets correctly
All the advantages of polycarbonate that were listed above can only be attributed to a high-quality polymer. Therefore, when buying material for a greenhouse, it is very important to avoid fakes. The seller who sells it to you must have the appropriate documents. In addition, you should check the basic parameters of the sheet. They should be as follows:
- Length - 6 meters.
- Width - 2.1 meters.
- Thickness - 4 mm minimum.
- Weight - 10 kg minimum.
To check the strength of the material, you can squeeze its edges; if the quality of the material leaves much to be desired, cracks will appear on it.
But high-quality material is not afraid of even squeezing with pliers. It can be easily bent in an arc. There is no crunching or breakage. Don’t forget about the need to check the material for transparency. In high-quality material there will be no foreign inclusions, the color of all sections of the sheet will be uniform. If you press your palm against the leaf, its veins should be clearly visible on the other side.
For greenhouse coverings, you need to purchase plates of material that have a UF film applied by varnishing. Information about this will be in the material passport.
What tools are needed?
In order to cut and install polycarbonate sheets on a greenhouse structure, it is recommended to acquire the following tools:
- with a knife;
- long cord;
- tape measure;
- long ruler;
- marker;
- wooden mallet;
- building level;
- electric drill;
- drills of different diameters;
- screwdriver;
- screwdriver;
- wood hacksaw;
- jigsaw;
- saw or construction knife.
Rules for covering a greenhouse with polycarbonate
In order for a polycarbonate greenhouse to last a long time, you need to know how to cover the roof with carbonate sheets correctly. To do this, you should follow the following rules:
- Checking the strength of the greenhouse frame. The roof profile should be spaced no more than 60 cm in order to withstand the snow load.
- If there is no sufficient lateral stability, it will be necessary to add slopes.
- Cutting sheets of material must be done rationally. They should be positioned vertically to allow natural condensation removal. The material should be cut so that its joints are located on the frame partitions.
- It is necessary that the roof of a polycarbonate structure have an overhang of at least 50 mm, otherwise there will be a need to connect the junction of the inclined and vertical surfaces with an adjustable corner profile, which is not cheap.
- The ends of the upper part of the structure will definitely need to be sealed. The lower ones, on the contrary, do not need to be sealed. They are simply covered with an end profile.
- External corners, ridge and longitudinal joints will also need to be covered with a profile.
- To attach polycarbonate to a metal frame, you need to use special self-tapping screws, which have a large head and a sealing rubber gasket. Fastening directly through plastic is only possible for small parts with a size of up to 500 mm.
- To install large elements, it is recommended to use a connecting profile without screwing a self-tapping screw into the panel.
- In order for the polycarbonate to move freely and compensate for its thermal expansion, it should not be inserted completely into the profile (leaving 4-6 mm).
Mounting methods
The installation process consists of correctly fastening the polycarbonate. Most often, specialists use thermal washers and profiles for this purpose.
Thermal washers
Manufacturers offer various thermal washers for hermetically sealed fastening, made from:
- polycarbonate;
- polypropylene;
- metal
Regardless of the material, all thermal washers have sealing polymer gaskets, which ensure a tight fit.
Polycarbonate thermal washers are considered the most durable and practical. They are quite aesthetic and are produced in a wide range of colors. With their help, cellular polycarbonate is attached. The size of the thermal washer must correspond to the thickness of the polycarbonate. Correctly selected fasteners allow you to tighten the screw all the way without compressing the material.
Did you know? The first greenhouses appeared in ancient Rome, where plants were planted in small carts, which were rolled out into the street during the day and left in heated rooms at night.
When installing, a hole is first marked and drilled in the material, the diameter of which is 2...3 mm larger than the diameter of the leg. The optimal pitch is considered to be 35...50 cm, the minimum distance from the edge is 4 cm. The thermal washer is inserted into the hole, the seal is centered and tightened.
Polypropylene thermal washers have a long service life (4...5 years) and allow the joint to be sufficiently sealed due to their shape. Metal thermal washers are the most durable and do not corrode. Tightness is ensured by rubber or polyurethane gaskets included in the kit. Most often, this type of washers is used when fastening aluminum connecting profiles.
Profile
To fasten polycarbonate, various types of metal profiles are used:
- UP - end;
- HCP - detachable, connecting, solid;
- HP - one-piece;
- K - ridge;
- F - wall;
- U - angular.
Arched greenhouses are mounted using end, one-piece and connecting ones. To assemble other structures, you can use any of the listed profiles.
Important! If, when covering an arched greenhouse, both ends of the polycarbonate sheet are at the bottom, all edges must be covered with profile tape.
Sealing tape
Sealing tapes are made of aluminum in two types: solid and perforated. One-piece allows you to completely seal the internal cavities of polycarbonate by gluing the upper sections of the sheets with it.
To protect internal cavities from insects, dust and dirt, perforated sealing tapes are used, gluing them to the bottom cut of the sheets.
Features of installation work
After all the necessary parts are cut out of polycarbonate, holes are drilled into them for self-tapping screws with thermal washers. It is important to center the holes in the resin channels. You need to take a drill such that its diameter exceeds the diameter of the screw by 3-4 mm.
The holes for self-tapping screws should be spaced in increments of 40-50 cm if a sheet of material 4 mm thick is used and in increments of 60-70 cm when polycarbonate is 6 mm thick.
When placing sheets on the frame, you need to distinguish their inner side from the outer side. The latter usually has a blue film, and on the inside the film can be transparent or milky white. It is recommended to remove it before installing the sheet. The outer film can be removed upon completion of installation.
First of all, the roof is covered, then the walls, end parts, doors and vents.
When laying polycarbonate, you need to make an overlap of 2 cm.
How can you attach polycarbonate?
Special connecting elements that simplify the fastening of polycarbonate are:
- Detachable connecting profiles, which are used for linear connection of longitudinal sheets. They resemble a cable channel and consist of a base attached to the frame and a cover covering the connection. The clamping capacity of such elements is high.
- One-piece connection profiles are also designed for linear connections. These are flexible long elements in cross section similar to the letter H, if it is turned on its side. This profile is not used for attaching polycarbonate to the frame due to the lack of the required strength with such a connection. But they can be used when constructing lightweight greenhouse structures.
- Self-tapping screws with thermal washers used for point fastening. Different types of these elements are intended for the metal frame and the metal base of the greenhouse. If you need to cover a frame made of polymer pipes with polycarbonate, you can use self-tapping screws designed for fastening to wood.
- Aluminum connecting profiles. They are produced detachable. Due to their rigidity and excellent shape retention, such elements can be used as independent racks and arches of small greenhouse structures.
DIY polycarbonate greenhouse: materials for making a supporting structure
The greenhouse frame can be made of various materials. Many people make their own polycarbonate greenhouses from wood. Assembling such a structure is not difficult. The frame is stable and durable. With proper care, treatment with a special composition and the use of dried wood, it can last quite a long time. Easily attaches to a wooden base. A greenhouse does not need a reliable foundation. Sufficient support pillars.
Wooden frame is quite popular
If you decide to buy a polycarbonate greenhouse, you will most likely be offered a product with a metal frame. You can make such a greenhouse yourself from thick reinforcement or profile pipe. The elements are connected by welding. Due to its heavy weight, it requires careful preparation of the base.
The metal frame is designed for long-term use
Metal-plastic pipes with high performance characteristics can be used to make the frame. They bend well and are strong enough to support the weight of polycarbonate. Suitable for making arched structures.
The cheapest option is a frame made of polypropylene pipes. Using nodal elements, you can form a greenhouse of any shape and size.
The plastic frame is easy to assemble with your own hands
Uncover
It is very important to take accurate measurements and mark the sheets before cutting polycarbonate. When cutting, the protective film is not removed. If necessary, you can prepare patterns from cardboard.
It is important to plan cutting in such a way that the sheet of material is used rationally. This is especially important in structures with curved lines (arched).
It is recommended to do the cutting with a jigsaw at a blade speed of no more than 3000 meters per minute to avoid melting of the material. A circular saw with fine-toothed blades also works well. The material should be cut on a flat surface.
Sealing the edges
To avoid moisture and dirt getting into the intercostal spaces of polycarbonate sheets, the edges of the sheets are closed after cutting. Only parts that are protected by frame elements remain open. To cover the edges, use a U or L-shaped profile and self-adhesive aluminum tape. Both can be solid or perforated. The first type is intended to protect the material from moisture, the second (used for the lower edges) so that condensation can escape from it.
For pitched greenhouses, a solid profile or tape is used on top, and perforated on the bottom. For arched ones, perforated devices are used on both sides.
In the absence of perforated devices, you can use solid ones and then equip them with holes.
Before attaching the tape or film, you need to remove 80-100 millimeters of the protective film from the polycarbonate plate.
Frame problems
Most often, gardeners prefer a simple wooden frame. The instructions for installing a greenhouse have minimum requirements for it.
But in some models attention is paid to fastening it with L-shaped brackets to the ground surface. In this case, the fastening element is reinforcement bars (diameter up to 0.95 cm)
Their pressing side usually has a length of 15-20 cm. And the long side, recessed into the ground, is up to 45 cm.
All the troubles described above do not occur immediately. Deterioration of polycarbonate or tilting of the entire building occurs gradually.
But a metal profile that suddenly bends or a board breaks can happen suddenly. And you need to react to this as quickly as possible. The metal is straightened, the board is hammered together (as a rule, a block nailed over it with an overlap is sufficient).
To prevent the problem from recurring, the weak point must be fixed and strengthened by installing an additional column. But, if it is possible to replace a broken or damaged part completely, you need to do it. It is just not recommended to do this in frost or rain. Nothing good will come of such an undertaking.
Point fastener
Point fasteners are made using thermal washers. They consist of a plastic washer with a leg, a self-tapping screw, a sealing washer with a porous structure, and a cap. The leg of the washer should have the same height as the thickness of the polycarbonate sheet.
With the help of thermal washers, polycarbonate plates are protected from deformation, and the connection is sealed.
To connect the structure frame to polycarbonate using the point method, you need to drill holes in the polycarbonate. Then the sheet of material is properly placed on the frame and secured with self-tapping screws. In this case, it is not necessary to make great efforts so that the sheet of material is not deformed. Next, take decorative caps and cover the holes in the thermal washers with them.
Then the ends are covered with thermal-waterproofing tape and covered with a profile. At the joints, special joining profiles are used.
What does strength depend on?
As has already become clear from the above, the roof can collapse due to a weak foundation. Manufacturers often save on the cross-section of galvanized profiles. At the same time, their products become cheaper and more accessible, but their quality drops noticeably. You can solve this problem in the following ways:
- dismantle the building for the winter;
- periodically remove snow from the roof of the finished structure;
- install special supports (although this does not guarantee the integrity of the building);
- buy a model with a reinforced frame;
- strengthen the base yourself by constructing it from wood or profile.
The planned repair of a structure and its strengthening, of course, begins with an inspection of the structure, including all the little things. First of all, the polycarbonate is carefully inspected
Particular attention is paid to all its cracks, dents, and swellings. Cloudiness can also be a cause for concern
In addition, the entire building is checked for tilt or distortion. It is best to use a level for this purpose.
If no damage is observed, the walls of the greenhouse can simply be washed inside and out, disinfected and, if necessary, partially replaced with soil. Well, if damage is still found, the greenhouse will need to be strengthened.
Using a profile
In order to independently cover a greenhouse with polycarbonate, you may need a detachable or one-piece profile. The first type is more expensive, but looks more attractive.
Installation using a profile occurs according to the following scheme:
- putting the profile on a polycarbonate sheet;
- drilling holes for self-tapping screws;
- gluing the frame rafters with thermal tape;
- fastening the plate to the frame using self-cutters with thermal washers;
- putting on thermal tape with an adhesive surface and an end profile.
The advantages of a split profile over a one-piece profile are that the lid covers the fastening points with self-tapping screws and protects it from moisture.
Varieties
In addition to carrying out the appropriate calculations, you need to decide on the type of roofing material:
- Cellular polycarbonate . Suitable for the construction of translucent structures such as greenhouses and canopies, as well as for vertical surfaces.
- Monolithic polycarbonate . It is the best solution for arranging the roofs of buildings, since it has greater transparency and is able to withstand weather disturbances.
Today, polycarbonate is produced in a variety of colors. This material comes in transparent, blue, purple, green, bronze and other colors. The color of polycarbonate affects the scope of its use. For example, transparent material is ideal for building greenhouses and hotbeds, while turquoise or blue is ideal for swimming pools.
Before you put polycarbonate on a canopy or roof, when choosing this product, you need to pay attention to the country in which it is produced and the brand. Experts believe that the best translucent material is made in European countries and Israel.
Of course, it costs more, but high-quality raw materials are used to produce it, and the top is covered with a protective layer from the negative effects of ultraviolet radiation. In addition to polycarbonate sheets, you need to prepare tapes for the ends, sealing washers and self-tapping screws.
How to care for polycarbonate coating?
For the longevity of a polycarbonate greenhouse, it needs to be properly cared for. Wash the polycarbonate coating with water and laundry soap. It is not recommended to use abrasive detergents, as they can damage the coating and cause excessive UV rays to reach the plants in the greenhouse.
Only rags can be used to remove snow and debris from the surface of the structure. Gardening tools or other improvised means can damage polycarbonate.
You cannot light a fire near a polycarbonate greenhouse. This can lead to its melting, deformation and seal failure.
Comments
Ivan, 41 years old
Last year we built a polycarbonate greenhouse at our dacha. One sheet of polycarbonate was damaged. Firstly, they marked it incorrectly and cut it in the wrong place, and secondly, they immediately removed all the protection and when they started to attach the plate, a crack appeared along it. As a result, they spent more time, effort and money due to the fact that they did not properly prepare and study the information.
Stepan, 50 years old
I covered the greenhouse taking into account all the rules given in this article. Only my frame is not metal, but made of wood. The greenhouse is in its second year. True, a couple of rafters on the roof had to be replaced after the winter, but otherwise everything is fine.
Roman, 31 years old
I am very glad that I chose polycarbonate to cover the greenhouse. Initially, it was planned to make the heifer in the form of a house and cover it with glass, but a friend recommended this material. I was pleasantly surprised by its flexibility and ease of installation.
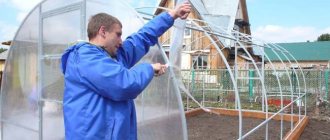
We begin installation. Stage one - cutting out
We hope you have already chosen and prepared a place for the greenhouse. If not, this article will help you.
Cutting is always a crucial moment. Before you pick up a cutting tool, watch a video on how to properly cut the polymer and cover a greenhouse with it. So that you don’t measure or cut off anything unnecessary.
We start cutting from the end part of the greenhouse. If your greenhouse doors are symmetrical, you have less work to do. We cut it out by placing half of the end on a sheet of plastic. Leave allowances of 1.5-2cm.