When planning to provide a plot of land with a greenhouse, a gardener, as a rule, plans to improve the conditions for growing plants.
The greenhouse, according to the plan of its future creator, is obliged to correct the mistakes made by nature.
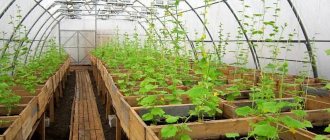
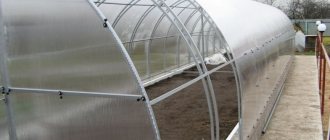
Polycarbonate greenhouse made of galvanized profile.
However, it is not always possible to achieve the desired result. You can get closer to the ideal if you build this simple structure on a slope.
Pros and cons of a relief area
Shadow and sun. The slopes of the relief area are always oriented to the cardinal points. On the south side in such areas the sun shines all day long, on the north side there is almost always shade. Slopes oriented to other cardinal points are more universal, and during the day shadow and sun alternate in fairly clear proportions. Such a dosed distribution of light and shadow is quite possible to use for growing certain types of plants with different light requirements.
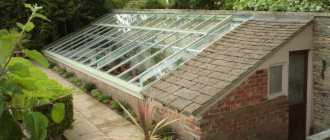
Scheme of a double-glazed greenhouse.
Air swirls. An area located on a slope is always blown more strongly than a flat area. This is due to the air turbulence that occurs when the wind encounters an inclined plane. This is also facilitated by uneven heating of the soil in illuminated and shady areas.
Lack of moisture. Water entering the area will certainly flow down, and this makes it difficult to uniformly water the plantings.
Ground sliding. The soil in a relief area is held in place not without the participation of the plant root system. Weeding, replanting and cultivating the site leads to the fact that the soil begins to slide downhill. This factor must be taken into account when cultivating the site and constructing a greenhouse.
Taking into account the distance to communications
Many gardeners choose the far corner of their plot to install a greenhouse for aesthetic reasons. However, this contributes to additional inconvenience and unnecessary material costs. Since the operation of the greenhouse requires water, and sometimes gas and electrical energy, it will be necessary to lay pipes or wires across the entire area. It is advisable to choose a location taking into account the need to lay communications.
REFERENCE: Do not forget about convenient maintenance of the building, ensure easy access and access.
What to consider when designing a greenhouse
Greenhouse construction diagram.
- Site layout. First of all, when designing, it is necessary to take into account the slope. For the most uniform illumination, the ground plane should be located at an angle of 15-19 o. This is not difficult to do if you use a building level and a plywood template when leveling the ground. If you plan to use a large area for the construction of a greenhouse, then it is better to use a tracing cord and pegs for leveling.
- Material for the frame. Currently, the greenhouse frame is most often made of wooden beams, rectangular metal pipes or a metal corner. All these materials have both advantages and disadvantages. The wooden frame has a low coefficient of expansion, which is very important for glass greenhouses. However, wood is susceptible to rot and therefore requires additional processing. Metal, on the contrary, easily changes its dimensional parameters when temperature changes, but is much more durable than wood.
- Covering material. Today, covering materials for greenhouses are presented in a very wide range. This is glass, fiberglass, polyethylene film, organic glass and even canvas from plastic bottles. But the undisputed leader is polycarbonate. Cellular polycarbonate can withstand high dynamic loads, transmits up to 90% of light and bends easily, which does not require much labor during installation.
Main functional elements of a greenhouse
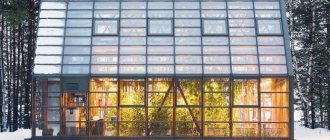
Scheme of a glazed greenhouse.
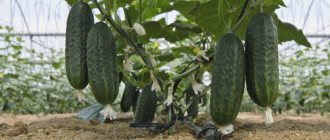
- A greenhouse built on a slope has one very significant advantage - it accumulates the maximum possible luminous flux. This is more than enough for plants even in the mid-season, and in some cases even in winter. Sunlight carries with it a large amount of heat, which can be rationally used, including for heating the soil.
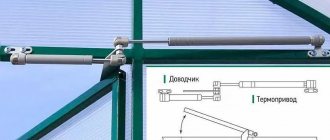
- Soil heating and irrigation design. A collector made of plastic pipes is laid into the ground to a depth of 40 cm. Pipes should be equipped with 7-10 mm holes along the entire length of the underground part. The upper parts are collected in a horizontal collector and equipped with an exhaust fan, and the lower parts are discharged 10-15 cm above ground level. This simple design allows you to maintain the same temperature of air and soil, condense moisture, which is used by plants, and, if you keep the greenhouse closed, maintain a high concentration of carbon dioxide. These factors contribute to almost doubling the yield.
- Construction of beds. The construction of a greenhouse, even on a small slope, is associated with quite noticeable soil sliding. You can avoid this trouble if you arrange the ridges in terraces. To make the sides, you can use special metal boxes or homemade wooden or tin structures with a height corresponding to the depth of the soil.
Steps in a garden with complex terrain
In areas with difficult terrain, it is imperative to provide steps to make it more convenient for you to move around the area and climb from one terrace to another. Moreover, the main thing you should pay attention to is safety.
The width of the staircase is usually equal to the width of the path that continues it (departs from it). If for some reason this cannot be done, then the stairs can be made a little narrower, but not less than 60 cm. If it turns out to be too long, then to make the climb up less tiring, the steps can be separated by platforms. This is usually done in places where the stairs change direction. On the site you can place a bench, a garden sculpture or, for example, a flower pot.
The depth of the steps and their height are also important indicators. The most comfortable steps for walking will be steps 37-44 cm deep and approximately 10 cm high.
The material for the stairs can be wood, concrete, stone, paving slabs and even logs.
Purpose of the greenhouse
DIY greenhouse for plants
A greenhouse is necessary so that you can grow vegetables, fruits and even ornamental garden plants in winter, late autumn and early spring.
In a country greenhouse you can grow exotic fruits that grow 600-1000 km south of your region.
The greenhouse structure consists of a frame covered with transparent roofing material. Metal, plastic or wood are used to build the frame of the greenhouse. The roofing materials are polycarbonate, film coating and glass.
Self-installation of sleeper foundations
If there is no desire or opportunity to involve experienced craftsmen in installation work, then this procedure is performed independently.
Installation is performed as follows:
- The first step is to clear the area for the greenhouse and mark it.
- Then you need to drive the sleeper piles.
- Next, you need to lay oblong beams on the piles and connect them together with iron brackets or corners.
- Then you need to install and secure the formwork well. Then the strip foundation is poured with concrete.
- You will have to wait until the base gains the required strength.
- Next, the greenhouse frame is installed.
- Then the covering material is fixed to the frame.
Types of greenhouses
First of all, buildings for growing plants are divided into greenhouses and greenhouses.
The greenhouse is a quadrangular wooden structure dug into the ground, filled with manure inside and stretched with film. Despite the simplicity of the design, this building is very effective. The disadvantage of a greenhouse is its seasonality and inability to heat.
Greenhouse for plants
Greenhouses are more complex buildings for growing plants. There are 2 main types of greenhouses: capital and seasonal.
Capital greenhouses are constructed from wooden beams or metal profiles with a foundation (basement or columnar). This type of greenhouse has greater resistance to winds and is permanently located on a summer cottage.
Seasonal greenhouses are less complex structures that do not require a foundation and are installed only in the summer. This type of greenhouse is very popular because... there is no need to create a permanent structure. On the agricultural goods market you can see a wide range of seasonal greenhouses, the price of which is not very high, and the advantage is that the design can be folded down to small sizes, so in winter it can be hidden in a utility room.
Video tutorial on how to do a greenhouse with your own hands
General rules
Most novice summer residents, and some experienced gardeners, quite often wonder how to properly install a greenhouse on their plot in order to get the maximum benefit from purchasing such a structure. Before assembling a greenhouse in a permanent location, it is very important to determine the presence of the most favorable factors:
- the most flat area;
- lack of nearby groundwater;
- absence of buildings and vegetation capable of shading the greenhouse;
- the area under the greenhouse structure must be protected from drafts and gusty winds;
- availability of communications necessary to maintain the structure;
- the highest quality and fertile soil for growing plants.
Where and how should the greenhouse be placed?
The placement of a greenhouse on a summer cottage plays an important role in its effectiveness. Please pay attention to the following greenhouse placement requirements:
- The main requirement is that the location of the greenhouse must be well lit and have reliable protection from gusts of northern winds. To satisfy this requirement, it is recommended to install the greenhouse from west to east (the longitudinal axis of the greenhouse faces north/south).
- It is also recommended to place the greenhouse in a visible place, preferably near a residential building.
- If a utility block or a place for storing garden tools and necessary materials (sand, sawdust, etc.) has already been built at the dacha, be sure to place the greenhouse next to them.
- If the garden plot is no more than 6 acres, it will not be possible to build a large greenhouse, because... There's not much room anyway. To somehow win space for a greenhouse, combine it with a residential building, summer kitchen or other building.
- One of the end walls of the greenhouse should be shorter so that the structure is slightly inclined to the west (this arrangement will allow the sun's rays to spread evenly across the entire area of the greenhouse).
- Another advantage of locating the greenhouse near other buildings is that it protects the greenhouse from gusts of wind.
- To create additional lighting for the greenhouse, it is recommended to install reflective screens covered with white paint at a distance of 1 meter from it, on the north side. These screens will reflect the sun's rays towards the greenhouse.
- To improve the temperature regime of the greenhouse, deepen it 0.7 - 0.8 meters into the soil, but do not overdo it, because a heavily recessed greenhouse will leave low-growing plants in the shade.
- Do not forget that the greenhouse requires electricity and water, so it is better to install it close to the electricity and water supply system.
- Do not install the greenhouse near trees, because they will create unnecessary shadow.
Selecting a location
Installation of a greenhouse always involves taking into account some of the requirements that apply to the location for such a structure. Before assembling the greenhouse, you should determine its location on the site. As a rule, summer residents try to create the most attractive and elegant ensemble out of all buildings. In this case, the correct location of the greenhouse is not taken into account at all. According to the rules, the greenhouse must be installed in accordance with the cardinal directions:
- the meridional type of installation of the greenhouse on the ground involves the location of the façade parts of the structure to the north and south, while the side slopes will be oriented to the east and west;
- The latitudinal type of installation of a greenhouse on the ground is characterized by the reverse location of the structure, and the greenhouse facades will be oriented to the west and east, and the side parts to the north and south.
The best option is to place the structure on a flat and well-lit area.
It should be remembered that the assembly of the greenhouse can be done with your own hands after a thorough examination of the construction site. The best option is to place the structure on a flat and well-lit area.
How to make a wooden greenhouse with your own hands?
The simplest and cheapest material for making a greenhouse is wood. A wooden greenhouse can serve you for more than 10 years if you follow the construction instructions, choose stronger and more durable types of wood (for example, oak or larch) and treat them with protective antiseptic agents. Let's look at step-by-step instructions for creating a wooden greenhouse with your own hands.
Step 1 – Prepare the site and create the foundation
First of all, we choose the future location of the greenhouse in the country. After this, we begin to prepare the area: we level it, if there are holes and bumps (this is a prerequisite), remove garden debris and mark the contours of the greenhouse using rope and wooden pegs. The recommended dimensions of the greenhouse should be at least 6 meters long and 3 meters wide. Next, we begin to create the foundation: because the greenhouse is made of wood and sheathed with film; the weight of the structure will be light, which means that there is no need for a strong foundation. It is best to use a columnar foundation - it is not difficult to build and material costs will be minimal.
The depth of the holes for support pillars must be at least 50 cm, the pillars must be selected with a cross-section (or diameter) of 10-12 cm and a length of 3 meters, so that the resulting finished structure has a height of 2.5 meters, which will be quite sufficient, taking into account comfort and greenhouse productivity. For a greenhouse of our size (6*3m), 6 columns are sufficient (4 in the corners of the structure and 2 in the middle). After the columns are installed, fill them with concrete mortar and wait a few days until they completely harden, after which we begin creating the frame.
You should pay attention to the fact that if the foundation is being built in hot weather, it is necessary to spray it with water until it hardens completely (since hot sun rays can destroy the foundation - it will begin to crack).
Step 2 – Create the frame of the greenhouse
Wooden greenhouse frame
Since the main part of the frame has already been built (wooden posts), all we have to do is fill the posts with horizontal bars (10 cm in cross section) from the top and in the middle. We attach rafters to the upper horizontal beams (every 0.5 meters), which are necessary to fix the roofing material and increase the stability of the entire structure.
Wooden greenhouse roof structure
When creating the frame, we immediately provide space for windows and doors; for this, we additionally create a door frame (1.8 * 0.8 m) and window frames, the dimensions of which we select ourselves. You should immediately pay attention to the fact that the door must be installed on the north side.
If the greenhouse will be built from metal, the frame must be made of a metal profile or a painted pipe, the difference between them is not significant.
Fastening of bars and rafters must be done using wood screws and metal corners; the use of nails is not recommended.
Step 3 – Sew on the greenhouse floor
As mentioned earlier, it is customary to use roofing materials such as glass, film and polycarbonate to cover a greenhouse. The cheapest and most common material is film coating: it has fairly good light conductivity and does not have significant weight, which means there is no need for additional reinforcement of the structure.
Glass is considered the most transparent material and this, in fact, is its main advantage, because... there is practically no loss of sunlight when passing through the roofing material. The disadvantages of glass are the difficulty of fastening, fragility and heavy weight of the material.
Installation features
Most often, factory greenhouse structures based on polycarbonate sheets are installed with your own hands, the installation of which is carried out in accordance with the attached instructions in several stages.
- Complete assembly of the frame according to the diagram included in the instructions with arrangement of the end parts with cut polycarbonate sheets.
- Deepening the T-shaped tips of the assembled frame structure into the ground, followed by backfilling with earth.
- Cut the plastic and cover the entire greenhouse structure with sheets of cellular or monolithic polycarbonate.
- It is not recommended to leave a self-assembled structure slightly buried in the ground for a long time, since strong winds can overturn the greenhouse. For the purpose of permanent fastening, a beam or shallow foundation can be used. If timber is used, it is laid on a waterproofing layer of roofing felt or similar material.
- When attaching structures to beams, special attention should be paid to ensuring that the structure stands as level as possible, and that window and door openings do not have even slight distortions.
- If the design features and installation of greenhouses require the use of sealing tapes, then these elements must be laid carefully at the joints of the structure.
- It is necessary to build a greenhouse with your own hands so that the number of cracks and gaps between the frame and the covering material is minimal. Otherwise, the greenhouse soil may cool, and the temperature inside the structure will be insufficient for growing heat-loving garden crops.
- If sheet polycarbonate is used as a covering, then the edges of such material must be dug into the ground at least five centimeters.
- When using a film covering, the covering material should be secured to the timber using a wooden or metal strip.
Polycarbonate greenhouse: advantages and construction instructions
DIY polycarbonate greenhouse
Cellular polycarbonate appeared on the building materials market not so long ago, but during its short lifespan it has replaced such popular materials for creating greenhouses as glass and film. Polycarbonate has many advantages, the main ones being the relatively inexpensive price and elasticity of the material. Other advantages of polycarbonate include the following:
- Durability
- Easy to install/dismantle
- The air gap in polycarbonate sheets creates additional thermal insulation
- The material is transparent, which contributes to good dispersion of light rays
- The lightness of polycarbonate eliminates the need for a complex foundation
Instructions for creating a polycarbonate greenhouse with your own hands
The first step is to decide on the dimensions of the greenhouse and make a drawing that will indicate all the dimensions, fastening system, number of sheets and type of roof.
It is recommended to select a greenhouse size that does not require cutting a lot of polycarbonate sheets, because... this entails extra cash costs and a large amount of construction waste.
The type of polycarbonate greenhouse roof can be either arched or “house”; the elasticity of the material allows you to make both structures without problems, but it is best to opt for an arched structure.
First of all, we prepare the area and pour the foundation; this stage may be identical to the previously provided instructions for making a wooden greenhouse, so read above about how to make a foundation.
Next we move on to building the frame. You can also use a wooden frame, but for variety we will provide you with another option - a metal frame.
The advantage of metal is high strength and durability; the disadvantage is corrosion, as a result of which the structure rusts and not only loses its aesthetic appearance, but also its strength.
To create a metal structure, you can use a steel profile, painted metal pipes or arcs. The latter are the most practical option if you use collapsible arches, because the structural elements are very heavy. Before connecting the frame, metal and wooden elements must be treated with anti-corrosion and antiseptic agents, respectively.
In this instruction we select the material for the frame – metal arches. They must be installed based on the drawing, options for which we will provide you with below. The polycarbonate is fastened to the metal arches using brackets that cover the pipe and fix the polycarbonate on both sides.
Greenhouse frame made of metal arcs
It is not recommended to drill holes in polycarbonate for fastening sheets, because... Water and dirt can get into the holes, which will not only worsen the appearance of the greenhouse, but will also lead to its destruction (during frost, the liquid will expand and destroy the cellular polycarbonate).
Drawing of a greenhouse made of metal arcs
Since polycarbonate can only be bent across the sheet, to create an arched structure it is necessary to install the sheets across the greenhouse structure.
Advice if you have not encountered polycarbonate roofing: choose material from well-known manufacturers and be sure to seal the ends of the structure with a special tape that will protect the material from harmful water and dirt.
Wind protection
Due to the draft wind, the microclimate inside the greenhouse structure is greatly deteriorated. The temperature inside the building can drop by as much as 5 degrees. Therefore, protecting the structure from cold wind currents with the help of vegetation or buildings becomes of great importance.
However, this solution has a downside, because buildings or fences are obstacles to the flow of natural light. If the greenhouse is located close to outbuildings or residential buildings, it must be installed on the side where the wind blows.
Polycarbonate greenhouses are often located at the southern edge of houses. In this case, it is important to maintain the required space between the residential building and the greenhouse. If snow falls or melts onto the roof of the greenhouse, the material may be damaged.
Gardeners often install protective screens (enclosing structures made of slate or metal up to 1.5 meters high).
If the greenhouse is located in an open area that is not protected from the wind, care must be taken that the main direction of the air flow is oriented towards the front side of the greenhouse structure.
A completely inappropriate place - between two buildings. In this case, the building will be constantly exposed to drafts.