3 ways to make a phytolamp for house plants with your own hands. Descriptions of the correct selection of equipment and lamp colors, a short test. 5 tape connection errors and 5 popular questions.
TEST:
To understand whether you have sufficient information about the phytolamp, its purpose and correct assembly, you should take a short test:
- How many primary colors of lamps are included in a lamp?
a) Three colors – green, red and blue.
b) Two – blue and red.
- Why do plants need blue light from a phytolamp and what are the dangers of its excess?
a) Blue light helps to accelerate the growth of plant cells, but if there is oversaturation, the plants will stop growing in length.
b) It has a beneficial effect on fruiting, but too much of it will negatively affect the taste of the fruit.
- How to find out the power consumption of an LED strip?
a) Go to the official website of the manufacturer, find the appropriate section and study the tables with data.
b) All information is applied directly to the tape and you just need to carefully examine it.
c) The tape contains a phone number that you can call and a robotic answering machine will provide all the information you need.
- Is it possible to use LED strip sold with a sticky end for fixing to the surface?
a) It is not advisable, since the sticky layer will not be able to reliably provide fixation, and therefore it is better to use additional fixation yourself using good glue.
b) It is possible. The manufacturer uses a special composition on its products that can provide the best fixation of the tape on any surface. There is no point in taking any additional measures.
Right answers:
- b) the required colors for placement in the lamp are blue and red.
- a) Cell growth will accelerate under the influence of blue light, but do not allow oversaturation, since then the plant will stop growing in length.
- b) All the information of interest can be found on the tape, where the manufacturer types the necessary information for use.
- a) To reliably fix the lamp, you will have to purchase good glue and connect the diodes to the desired surface using it. A standard layer of adhesive will not provide a good hold on the device and the work will have to be redone when the tape comes off.
To create the right lighting for your house plants, you need to assemble a special LED phytolamp.
Definition: phytolamp is a special lighting device that promotes plant growth. Used in the absence of natural light.
There are a huge number of expensive devices for flower lighting on sale. Therefore, it is better to try to assemble a phytolight for lighting plants yourself. You just need to correctly calculate the number of light bulbs and study several technologies for correct assembly.
How photosynthesis affects plant development: briefly
During the process of photosynthesis, carbohydrates are formed from inorganic substances under the influence of solar radiation energy. Organic cells are formed from them.
The process proceeds according to the chemical formula with sequential alternation of two phases:
- light, when oxygen and hydrogen are released from water;
- dark - carbon dioxide is absorbed to form carbohydrates.
Plants need both phases for their development, but the spectrum of natural sunlight in winter is very short.
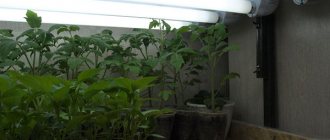
Therefore, when growing seedlings, additional illumination from artificial sources has a beneficial effect on its development.
It is important to realize that the radiation spectrum and its power must be selected optimally, because modern electric lamps are created in a large assortment with different technical characteristics.
Their parameters should be carefully analyzed for all stages of seedling development, and the influence of the spectrum should be taken into account.
| Lamp color | Impact on growth and development |
| Red | Accelerates the development of seeds, the formation of sprouts, improves flowering, and promotes the formation of ovaries. |
| Orange | Provides better fruiting. |
| Yellow and Green | They influence growth. |
| Purple and Blue | Stimulates root development and accelerates the flowering phase |
| Ultraviolet | In small quantities it limits overgrowth, but in higher doses it causes burns to leaves and stems. |
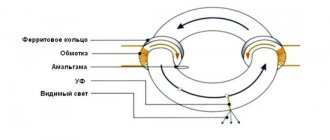
Self-production of the first phytolamp from tape
The cheapest option for a homemade phytolamp is made from an LED strip. The lamp is made of plastic with a built-in conductive path.
The flexibility of the construction material allows you to create the desired lamp contours. To select the required power of the block, we find out the power consumption of the tape. This value is fixed: 4.8 W per meter, 7.2, 14.4.
These values are printed on each tape. Then you need to multiply the value by meters.
Required:
- LED strip (12 volts). You need to pick up 2 meters of red and 30 cm of blue. The resulting phytolamp will have a square size of 20 by 20 cm.
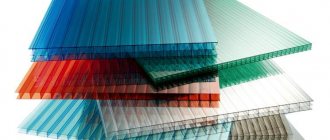
- PVC has a thickness of 2 mm and a size of 20 by 20 cm. You can purchase the material at a construction store. It is very similar to regular plastic.
- Power connector that will connect to the tape.
- A 12 volt power supply with the required power to power the tapes.
LEDs are available in 2 main types: SMD 5050 and SMD 3028. The numbers indicate the size in millimeters.
For example, you can take a standard length of 2.6 meters - the consumption is 4.8 watts per meter. Using calculation, you can get the power of the unit, which is 12.5 V. The length of the LED strip in meters is multiplied by the power. That is, 2.6 multiplied by 4.8 equals 12.48. In this case, the unit must be selected with a power of at least 13 watts. This number is taken so that there is a small margin.
Before starting assembly, the tape must be cut into pieces equal to 20 cm. As a result, you can get 10 red light tapes and 3 blue ones. We fix them well on the PVC in a certain order: three red, one blue, two red, one blue, two red, one blue, three red.
If you can’t find a PVC sheet, then you can use regular plastic, metal or polycarbonate - whatever you can find in the store.
Tapes are available with and without an adhesive layer. It is undesirable to use the first option, since the LED will not be fixed quite firmly and you will have to redo all the work. That is why for high-quality fixation you need to use hot-melt adhesive, which is used to process the entire tape.
After this, the pieces of tape are soldered together with thin wires. Now we connect the power supply.
This is how you assemble a phytolamp for plants with your own hands. Videos can help you assemble the structure, if necessary - they are easy to find.
What you need to know about artificial light sources used for growing plants
First, let's look at the characteristics of natural lighting, which we will take as a sample.
What the spectrum of the Sun looks like on a summer day - our standard for designing a phytolamp
I show the results of a practical experiment. Measuring the wavelengths of sunlight was carried out with a spectrophotometer at noon in clear summer weather and showed the following picture.
The abscissa axis of this graph represents the wavelength in nanometers, and the ordinate represents the power in watts per square meter of irradiated area. All colors from ultraviolet to infrared are present here, which are actively absorbed by plants for their growth.
They especially need the spectrum:
- ultraviolet (380-410 nm);
- blue (445-460 nm);
- red (630-660 nm);
- infrared (690-730 nm).
Plants do not use other spectra.
Good photosynthesis in seedlings occurs when backlight lamps create optimal radiation. At the same time, the energy of sunlight, as well as water and carbon dioxide, is converted into organic substances - green mass.
It is enough for us to take this test as a basis for designing future homemade products.
4 types of spectrum from the most popular sources in everyday life: how they differ from natural light
I show the results of four experiments performed with the same Ocean Optics STS-VIS artificial light spectrophotometer with incandescent filament, LED, Filament and compact fluorescent light bulb (CFL).
The spectrum from one 75-watt incandescent lamp at a distance of 50 cm from it looks like this.
It is clearly noticeable that it is strongly shifted towards red tones at the limit of 630-660 nanometers, and there are very few shades of blue and green.
An incandescent lamp has low light output and is characterized by increased heat generation. The illumination from it reached 380 lux.
For reference, I remind you of the relationship between lux and lumen.
The color temperature of the incandescent lamp was 2700 degrees Kelvin and lies in the warm white region, CRI=91.
It is convenient to compare it with LED sources.
Spectrum from a regular white 12 watt LED lamp
Here, the color spectrum and energy transfer ratio have a different picture, the color rendering index has reached 63.
The color temperature of the lamp is 3500 degrees, and the illumination in lux is 1110, which is almost three times more than that of incandescent lamps.
I’m just saying that the color rendering of sunlight (CRI) on a clear day is equal to 100 units, and all other sources are compared with it and divided into six characteristics.
Spectrum from an energy-saving 15-watt compact fluorescent lamp HLCT3
This is equivalent in power to Ilyich’s 75-watt light bulb. It showed 415 lux of brightness, a radiation power of 1.3 watts per square meter of area, and a color temperature of almost 6500 degrees Kelvin.
Color rendering was 82 units, which is slightly higher than that of the LED analogue, but the spectrum is cool white.
When comparing the results, remember that LEDs emit light strictly in one direction, and other sources emit light evenly in all directions.
This must be taken into account when designing a phyto lamp.
Spectrum from a Filament lamp with a power of 8 watts
Filament illumination was 95 lux, radiation power 0.3 watts per square meter, color rendering 2700 degrees K, CRI 75 units.
The measurements taken with a spectrophotometer allow us to conclude that not a single type of such popular lighting sources creates optimal lighting for growing plants.
However, even in this case, supplementary lighting with them plays a positive role, improving the growth of seedlings.
Important lighting information
Plants consume light energy in the range of 400÷700 nm. The light from this area is abbreviated as PAR (Photosynthetically Active Radiation).
Its energy is measured in watts and is characterized by the amount necessary for photosynthesis to occur. This is not a characteristic of the light source, but the seedlings’ need for light energy.
Biologists take into account its propagation by photons and measure their number in micromoles bombarding 1 square meter of area. It is designated FFP PAR (Photosynthetic Photon Flux).
(1 mol=6·1023 photons. 1 micromol=6·1017 photons.)
How to avoid 5 mistakes when connecting a tape.
- We must not forget about polarity. The tape is a semiconductor device, and therefore the polarity must be observed correctly. But if there is an error, nothing will happen - it just won’t work and you can try everything again.
- When cutting, you need to find special places on the tape for cutting. You cannot cut anywhere.
- There may be a factory solder on the inside of the tape. If tape is attached to the device, you should be careful when peeling it off, since the soldering can be easily torn off.
- You cannot connect an additional tape to a power supply that was designed only for the first tapes. As a result, the equipment will fail.
- You should not use flux containing acid for soldering. It will remain on the wire and corrode it over time.
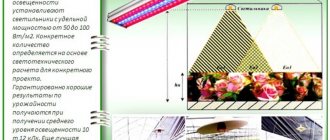
Lamp frame design
The location of the LEDs depends on the width of the surface on which the seedlings will stand. If this is a window sill less than 25 cm wide, they can be mounted on one ruler, if larger - on two or even three.
ElevatorForumHouse Member
The ruler is a piece of aluminum profile 100 mm shorter than the window sill.
It is important to position the LEDs evenly, and given that each emits a light cone with an angle of 70-120 degrees, so that the projections of these cones slightly overlap each other, as in this diagram by our user with the nickname Liftanuty.
The profile width is calculated based on the fact that for high-quality heat removal from one one-watt LED, 25 sq. cm of surface area is needed.
A symmetrical U-shaped symmetrical profile is best suited for LED strips. Along its edges you need to make stops with a height of 1 mm.
The rulers must be secured in the frame with screws or blind rivets.
Answers to 5 frequently asked questions.
- Will the tape light up if connected incorrectly? - No, it just won’t turn on.
- What is multibelt tape? – Changing light temperature.
- Which tapes are best to use to create a complex design? – Curly with flexible segments.
- Will the flowers overheat under the light? – No, the tapes do not heat the plants.
- Do I need to add additional white light? - No, it won't be useful.
Assembling a phytolamp or LED lamp for plants with your own hands is not the most difficult task for a gardener.
You can study additional materials on making a phytolamp from an LED strip with your own hands. Video instructions, for example, are easy to find.
Experience of use
FORUMHOUSE member YurecV assembled such a budget lamp from Chinese LEDs and drivers, as well as an aluminum I-beam from a hardware store.
The lamp has two lines, each with 21 LEDs (10 blue and 32 red), the distance between them is 4.5 cm. The LEDs are attached to the I-beam with autosealant.
The lamp cost a thousand rubles (prices in 2016, but even then it was 4-6 times cheaper than buying a ready-made one) and a day of work: half a day to assemble the frame, mark and attach the LEDs, and another half a day to cut and clean , tin and solder the wires. Between these processes we had to wait a day for the sealant to dry completely.
The LEDs on each line are connected in series, each line has its own driver. The entire design consumes 32 watts.
The lamp heats up, but weakly: up to 41 degrees. It can be lowered closer to the plants without the risk of burning them.
In operation, the lamp showed its best performance; even the light-loving dill under it grows fluffy and spreading.
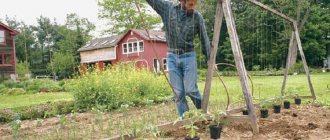
Why do seedlings need lighting?
Most gardeners begin planting seeds for seedlings in February or March. Daylight hours at this time of year are short, and seedlings of different crops require 10–16 hours of light per day for harmonious development. When it is deficient, the seedlings become very elongated, the leaves turn pale and wither; after planting in the ground, the plants either do not take root at all, or take a long time to adapt to the new habitat. And on the contrary, those specimens that have had enough light turn out to be powerful, resistant to the vagaries of the weather, they are characterized by a more developed root system, better resistance to diseases and pest attacks and, as a result of all this, increased productivity.
It is impossible to grow high-quality seedlings without good lighting; seedlings do not have enough sunlight at the end of winter and at the beginning of spring
Buy or make it yourself?
What did you end up with in terms of expenses? 1400 rubles included LEDs, driver and delivery by Russian Post. Aluminum threshold 0.9 - 160 rubles, superglue - 20 rubles, thermal paste - I had my own, 1.5 meter cord with a plug - 70 rubles. Total – 1650 rubles.
As you can see, much cheaper than store-bought phytolamps.
And one more little tip. If you want to automate the process of additional illumination of seedlings, then I recommend spending money and purchasing an electronic programmable timer.
This will allow you to control the duration of the phytolight and set the intervals between its activations. For example, my lamp works from 5 am to 12 pm and from 4 pm to 9 pm, and the “LED sun” rests for 4 hours during the day.
Next year I plan to make a special box for growing seedlings and cover the inside with foil material to catch all the light, so priceless and very necessary for our favorite plants.
In any case, no matter what option you use - using conventional fluorescent lamps or using phytolamps - this is much better than not using additional illumination of seedlings at all.
PS Now I have replaced the phytolamp from this lesson with a regular homemade one, with a white spectrum of light. It also uses 13 LEDs, a driver and a 20x20 aluminum profile that is slightly shorter than the width of the window.
That's all. Thanks everyone for your attention. If you have any questions, ask.
Sincerely, Anton Lapshin.
If you liked the lesson or article, please support me by clicking on the social buttons below. Thus, you will share information about the GimpArt.Org blog with your friends on social networks. Thank you!
Author of the GimpArt.Org blog - Anton Lapshin
Over the course of 10 years, I taught more than 12,000 users how to use the Gimp photo editor; my video lessons and master classes on the YouTube channel of the same name were watched more than 1,400,000 times!!!
General rules and important nuances when additional illumination of seedlings
Lighting for seedlings will give the desired effect only if everything is organized correctly. Otherwise, the lamps will do more harm than good:
- To determine if your seedlings are getting enough light, keep an eye on the stems. If they become thinner and stretched out, it means there is not enough. Add more lamps.
- It’s also easy to check whether the seedlings are too hot. Hold your palm directly over the leaves. If you feel heat coming from the lamps, you need to raise them higher.
- The seedlings themselves will signal that it is time to turn off the lamps - in the evening their leaves rise and close slightly. Only ungerminated seeds are illuminated around the clock for the first 3–4 days.
- If you doubt whether additional lighting is needed during the day, turn on the lamps. When the light level changes noticeably, it is clearly necessary. If there is no visible difference, turn them off.
- The most common mistake is to think that seedlings on a south or east windowsill do not need additional lighting. It is necessary at least in the morning and evening hours, on cloudy days.
- Until the shoots emerge, place the lamps 10–12 cm above the containers and strictly vertically. Afterwards, lift it to a height of 40–60 cm and rotate it at an angle of about 60°. It is advisable to immediately make or purchase height-adjustable brackets and/or lamps on hooks in order to be able to change the height of their location without any problems.
- Having planted the seedlings, reduce the lighting power for 2-3 days to allow the plants to recover.
The photo clearly demonstrates how effective supplementary lighting is when lamps are used correctly.
Checking LEDs with a tester
Checking the LED with a multimeter
You can determine the performance of LEDs for phytolamps using a tester. The verification algorithm is as follows:
- Setting the tester to the “breakage test” position.
- Touch the terminals with the probe. Red is placed on the anode, black - on the cathode.
- When checking, the diodes should light up. Defective ones will not light up.
- When changing the polarity, the screen should remain one.
Also, testing on a multitester can be carried out through the transistor sockets. The holes on the left of the anode are placed in sockets E, the cathodes - in C. For the holes on the right - vice versa.