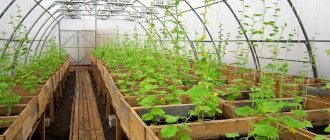
For almost all regions of Russia, heating the soil in a greenhouse is the only opportunity for early planting of garden crops. Most often, the task is to maintain the required temperature to protect seedlings from changeable weather in the spring, since a year-round heating system is too expensive for most farms and does not pay for itself with the harvest.
Heating cable for greenhouses is successfully used to organize additional or main heating of soil and air, protecting plants from hypothermia and maintaining the optimal temperature to obtain the desired harvest.
When organizing heating, it should be taken into account that no matter what heat sources are used for heating, the energy consumption, all other things being equal (system operating time, insulation, area) will be the same - 80-100 W/m2. This means that in order to heat the greenhouse, you will have to obtain this amount of energy in any way, regardless of its source. The difference in heating methods, therefore, is in efficiency (efficiency), complexity of organization, operation and availability of the energy source.
Cable heating system for greenhouse soil
With cable electric heating, local heating occurs near the roots, that is, the part of the soil in which the roots of a heat-loving plant are located is heated. For this, 2 types of heating cable are used: resistive or self-regulating. The most important difference is that the self-regulating heating cable is not afraid of overheating. It can be stacked on top of each other without fear of the area where the cables meet burning out. A resistive wire has a constant power and if during operation the cable becomes blocked and overheats, it will fail.
Heating a greenhouse with a resistive cable
For the purpose of heating the soil in greenhouses, resistive cables for anti-icing systems with a linear power of 10-15 watts per 1 linear meter are often used. Commonly used options include:
- Armored sections 10 TSOE2 – armored single-core heating sections from the manufacturer SST LLC, Mytishchi, Russian Federation. Available cable lengths: from 58 to 218 meters. The main advantage is the twisted armor, which protects against damage from a shovel or other objects during soil cultivation. The disadvantage is the high price and complexity of installing a heavy and elastic cable;
- Single-core heating cable NSKT with a linear power of 10-15 Watts from the same Russian manufacturer SST LLC. The cable is comparatively cheaper than its analogues, because is single-core. This complicates its installation, because... After installation, both ends of the cable must be connected to a single source of electricity;
- Single-core sections ICE FREE O and two-core sections ICE FREE M from another Russian one. These options for heating sections are not inferior in characteristics to analogues, but at the same time they are 10-20% cheaper.
Using resistive heating cables will be the most optimal solution, because... Manufacturers offer a wide table of section sizes and capacities suitable for the most complex and non-standard solutions. In addition, you can select cables for more or less aggressive operating conditions in order to increase the performance of the greenhouse heating system.
Ready-made kits (Green Box AGRO)
The Russian one was one of the first to release ready-made solutions for heating the soil - Green Box Agro kits on two-wire shielded heating sections 14GBA. Linear power of sections 14 Watt per m/linear. In addition to the sections, the kit includes a box and a TP 600 thermostat for controlling the soil heating system.
The cable sheath is made of special polymers that are resistant to aggressive environments (high humidity, exposure to fertilizers). The cable is equipped with a foil shield that meets all safety requirements against electric shock. The model range includes 9 standard sizes (from 200 to 1480 Watt) with a heating area from 2 to 15 m2.
It must be said that GBA kits are one of the most optimal solutions for heating the soil of greenhouses, since a linear power of 14 watts is just enough to warm seedlings and seedlings and at the same time not to dry out the soil or burn the roots. The manufacturer has been developing this system for a long time together with specialized research institutes and has developed the most effective system.
Currently, similar products are produced by other Russian manufacturers: Teplyshko (Kaleo), SNGT from Chuvashteplokabel, Heatline-Grunt from the manufacturer Heatline. They are a little cheaper, but inferior in quality to Green Box Agro.
Heating greenhouse soil with a self-regulating cable
One of the advanced solutions in heating the soil of greenhouses is the use of self-regulating heating cables. The cable is based on a self-regulating nano-matrix, which independently increases heat dissipation if the ambient temperature is low and, conversely, reduces its power if the surrounding temperature is warm.
This cable is ideal for greenhouses for the following reasons:
- Self-regulation. If an air cushion has formed in the ground or the area with the cable is covered with something, it will simply drop the power. At the same time, a regular resistive cable may burn out;
- Energy saving. This cable allows you to specifically reduce or increase the temperature where necessary. Due to this, electricity can be saved up to 70%;
- Sections of any length. The self-regulating cable can be cut to any individual length. The resistive cable comes in strict segments, which are often not enough or, on the contrary, turn out to be too much for your greenhouse.
Tips for gardeners
When choosing a system for heating a greenhouse, it is important to consider the cost of its operation, as well as the existing location. In the case of water heating, it is only advisable if the greenhouse is located near the house, which allows it to be connected to the central system, since the construction of a separate boiler room is financially intensive. Electric heating devices consume quite a large amount of electricity, which will affect your utility bill; in addition, they dry out the air, which negatively affects plants and requires the installation of a humidifier.
In terms of cost-effectiveness ratio, cable heating is considered the most optimal: for a room with an area of 24 m², 92 m of cable with a power of 1650 W is sufficient. The success of the procedure also depends on how long the heat is retained in the room.
Find out how to heat a greenhouse with a heating cable.
To do this, you should think about thermal insulation of both the room itself and the heating elements. Now you know how to make a room warm with your own hands, why thermal insulation is needed in a greenhouse, and also what technology to choose, taking into account the cost-effectiveness ratio. Grow vegetables in the temperature conditions required for them, which will help you fully recoup your costs thanks to high yields.
Soil heating
The reason why we chose electricity rather than water heating of the greenhouse is that the first option is easier to implement with our own hands, purely technically. It is quite difficult to solder water pipes; you will also have to think about whether to power them from a house boiler or one installed in the greenhouse itself.
The first option is without installing a concrete base
Preparing the beds for organizing warm soil in the greenhouse is very simple: remove the soil to a depth of 40 cm, put it in bags, and take it out of the greenhouse. Installation without pouring concrete will be carried out as follows:
- We pour a sand cushion 10 cm thick. In this case, we lay scraps of boards on the sand, a meter apart from each other.
- We lay out the self-regulating heating cable for heating the soil of greenhouses on top, fixing it with special fasteners to the tree.
- We cover everything with polyethylene, the edges of which should be slightly on the walls of the beds.
So, we did the heating of the soil in the greenhouse with our own hands. Now you can fill the soil and begin preparing it for planting.
Please note: for ease of heating regulation, it is better to place a thermoregulation device with switches near the front door. Accordingly, we lay the cable in the ground with this in mind. . Making a warm floor in a greenhouse with your own hands: installation without cement screed
Making a warm floor in a greenhouse with your own hands: installation without cement screed
Organization of soil heating with a cable under the screed
First, as in the first case, we remove 40 cm of soil, then make a sand cushion (10 cm). Along the edges of the heated greenhouse floor we will arrange a 15 cm high border, which will prevent the cement from spreading beyond its boundaries. We compact the sand well, achieving as smooth a surface as possible. Next we work like this:
- We lay a layer of waterproofing material, for example, thick cellophane film.
- We place several metal profiles or wooden beams (30x40) on the film along the length of the greenhouse. The step between elements is 60-80 cm.
- We knit a reinforcing mesh from a steel bar and lay it on the prepared surface. Using knitting wire we attach the mesh to the profiles/beams.
- We lay out a soil heating system in the greenhouse on top of the mesh. We attach the wires to it with plastic clamps.
Installing a heating cable in a greenhouse under a concrete screed
Please note: we make the heating screed using a concrete-sand-gravel mixture. The consistency should be the same as in the photo below. Pre-hardening of the screed will occur in approximately 3 days. If no structures are planned to be built on its surface, after this time you can begin pouring soil.
We set up a greenhouse with heated soil with our own hands: pouring screed
Another option for a warm floor in a greenhouse; the video shows the installation of a carbon cord. The principle of soil heating is the same as when laying an electric heating cable.
Warm bed in a greenhouse made of polycarbonate, biological method
The biological method of heating beds is made using natural biofuel placed in the subsoil layer. Plant residues, sawdust and manure are used as filler, which is spilled with water for the rotting process. Such beds are the most economical design.
Warm beds running on natural fuel are usually divided according to the type of construction:
- In-depth, when fertile soil is removed, a trench is dug, compost is laid and filled with soil on top so that it is level with the total mass of the earth;
- Raised beds, the top layer of soil is removed from the surface and placed in special wooden boxes, which serve as protection against shedding and washing away of the soil during operation;
- A hilly bed, laid without a box on top of the main platform;
- A combined option, when the lower layers with organic matter are laid at ground level, and the fertile soil layer is fixed with a box.
To make a structure for a combined warm ridge, you need to mark out places for future plantings. Then carefully remove the layer of turf, putting the fertile soil aside. Next, you need to dig a trench up to 60 cm deep. To protect against freezing, foam plastic or closed plastic containers are placed at the bottom of the trench. Next begins the first layer of organic matter, consisting of large branches, wooden chocks, and large plant objects.
This layer will play a drainage role. Then a paper backing consisting of waste paper is laid.
After this comes a layer of finer organic matter, food waste, tree leaves, and small grass stems. Next, add ready-made compost, or semi-rotted manure, to begin the rotting process. We install a pre-prepared box into which we will pour fertile soil. Each laid layer must be thoroughly watered. We cover the last layer with fertile soil. Soil enriched with organic matter is perfect for planting tomatoes, pumpkins and cucumbers. The rotting process can warm the earth for 2 months.
Arrangement algorithm
- Dig a trench 40-60 cm, 50 cm wide. The length depends on the length of the intended bed. Compact the soil.
- Cover the bottom with thermal insulation material - polystyrene foam. This will increase the efficiency of the system.
- Next, a sandy drainage layer of 5-10 cm is poured.
- A fine-mesh metal mesh is laid on the drainage layer, to which the cable is attached. The cable is located in a “snake” at a distance of 15 cm.
- A sand layer forms and spills.
- The protective mesh protecting the cable is stretched again.
- The top layer is the soil in which the seedlings are planted.
The thermostat is placed in a box (1 m above ground level), which is made of moisture-proof material. The system operates in spring and autumn.
Advantages and disadvantages of heating soil with cable
Previously, summer residents had to use “potbelly stoves” as additional heating. Thanks to the rapid development of modern technologies, farmers abandoned this archaic method, preferring new devices.
Since the temperature of the soil, rather than the air, is more important for plants, special cables began to be used to heat it.
Such a system allows you to turn on the heating as needed, regulate and maintain the desired temperature.
Heating can be carried out locally or spread throughout the entire greenhouse. Thanks to the possibility of local heating, farmers can grow several crops with different temperature requirements in one greenhouse.
Heating the soil is accompanied by several advantages:
prevention of soil freezing; reliable protection of plants from frost; acceleration of plant growth and fruit ripening; increasing the fruiting period; accelerated seed germination; growing heat-loving varieties of vegetables (this is especially important for regions with cold climates).
The advantages of such a system are reflected not only in the growth and development of plants. Farmers also welcome the proposed method for its following properties:
- safety (when using water, in the presence of branches and other foreign objects in the ground, accidental overlap of cables, the system will not fail or create conditions that pose a danger to humans);
- efficiency (low power consumption);
- convenience and the possibility of specific installation (cables of various cross-sections and power can be laid in one greenhouse).
What it is
Insulated beds, also called smart or high, appeared in organic farming. These are structures filled with organic remains (twigs, grass, leaves, etc.). They slowly decompose, releasing heat and warming growing plantings. Plants begin to bear fruit much earlier than those planted in conventional beds. In addition, as a result of the decomposition process, the soil is enriched with macro- and microelements. This allows plants to develop normally without additional fertilizers.
Smart designs are made with your own hands in the fall or spring. The principle of the device is the same. The only difference is the filling. Before winter, you can fill the system with long-decomposing biofuel. In spring, it is better to use something that decomposes faster. It is easier to arrange such ridges in the fall. The explanation is simple. At this time, more plant material is added to the structure as biofuel.
Gardeners who use insulated beds are well aware of their advantages. Let's look at them in more detail.
Advantages of smart designs
- Possibility of early planting due to natural heating from organic matter rotting in the ground. If necessary, you can install covering arcs and get something like a greenhouse.
- Significant reduction in applied fertilizers. Most often, they are simply not needed, since the decomposition process provides the entire necessary set of macro- and microelements.
- Increased productivity, accelerated ripening of all crops.
- The care of plantings is simplified. Instead of digging - loosening, weeding is required very rarely.
- Useful disposal of organic waste. Any waste from gardening and garden work, vegetable and fruit peelings, etc. are suitable for biofuel.
Instagram ogorody_dacha
Instagram ogorody_dacha
- Country cottage area
Assembling a drip irrigation system for a greenhouse from a barrel in 3 steps
Flaws
- Among the disadvantages, more frequent watering should be noted, since moisture evaporates faster.
- Another disadvantage is considered by some to be the effort that has to be spent on setting up the system. However, all costs, both physical and monetary, are paid off by the high efficiency of the agricultural structure.
The service life of one such ridge is four years. During this time, its filling overheats and the decomposition process stops. To renew it, it is necessary to remove the used biofuel and install new one. All four seasons can be planted in the same way, but it is best to make the most of the benefits of the system. Then you should listen to the recommendations of agronomists.
What to plant on smart beds
- First year. Squash, cucumbers, pumpkin, zucchini.
- Second year. The same thing, plus tomatoes and all varieties of cabbage.
- Third year. Beans, carrots, beets, peppers, potatoes.
- Fourth year. Peas and green crops.
It’s good to use “smart” systems for strawberries. After four years, she requires a mandatory transplant. This is just enough for one cycle. You don’t have to adhere to these rules and plant what is necessary.
Instagram ogorody_dacha
Instagram ogorody_dacha
- Country cottage area
We select neighbors in the garden beds: tables of plant compatibility in the garden and vegetable garden
A simple greenhouse with heated soil with your own hands
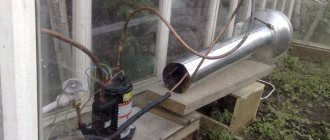
Water heated beds also have a number of advantages. Firstly, the condensate formed on the pipes additionally moistens the soil. This design provides uniform heating of the air in the room. To heat the greenhouse, you will need a gas or electric boiler; you can also use a small wood-burning stove made of brick or metal.
You need to purchase a smoke outlet pipe for it. The choice is made in accordance with the configuration of the heater.
To install a furnace or boiler, it is necessary to prepare a foundation; for a brick structure, a concrete foundation. A metal boiler can be placed on a sheet of asbestos and cement mixture. Next, the structures provide stability and attach the chimney, hermetically sealing the connection points.
Insulation of beds with pipes, necessary work:
- Remove soil 35-40 mm thick;
- Material for thermal insulation is laid at the bottom of the resulting trench; foam plastic is usually used;
- Water pipes are placed on top and connected to the heating system;
- Fertile soil is laid on top of the pipes.
This heating method is considered optimal, but it is necessary to ensure that the temperature of the water in the pipes does not exceed 45 ° C, otherwise you can burn the roots of the plants.
Advantages of heating the soil with a heating cable
Such a system is ideal for Belarusian climatic conditions; it will not only protect the soil from severe frosts, but also preserve its fertility and quality. Depleted soil is unable to produce the desired harvest; if you take care of it, then it will take care of us. Frost does not allow the soil to be saturated with moisture, heat, or useful minerals, and the heating system will provide the soil with the opportunity to feed and produce fruit at any time of the year.
Thus, we can highlight the following advantages of purchasing a cable heating system for plant soil:
- Early sowing. Thanks to the warm soil, you can plant seedlings in a greenhouse about 1-1.5 months earlier than usual and harvest until late autumn. This way you can get 2 harvests in 1 year;
- Comfortable and safe growing conditions. Seedlings and seedlings will not freeze in case of frost and will grow and bear fruit more intensively;
- Relatively inexpensive components. The price of the entire system, depending on the size of the greenhouse, will cost $100-300;
- Economical consumption of electricity. We are not required to heat the entire greenhouse. The cable warms the soil and plant roots. To do this, for 1 sq. meter of beds the power is about 80 Watt/m2. The use of thermostats reduces energy consumption by another 30-70%;
- Quick installation. Unlike boiler water heating, the system can be installed in 1-2 days. If you use water boiler heating, then its installation will take more time and money.
Electric soil heating systems equipped with thermostats monitor the temperature in the greenhouse and will become indispensable assistants for every landowner. Previously, much more effort and time was spent on providing plants with a comfortable existence even in cold seasons. Thanks to soil heating systems, you can easily manage your site and vegetation. Heat, moisture and mineral decomposition are the main elements that provide the earth with vital force; this issue is resolved much faster today thanks to these systems.
Generally speaking, this whole system is something like heating for the soil and plants during the cold season. Why not allow nature to exist even in frost, taking into account the needs of each plant and the ability to provide complete comfortable conditions? If modern technologies can provide warmth to the soil and plants in the cold winter, then all that remains is to choose the most optimal option!
Features of operation
After overcoming the difficulties with installing the system, its operation is very simple. The gardener decides how many degrees should be set on the thermostats in different areas depending on the requirements of the crop that will be grown there. When it warms up to the specified temperature, the sensor will operate and the line power will be turned off. When the soil cools down to a predetermined value, the self-regulating cable will begin to heat the ground again. This approach allows you to save a significant amount of energy - up to 30%.
The peak period for using heating in a seasonal greenhouse is from March to May. During the last weeks of spring, heating is used to protect against night frosts on the soil. In the fall, it makes sense to turn on the system so that vegetables whose fruits have not yet ripened can still finish bearing fruit.
Important! Year-round heating must be carefully planned in advance. Every nuance is important here - from the vagaries of the crops being planted to the need for a backup power source in case of a sudden power outage.
Installation
Installation of a cable electric soil heating system in greenhouses consists of the following steps:
Under the greenhouse it is necessary to remove a layer of earth approximately 40 cm deep; Sprinkle the bottom of the hole with a 5-centimeter layer of sand. Sand needs to be spilled and compacted to make the base stronger; We place a reinforced mesh with cells of approximately 10 cm on the sand and lay out the heating cable on it. The cable should be secured to the mesh with plastic ties so as not to damage the outer sheath. The wire is laid out like a snake with a laying step of approximately 12-15 cm; Between the turns of the heating cable we install a temperature sensor, which it is advisable to place in a corrugated tube; Sprinkle the mesh with the cable with a 5-7 cm layer of sand and again spill and compact it; We put a fine-mesh reinforced mesh on top to protect the cable from mechanical damage with a shovel or other objects; We fill the system with a fertile layer of soil on top; Install the thermostat and connect the cable to it
Attention! It is advisable to install an RCD in front of the thermostat to ensure safety precautions against electric shock.
After completing all installation stages, you can safely plant seedlings and connect the plant root heating system in your new greenhouse.
How to make heating?
Installation of the systems is carried out according to a single principle - the heating element is placed underground, according to the following algorithm:
- Remove the top layer of soil, approximately 40 cm.
- Level the bottom, then add 5 cm of sand and compact it.
- Spread a thermal insulating film on top, for example, polystyrene foam - thanks to this, it is possible to retain heat and prevent it from escaping deep into the soil.
- Fill in 5 cm of sand.
- Lay a stainless mesh with 5–10 cm cells.
- Laying of heating elements.
- Cover with wet sand - a layer 5 cm thick.
- Cover everything with a net - both plastic and stainless steel are suitable for this purpose. This layer is necessary in order to protect the heating source from any damage.
- Finally, we fill the structure with fertile soil - for this, the initially removed layer is mixed with fertilizers.
Making warm beds in a greenhouse types of heating
Solar heat warms the beds only by the beginning of May, in some regions and by the end of May. Artificially heated soil is suitable for planting plants as early as March, while the root shoots are in comfortable conditions, which contributes to their strengthening and plant growth. In addition, the heat generated by the earth helps warm the air in the greenhouse.
Advantages of warm beds:
- Early planting and achieving maximum yield in the first summer months;
- Getting good results even on relatively fertile soil;
- Reducing the need for plant nutrition;
- Increasing the fruiting period;
- Reducing water consumption during irrigation;
- Weed control.
Preparing a warm bed in a greenhouse is carried out in autumn or early spring. There are several options for heating the bed: electric cable, water pipes, biological compost. When using a cable, it is laid under the soil in advance and heated using electricity. These designs are highly efficient, but expensive to maintain.
Water heating is used using special pipes made of polymer material, which are laid under the ground.
Hot water flows through the pipes, capable of heating the earth. For biological beds, plant residues and manure from livestock farming are used. The heating element is the rotting process, as a result of which the soil temperature rises. This is the most economical way to heat beds. Each method has its pros and cons. The gardener selects the most appropriate option based on his own views on growing plants.
Construction of warm beds
Three types of beds are recognized by gardeners as the most effective: those using electric and water heating, and organic ones.
The creation of future beds should begin with the creation of frames. They can be made from materials available to the summer resident:
- The most financially and labor-intensive are solid brick beds. But this option will last a long time, and the brick will hold heat perfectly.
- Wooden frames also hold heat well, but they are less durable. To increase their service life, they must be treated with antiseptics in several layers.
- Metal sides are durable, but have high thermal conductivity.
They also use slate, plastic panels and everything that has served its intended purpose. However, these materials are possible to use, but are not desirable due to their impracticality and fragility.
What are the advantages
The main arguments why it is not advisable to use heating systems for soil in a greenhouse are the weak effect in small areas and the high cost of the equipment. Many believe that the greatest benefits from heating the soil in protected soil conditions will be obtained by farm greenhouses in which vegetables are grown throughout the year. However, warming the soil in regular, seasonal structures is beneficial for the following reasons:
- Heat loss through the soil is eliminated;
- Planting seedlings can be done at any time of the year in order to get a harvest by the time the price for it increases as much as possible;
- In warm soil, the root system of the crop develops well, which is why the above-ground part forms and grows even better;
- The yield increases, expressed in kilograms of fruit collected per unit area;
- The fruiting period increases;
- The constant soil temperature in the greenhouse prevents the death of plants during frosts.
Recommendations for using a warm bed
The most commonly used soil heating due to the heat generated during the decay of organic matter is not constant in each specific case and changes its temperature and quality indicators over time. Typically, a warm bed filled with organic waste is fully functional for 4 years.
You will be interested to know how to insulate a greenhouse for the winter with your own hands.
And since in each year of this period it demonstrates different conditions, it is advisable to vary the vegetables grown on it:
- The first year is characterized by maximum heat generated and a high concentration of nitrogen. During this period, it is preferable to plant pumpkins, watermelons, cucumbers, tomatoes, melons, eggplants, peppers, and zucchini.
- The next year, the heat generated, having decreased somewhat, still remains at a high level. The same is observed with a high nitrogen content, so it is recommended to replant the same crops as originally. The exceptions are melons, watermelons and pumpkins. During this period, crops prone to saturation with nitrates should also not be grown here.
- The third year is most suitable for growing tomatoes, legumes, peppers and cabbage, as well as root vegetables and herbs.
- In the fourth year, when heat generation is minimized and the concentration of nutrients decreases, it is advisable to plant unpretentious crops such as peas, beans and greens.
Experts recommend creating new beds with bioheating in a greenhouse in the fall after harvesting, so that the heat release is maximum in early spring.
Planting seedlings in a greenhouse in early spring and growing them in almost winter soil is quite possible if you resort to the help of warm beds. Some difficulties in arranging them are fully compensated by the numerous advantages that gardeners receive from their use.
Greenhouse kits
Many companies produce ready-made kits based on thermal cables.
For example – Green BOX Agro. The set consists of a resistive two-core cable with a specific power of 14 W/m, the range ranges from 200 to 1480 W with a section length from 14 to 102 m. The product is adapted for use in greenhouses, the insulation is made of environmentally friendly material that retains its properties in any soil conditions exposure to various fertilizers. The soil temperature is adjusted using a TR-600 thermostat. The thermostat includes an external temperature sensor, with which the ground temperature can be maintained in the range from +18 to +27 with an accuracy of 1 °C. The product is designed to work in conditions of high humidity. The maximum current is 16 A at a supply voltage of 220 volts. Thus, several heating sections can be connected to the product within this current value. The cost of a thermostat is about 3 thousand rubles, heating sections - from 2 to 6 thousand rubles.
The South Korean company Lavita offers a similar system. The products are equipped with sections based on thermal cables with a linear power of 20 W per meter. The range is from 200 to 2800 W with a section length from 10 to 140 m. The cost of a section is from 1.5 to 15 thousand rubles. In addition, this company offers two types of thermostats: regular and programmable, which allows you to program the operation of the regulator for a week. The price of regulators is 1100 and 2300 rubles. respectively.
All regulators are supplied separately and can also be used to configure a heating system based on self-regulating thermal cables.
The following materials:
- 04/12/2016 15:27 — Construction and design In order to properly build a greenhouse or hotbed, you must first decide on their main practical advantages...”>Greenhouses and greenhouses: secrets of construction and maintenance, planting and caring for various crops
- 07/27/2016 00:00 — About the influence of the color of the shading net on plants in a greenhouse As soon as shading nets appeared in greenhouses, the desire immediately arose ... ">Colored nets for greenhouses
- 02/27/2016 22:18 — The mention of nonwoven materials immediately evokes an association with spunbond. This is already a common noun not only for a whole class of materials, but also for t...”>Nonwoven materials in agriculture: varieties, properties, applications
- 02/08/2016 22:53 — Agree, high-quality, long-term greenhouse film means no costs and no worries for several years. However, failure to follow simple rules can lead to…”>So that the greenhouse film lasts a long time
- 01/24/2016 23:14 — Covering film materials for greenhouses In recent years, there has been a noticeable interest in greenhouse forms of management, both amateur and…”>Modern films for greenhouses
Previous materials:
- 05/01/2016 22:30 — Unlike furnaces, pyrolysis hot water boilers are more convenient in that they allow you to organize not only uniform heat distribution throughout the greenhouse, but also throughout...”>Pyrolysis hot water boilers for greenhouses and outbuildings
- 11/28/2015 08:20 — There are quite a few ways to heat greenhouses. From the simplest, for example, put 1-2 buckets of boiling water in the greenhouse so that the seedlings do not get caught at night...">Heating of greenhouses and hotbeds: traditional and modern methods
- 09/30/2015 22:44 — Flexible translucent polycarbonate panels are great for building a greenhouse. This polymer material is very popular among consumers for its high...">Which polycarbonate to choose for a greenhouse
- 05/19/2015 11:35 — Economic sanctions against our country, which followed from abroad from former partners, served as an impetus for inflating prices for many industrial and other ... ">Private greenhouse farming using a real example
- 04/30/2015 12:58 — Greenhouses: what, for what and why
Next page >>
How can you heat a greenhouse at your dacha?
When choosing how to heat a greenhouse in the country, vegetable growers consider the following sources of thermal energy:
- solar radiation based on the “greenhouse effect” (the greenhouse, or greenhouse, effect is the increase in air and soil temperature in cultivation structures due to the conversion of short-wave solar energy entering through glass or film into thermal (infrared) energy, which does not pass back through the translucent fence);
- biochemical reactions during the decomposition of organic materials by microorganisms (biological heating);
- heating water and air when burning fuel (water, hot air heating, direct combustion of gas in greenhouses);
- geothermal waters (water and hot air heating);
- electrical energy (electric heating).
The most economical heat sources for heating a greenhouse are thermal waste from industrial enterprises and geothermal waters.
The economic efficiency of heating systems is determined not only by the cost of thermal energy sources, but also by their location, period of use and other factors. As the temperature of the coolant decreases and it moves away from the greenhouses, the economic efficiency of heating greenhouses decreases.
In winter greenhouses, where 30-50% of all operating costs for growing vegetables are for heating, the economic efficiency of heating systems is mainly determined by the cost of the coolant. In spring film greenhouses, the costs of maintaining optimal temperature conditions are much lower, and their main component is the costs of depreciation, maintenance, and routine repairs of heating systems. Under these conditions, the electric method of heating greenhouses is no less effective than other methods.
How to save on energy consumption?
I have already written more than once about the two-tariff system, when nighttime electricity consumption allows you to save a lot. In the case of a greenhouse, this option also saves you from high costs. Additional heating in a polycarbonate greenhouse is needed at night, and during the day, even in March, the greenhouse heats up to 25-30 degrees.
Sources
- https://DachaMechty.ru/pochva/podogrev-grunta-v-teplitse.html
- https://profobogrev.ru/services/obogrev-grunta/
- https://mr-build.ru/newteplo/teplyj-pol-v-teplice.html
- https://7dach.ru/Alensel/obogrev-teplicy-svoimi-rukami-3194.html
- https://SadDa.ru/obustrojstvo/uglerodistyj-shnur-dlya-obogreva-teplic.html
- https://sto82.ru/sovety-i-opyt/podogrev-teplicy-elektrokabelem.html
- https://electricdo.ru/podogrev-pochvy-v-teplice-kabelem.html
- https://svet-komfort.ru/otoplenie/podogrev-zemli-v-teplice.html
- https://SadDa.ru/obustrojstvo/obogrev-grunta-v-teplice.html
How do you like the article?
Owners' opinion
If you look at the reviews of owners of warm beds, you can see a truly rosy picture. A larger number of authors argue that growing seedlings in warm beds, and even in greenhouses, only has a better effect on the harvest. Those who use organic warm beds claim that in any climatic conditions the yield increases several times. They note the ease of formation of such beds, the possibility of early planting of seedlings and, accordingly, earlier harvesting. Many also point to the cost-effectiveness and durability of this method. On any site there will always be the ingredients to create this type of beds. And even a woman can build it with her own hands.
Owners of electric heated beds point to the ease of installation if you follow the instructions exactly, and the durability of such a structure. The only downside is that you can’t find such a system in stores everywhere. Some users order installation kits online. Increased productivity, early fruit ripening and full automation of this method are noted if you install a thermostat.
Many gardeners prefer the water method of heating beds. Among the advantages, in addition to high yield and early ripening, is the possibility of self-assembly of this type of heating. Any man is able to install pipes of the required size and diameter, connect a water pump and install a furnace to heat water. In addition, this method, as the authors note, is more economical than electrically heated beds.
Organic fuel beds
The most budget option. Organic matter is used to create heat - wood chips, leaves, compost, grass, manure, etc. In this case, expenses will be needed only for the construction of the frame. Surprisingly, if such beds are arranged correctly, they will last for 5 years. And organic matter will turn into excellent soil for plants.
Summer residents recognize the third method of organizing warm beds as the most effective. Not surprising. Maximum effect at minimal cost!
The organization of organic beds has 3 options: buried, raised and combined. These methods of organization can be of other varieties (bed-box, bed-hill, etc.), but the essence remains the same.